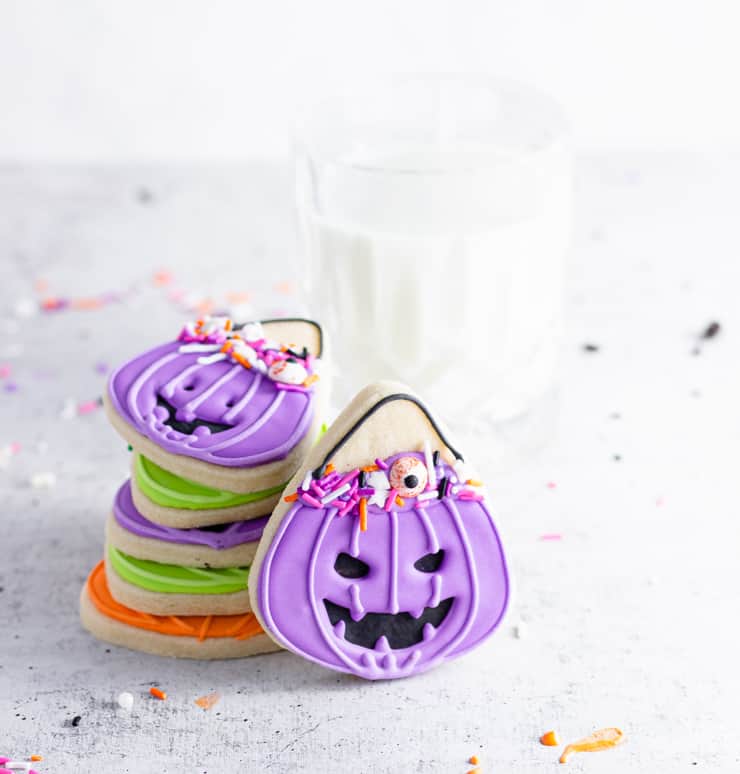
These Halloween sugar cookies are sure to put a smile on your face! Using a simple candy corn cookie cutter, a foolproof sugar cookie and royal icing recipe, and step-by-step photos, this post is sure to have you cranking out jack-o-lantern treat bucket cookies in no time.
After taking an almost year and a half hiatus from blogging, you know what I missed the most? I mean, if you've been following me for any amount of time, you'll know it's the Halloween stuff. It's always the Halloween stuff. But beyond that: sugar cookie decorating!
There's something so creatively satisfying about watching a sugar cookie design come together.
And if you're new to sugar cookie decorating, don't worry! This design is a beginner level certified: It uses a common, easy to find cookie cutter, a limited number of icing colors, only one icing consistency, and leaves enough room for you to be creative with your design (I had a lot of fun with the various facial designs) or to play it safe.
If that still sounds like a lot, be sure to check out my comprehensive guides on sugar cookies and royal icing before you begin.
How to make these Halloween sugar cookies
First, make your sugar cookies.
I wrote a whole post on making sugar cookies, including common sugar cookie problems and how to fix them, so be sure to check that out if you’re new to sugar cookie baking.
To make these sugar cookies, follow the directions in the recipe card below. Once your dough is made, flatten it into a disc, wrap in plastic wrap and chill in the refrigerator for at least 1 hour.
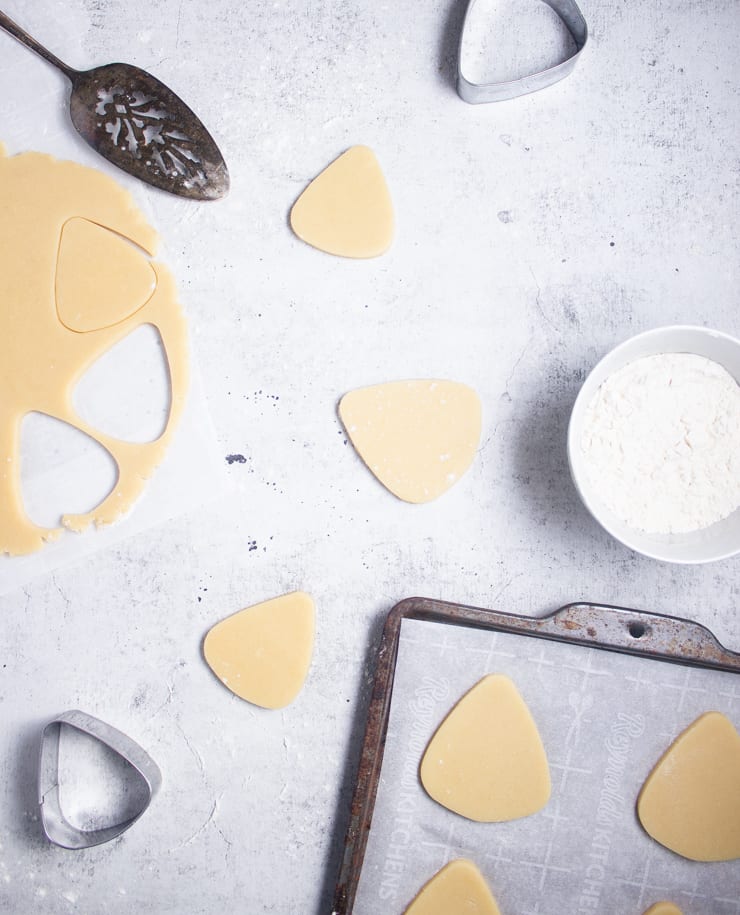
Remove the dough from the refrigerator and knead it on a lightly floured surface until malleable. Roll the dough out to about ¼″ thick and cut it out using a candy corn cookie cutter.
Pro tip: Don't roll your cookies any thinner than ¼" or they'll spread during baking.
Bake your cookies at 350F for 6-10 minutes, depending on the size of the candy corn cutter you used, or until the tops are no longer shiny. I used a 3" tall cookie cutter and baked the cookies for 8 minutes.
Pro tip: If your cookies do spread during the baking process, you can use your cookie cutter to cut them out again. Just be sure to do it immediately after removing them from the oven while they’re still warm and soft.
Second, whip up a batch of royal icing.
You’re going to want about a 20-second consistency for this recipe. If you’re not familiar with consistencies or working with royal icing, check out my comprehensive guide to royal icing.
In a nutshell, a 20-second consistency means that you can pick up a spoonful of icing, drop it back in the bowl and it will take roughly 20 seconds to reabsorb completely.
Third, ice your cookies.
Once the cookies have completely cooled, they're ready to be iced! Divide your royal icing into three equal portions with a fourth small portions of just a few tablespoons.
Tint the larger portions green, purple and orange (or whatever color you'd like to use for you treat buckets) and the smaller portion black.
Using a food-only brush, "paint" a small amount of black icing on the lower half of each cookie.
Load about a tablespoon of the green, purple and orange icing into three separate piping bags. Clip a small, round hole in the end of each and use this icing to pipe the outline of the facial features you want over the black icing. Once you're done with the outline, store the icing open point down in a cup with a paper towel at the bottom.
Load the remaining icing into piping bags, and fill in the lower half of the cookies. Using a swirling, circular motion with a toothpick, work the icing out to the edge of the cookie and into any area around the face outline that the icing didn't naturally move into.
Once the top of the icing has formed a skin (about 30 minutes), use the piping bags with the small holes that you used to outline the facial features to pipe lines from the top to the bottom of the treat buckets.
Allow to set overnight or for at least 8 hours.
Once the icing is completely set, pipe a line of your leftover icing along the top of each treat bucket in the color of the bucket (so a green bucket would get an extra line of green icing along the top). These lines don't have to be perfect. In fact, they look a little better if they aren't as this is what the sprinkles will stick to.
Pour some sprinkles on a plate and gently press the freshly iced top of the cookie into it.
Use the remaining black icing to pipe a thin handle from one side of the jack-o-lantern bucket to the other.
Tips for making these Halloween sugar cookies
- Working ahead: Sugar cookie dough can be kept in the refrigerator for up 5 days before use. You can also freeze the dough for up to 6 months. To use frozen dough, thaw it in the refrigerator overnight.
- To prevent butter bleed, cool your cookies on a cooling rack rather than the pan, and make sure they’re completely cool before working with them (I like to leave them out over night so the tops dry as much as possible).
- If your cookies spread during the baking process, use the same cookie cutter to “cut them out” again immediately after removing them from the oven. When the cookies are hot and soft, you can make a clean cut.
- Royal icing darkens as it dries: Whatever color you want on your cookie, you’ll want to mix it slightly lighter as it will darken as it dries.
- Some colors are hard to mix: Red and black in particular can be difficult colors to mix. The good news is that they will darken as they dry. It also helps to use a highly pigmented gel food coloring like “super black” or “super red” by Americolor.
- Make more of each icing color than you think you’ll need: Because royal icing darkens as it dries, it’s very hard to match a color if you end up not having enough. It’s always a good idea to make more of a color than you think you’ll need.
- If you end up with any little air bubbles in your icing, you can pop those with your toothpick or quilling tool.
- Storage: Cookies can be stored in a cool, dark place in an airtight container for up to 3 weeks.
Did you make this recipe? I’d love to hear how it went in the comments below. Better still, snap a photo and tag it on Instagram with #thesimplesweetlife. I love seeing your creations!
PrintRecipe
Treat Bucket Sugar Cookies
These colorful Halloween sugar cookies are as simple as "trick-or-treat"!
- Prep Time: 8 hours
- Cook Time: 8 minutes
- Total Time: 8 hours 8 minutes
- Yield: 24 1x
- Category: Dessert
- Method: Baking
- Cuisine: American
Ingredients
For the sugar cookies:
- 2 sticks unsalted butter, at room temperature
- 1 cup granulated sugar
- 1 egg
- 1 tsp. vanilla extract
- 3 cups all purpose flour
For the royal icing:
- ¼ cup meringue powder or powdered egg whites
- ½ cup lukewarm water
- 1 lb powdered sugar
- Optional: 1 teaspoon of an extract of your choice
- Food gel coloring in orange, green and purple
Additional supplies:
- Sprinkles
- Piping bags
- Small, food-only brush
Instructions
To make the sugar cookies:
- Beat the butter in the bowl of a stand mixer until smooth.
- Add the sugar and continue beating until thoroughly combined. Add the egg and vanilla extract and repeat.
- Scrape down the sides of the bowl and add the flour one cup at a time, mixing between each new addition.
- The dough should be firm, easily peels away from the bowl and no longer sticky.
- Flatten the dough into a disc, wrap in plastic wrap and chill in the refrigerator for at least 1 hour.
- Once the dough is chilled, knead it on a lightly floured surface until malleable.
- Roll the dough out to ¼″ thick. Cut out with a candy corn shaped cookie cutter.
- Bake the dough at 350F for 6-10 minutes, depending on the size of the cookies.
- The cookies are done when they’re no longer shiny on top.
- In the bowl of a stand mixer, combine the meringue powder/powdered egg whites and lukewarm water.
- Use a whip attachment to whip the mixture on high until frothy. Scrap down the sides as you go to make sure there’s no residual powder.
- Sift the powdered sugar and add it to bowl. Continue whipping the icing, this time on medium speed. Stop the machine every 2-3 minutes to spray and scrape down the sides.
- If you’re adding additional flavoring to your royal icing, you can add it during one of the stops to scrape down the sides of the bowl.
- Whip the royal icing until you’ve reached a 20-second consistency.
- Divide the icing into three equal portions and a fourth small portion of just a few tablespoons.
- Tint the larger portions orange, green and purple, and the small portion black.
- Using a food-only brush, paint a thin layer of the black icing onto the cookie.
- Load a small amount of each color into piping bags. Clip a small hole in the tip, and pipe the outline for the features of the jack-o-lantern faces.
- Load the remaining icing into the bags, and fill in the bottom half of the cookies, leaving inside of the features open for the black icing to show through.
- Once the outside of the icing has set (about 30 minutes), go back in with the bags you used to pipe the features to add lines from the top of the jack-o-lanterns to the bottom. Allow the cookies to set overnight, or at least 8 hours.
- Take the remaining icing and pipe a line of it at the top of the jack-o-lanterns. This doesn't have to be perfect.
- Dip the icing into the sprinkles.
- Use the remaining black icing to pipe a thin black handle.
Notes
- Working ahead: Sugar cookie dough can be kept in the refrigerator for up 5 days before use. You can also freeze the dough for up to 6 months. To use frozen dough, thaw it in the refrigerator overnight.
- To prevent butter bleed, cool your cookies on a cooling rack rather than the pan, make sure they’re completely cool before working with them (I like to leave them out over night so they cool and dry as much as possible).
- If your cookies spread during the baking process, use the same cookie cutter to “cut them out” again immediately after removing them from the oven. When the cookies are hot and soft, you can make a clean cut.
- Royal icing darkens as it dries: whatever color you want on your cookie, you’ll want to mix it slightly lighter as it will darken as it dries.
- Some colors are hard to mix: red and black in particular can be difficult colors to mix. The good news is that they will darken as they dry. It also helps to use a highly pigmented gel food coloring like “super black” or “super red” by Americolor.
- Make more of each icing color than you think you’ll need: because royal icing darkens as it dries, it’s very hard to match a color if you end up not having enough. It’s always a good idea to make more of a color than you think you’ll need.
- If you end up with any little air bubbles in your icing, you can pop those with your toothpick or quilling tool.
- Storage: Cookies can be stored in a cool, dark place in an airtight container for up to 3 weeks.
Nutrition
- Serving Size: 1 cookie
- Calories: 251
- Sugar: 28.8g
- Sodium: 20mg
- Fat: 7.8g
- Saturated Fat: 4.9g
- Carbohydrates: 43.7g
- Fiber: .4g
- Protein: 3.2g
- Cholesterol: 20mg
Keywords: halloween sugar cookies, halloween dessert, how to make cookies
If you liked this, you might also like...







Leave a Reply