
If you're new to working with royal icing and want to learn the basics, this is the post for you! Here you'll find my favorite royal icing recipe, a breakdown of the basic types of icing, answers to frequently asked questions and how to troubleshoot common royal icing issues.

Disclaimer: Please note that some of the links below are affiliate links and I will earn a commission if you purchase through those links. I recommend all of the products included in this post because they are products I love and trust.
I think we can all agree: When it comes to cookie decorating, it's hard to beat the level of detail you can get with royal icing. But for a beginner, making and decorating with royal icing can feel pretty intimidating.
Should I use raw egg whites or meringue powder? What about powdered egg whites vs. meringue powder? How do I store it? How do I use it? What's all this talk about consistencies?
These were just a few of the things I wondered when I started working with royal icing and boy, I didn't even know where to begin! But after decorating with it for over 6 years, I've learned a lot about how to make it, use it and what NOT to do.
So if you're new to royal icing and don't know where to start, this is a great place to be! Let's take some of that guesswork out of your decorating endeavors.
Jump to:
Ingredients
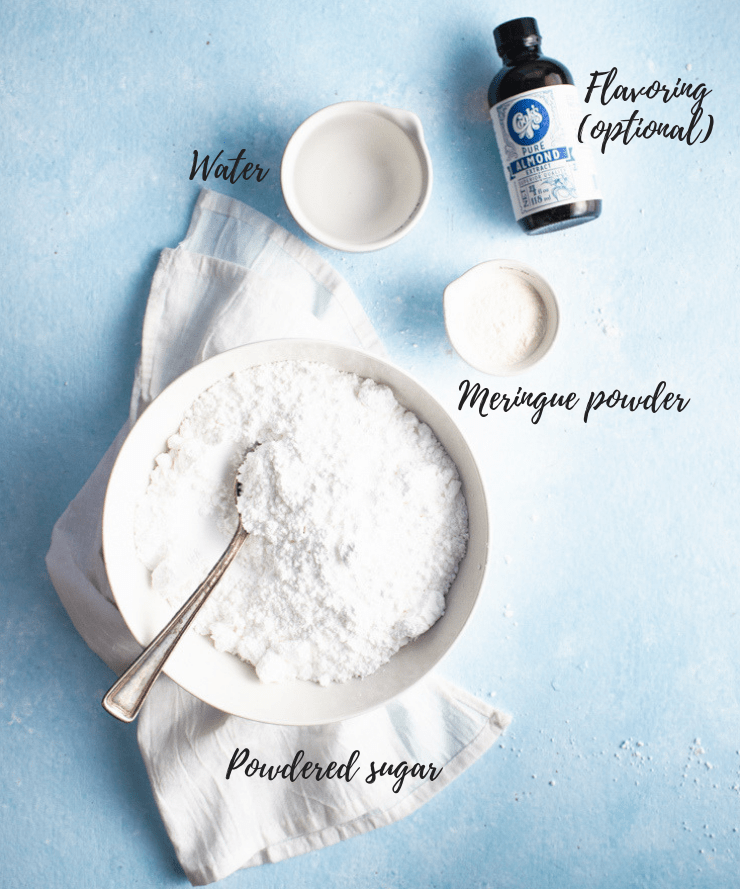
There are two types of recipes for making royal icing: royal icing with egg whites and royal icing with powdered egg white substitutes (like powdered egg whites or meringue powder).
Although you can use pasteurized egg whites in place of raw whites, I personally prefer the powdered substitutes because they have a long shelf life, don't need refrigeration and, in my opinion, produce a more stable royal icing.
How to make royal icing with meringue powder:
- ¼ cup meringue powder (affiliate link for the meringue powder I use) or powdered egg whites
- ½ cup lukewarm water
- 1 lb powdered sugar
- Optional: 1 teaspoon of an extract of your choice
This will make enough royal icing to decorate about 2 dozen cookies.
Royal icing without meringue powder
Powdered egg whites are a great substitution for meringue powder, and for the sake of this recipe, powdered egg whites and meringue powder are essentially interchangeable.
But if you're wondering how they're really different, powdered egg whites are just that: dried egg whites, while meringue powder is an egg product containing corn starch, egg whites, sugar, gum arabic, calcium sulphate, citric acid, cream of tartar, silicon dioxide and artificial vanilla flavoring.
Personally, I tend to prefer meringue powder because it's slightly more stable and already has flavoring, but either one will make a solid royal icing.
Watch the process
How to make royal icing
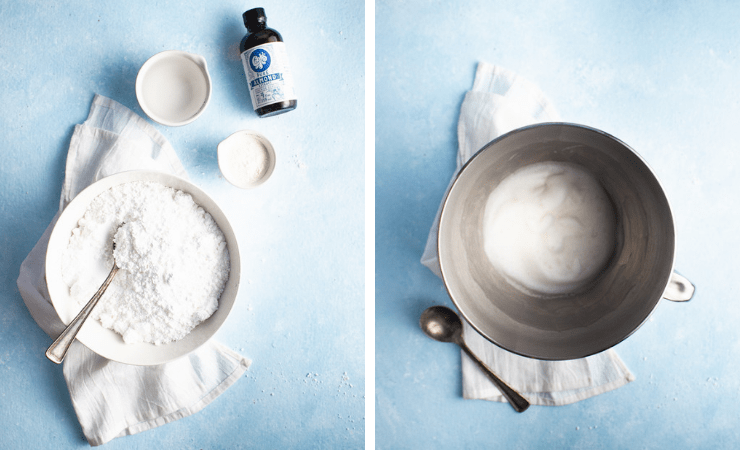
In the bowl of a stand mixer, combine the meringue powder/powdered egg whites and lukewarm water. In this context, "lukewarm" means just slightly warm to the touch.
Use a whip attachment to whip the mixture on high until frothy. Scrap down the sides as you go to make sure there's no residual powder.
Pro tip: Use a water bottle to lightly spray the sides before scraping them. This will help ensure that the powder dissolves and your royal icing is lump free.
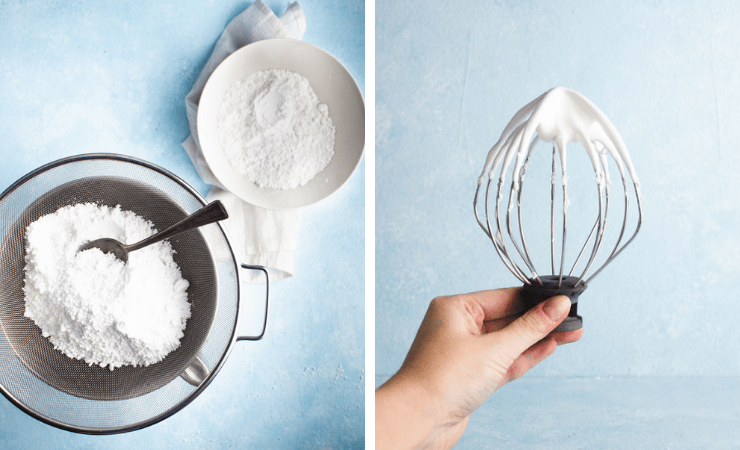
Sift the powdered sugar and add it to your bowl. Continue whipping the icing, this time on a medium speed. Stop the machine every 2-3 minutes to spray and scrape down the sides.
If you're adding additional flavoring to your royal icing, you can add it during one of these stops.
Whip the royal icing until you've reached the desired consistency. Personally, I work almost exclusively with 20-second consistency icing, which is light and reminiscent of marshmallow fluff.
If you need more than one consistency, whip your royal icing to the stiffest consistency and add a few drops of water at a time to the remaining icing to water it down to the desired consistency.
Icing consistencies
You may be wondering, "Ok, if I'm supposed to whip the royal icing to the desired consistency... what consistency should I be using?" Great question! This really varies from cookier to cookier and project to project.
Here are the basic consistencies and what they're used for:
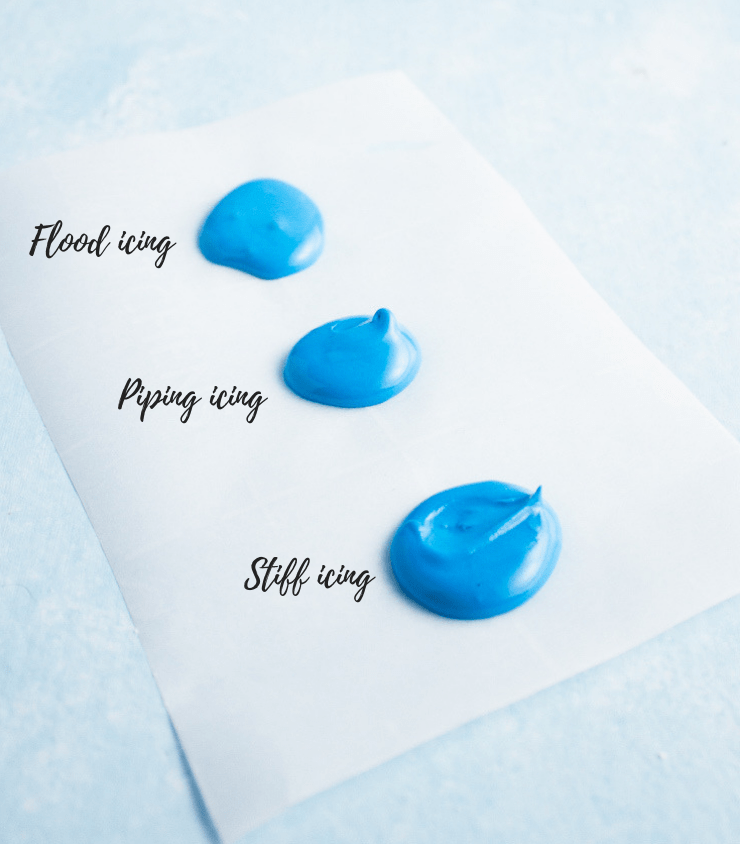
Stiff icing
As the name implies, this is the thickest/stiffest consistency of icing. This icing holds a very stiff peak and has a spreadable, frosting-like consistency.
Uses: flowers/succulents/other intricate shapes that need to hold their form, brush embroidery
Piping icing
This is best described as medium-consistency icing. It should hold a soft peak that doesn't spread when piped. Think soft serve ice cream.
Uses: outlining cookies, lettering, detailing/filigree, piping borders
20-second icing
This isn't a consistency you see called out very often, but I wanted to mention it because it's my go-to icing consistency.
If you're unfamiliar with consistencies in seconds, the seconds stand for the amount of time it takes the icing to reabsorb into itself.
In other words, if you pick up a spoonful of icing and drop it back in the bowl, this icing will take approximately 20 seconds to reabsorb. Its consistency is somewhere between piping icing and flood icing.
Rather than outline and fill, I pipe an entire layer of this icing straight onto the cookie, use a toothpick to work it into place, gently shake/tap and it's good to go.
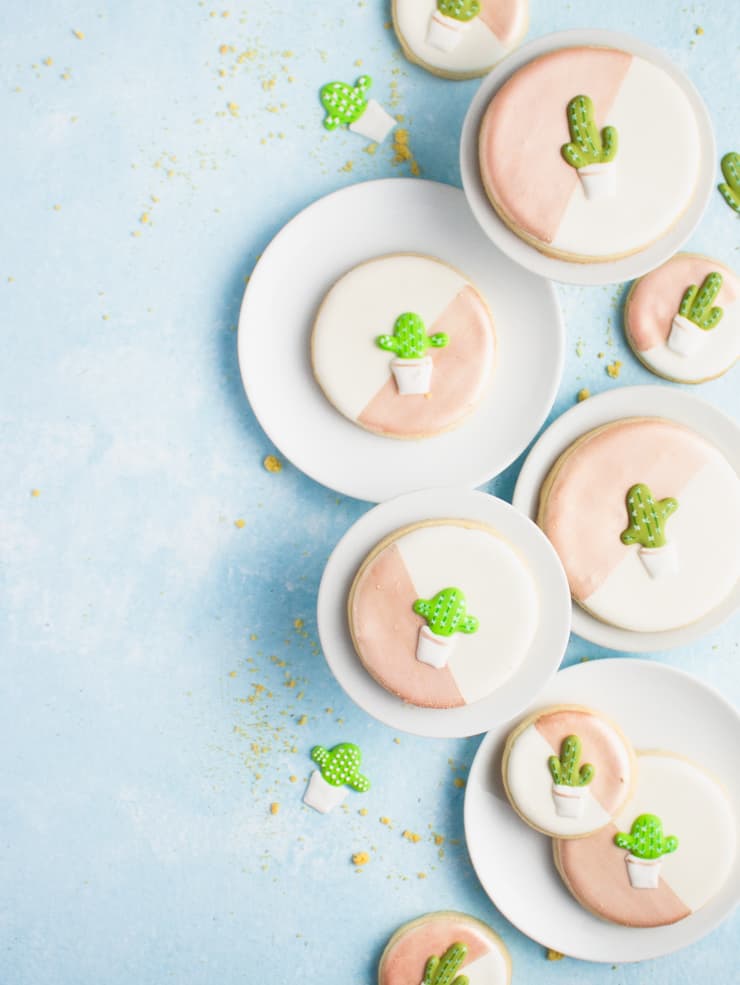
Uses: filling/covering cookies, royal icing transfers, building dimension, wet-on-wet, dipped cookies
Flood icing
This is the thinnest icing you’ll use when decorating your cookies and it’s used primarily for filling in areas that have been outlined with piping icing. This icing should be right around a 10-12 second consistency.
Uses: flooding outlined areas, wet-on-wet
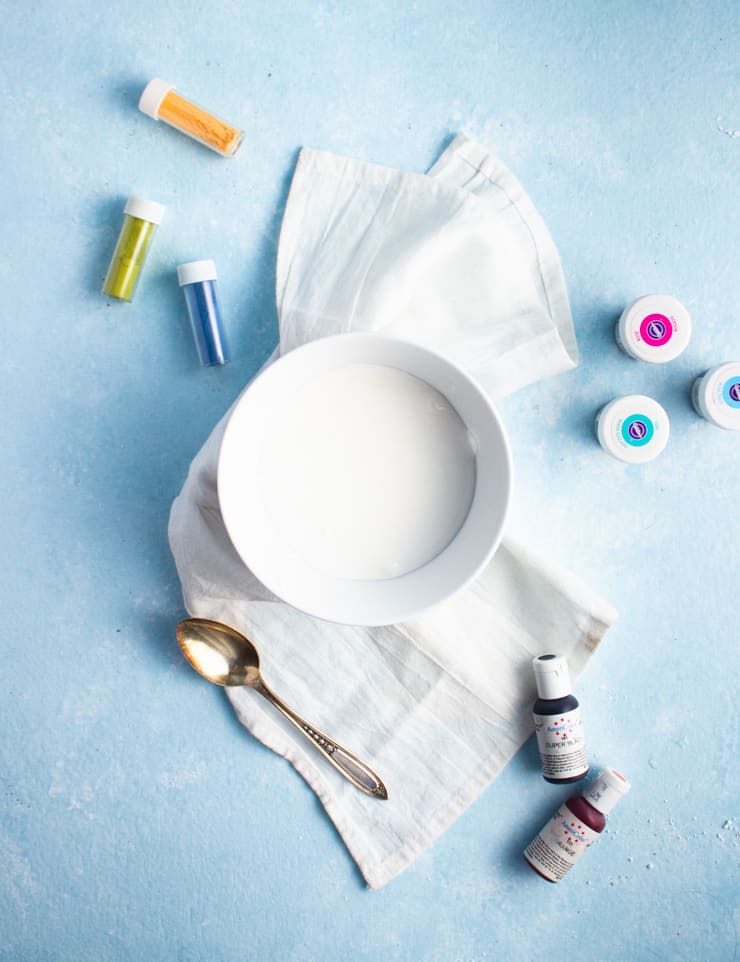
Coloring royal icing
Royal icing is very easy to color, but there are a few things you should keep in mind.
- Use gel food coloring: using powdered or watery food coloring can affect the consistency of your royal icing. Gel food coloring is extremely pigmented so you shouldn't need much, and the consistency is already like that of the icing itself. I personally prefer AmeriColor's food gels (affiliate link).
- Royal icing darkens as it dries: whatever color you want on your cookie, you'll want to mix it slightly lighter as it will darken as it dries.
- Some colors are hard to mix: red and black in particular can be difficult colors to mix. The good news is that they will darken as they dry. It also helps to use a highly pigmented gel food coloring like "super black" (affiliate link) or "super red" (affiliate link) by Americolor.
- Make more of each color than you think you'll need: because royal icing darkens as it dries, it's very hard to match a color if you end up not having enough. It's always a good idea to make more of a color than you think you'll need.
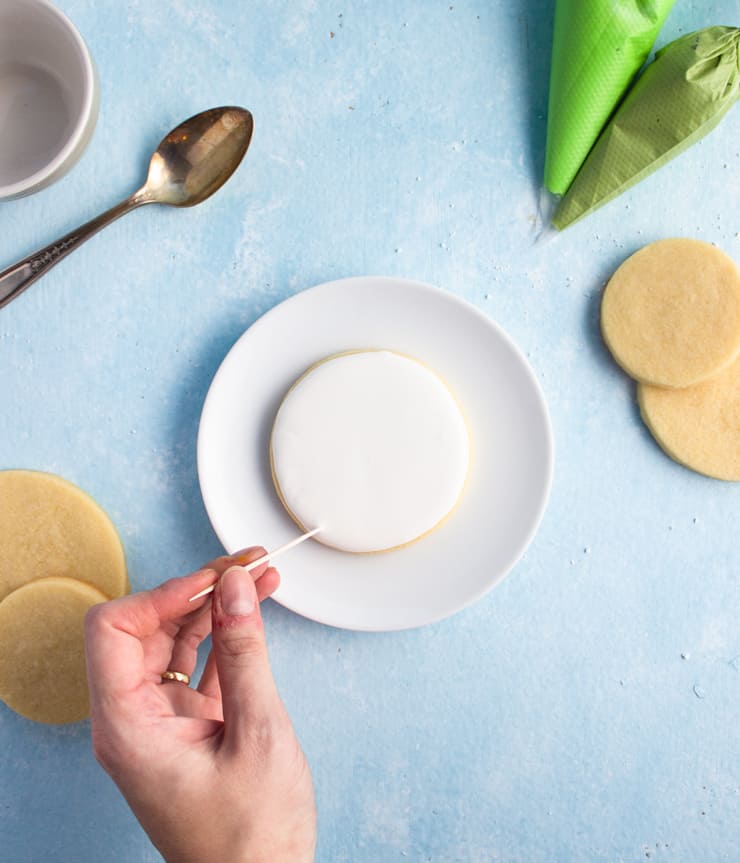
Decorating with royal icing
Now that you know all of the basics of making royal icing, here's how to decorate with it.
- If you need an outline for your design, draw it directly onto your cookies with a food pen/marker.
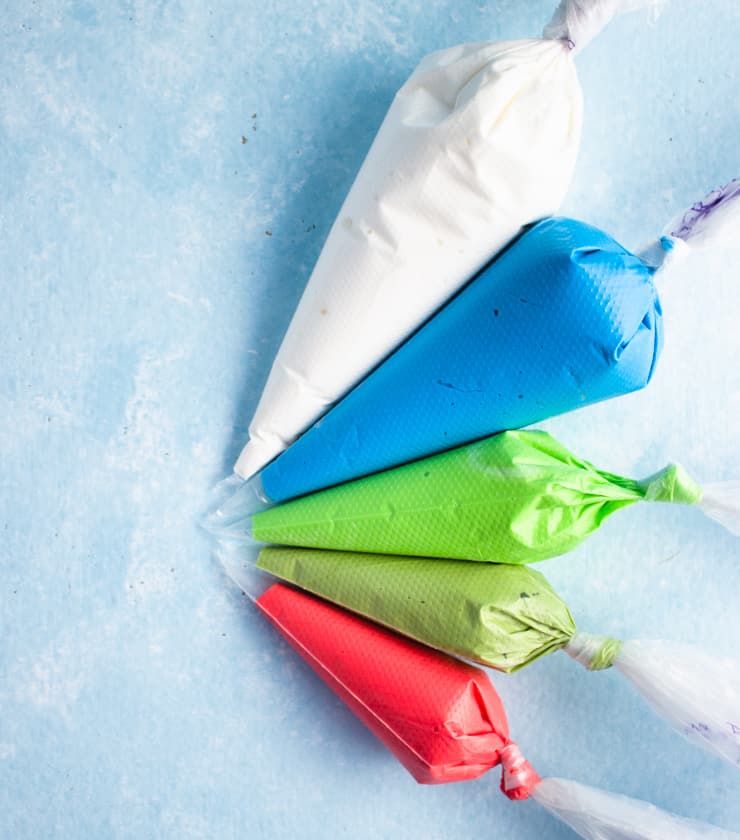
- Load your icing into piping bags and pipe it directly onto the top of your cookies. Pro tip: For easy loading, place the piping bag into a tall glass and pull the top down around the sides of the glass. This will hold the bag in place while you pour.
- Use a toothpick or a quilling tool to work the icing into place. A gentle tap or two will help the icing settle.
- If you end up with any little air bubbles, you can pop those with your toothpick or quilling tool.
- Allow the icing to dry completely before packing or adding additional decorations (about 6-8 hours).
Troubleshooting
How do I prevent lumps in my royal icing?
If you find your royal icing has lumps, try straining it through a fine mesh cloth. Pro tip: A pair of clean pantyhose is perfect for this, and you can even drop it right into your piping bag to reduce the mess.
How do I avoid butter bleed?
Butter bleed occurs when the butter from the cookie leeches into the royal icing leaving it discolored.
The main culprit: heat. To prevent butter bleed, cool your cookies on a cooling rack rather than the pan, make sure they're completely cool before working with them (I like to leave them out overnight) and use a thicker icing.
Once the cookies are iced, make sure to keep them somewhere cool.
Frequently asked questions
If the cake is covered in fondant, yes. But just like butter bleed from a warm cookie, butter from a buttercream frosting will leech into your royal icing leaving it discolored. Dried or drying royal icing should not be refrigerated.
Royal icing made with meringue powder or powdered egg whites can be stored at room temperature. To keep the royal icing from crusting, place a piece of plastic wrap directly on the surface of the royal icing.
If you keep it for more than a few days, the water may start to separate from the icing. This doesn't mean you can't use it, but you'll want to give it a good mix before you do. You can store royal icing in this manner for about 2 weeks.
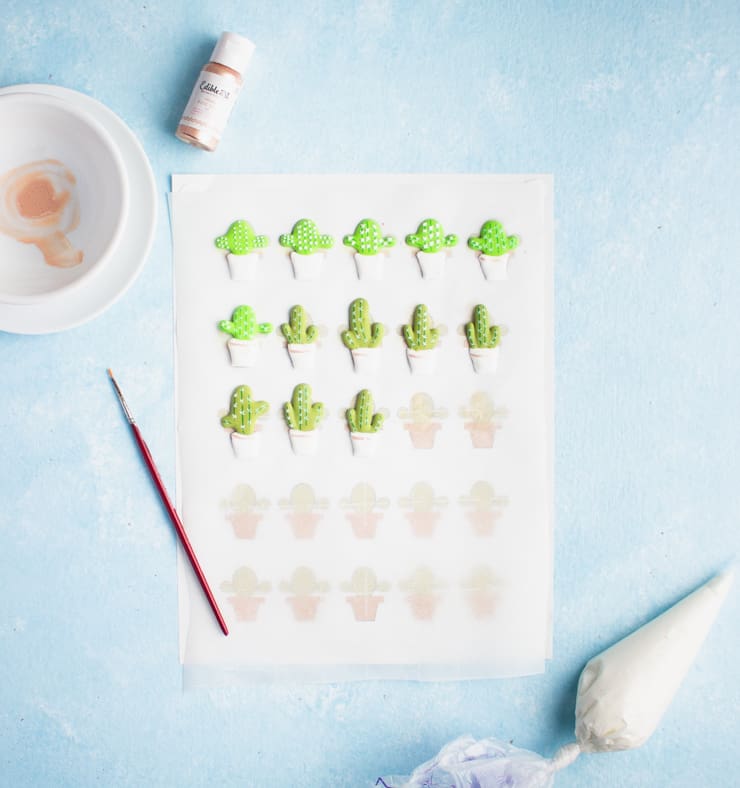
Royal icing transfers are royal icing decorations that have been piped onto wax or parchment paper that can be transferred to other creations like cookies or cupcakes.
Transfers are great for making decorations ahead, perfect for beginners who may want the assistance of a stencil and can be kept in a cool, dry place out of direct sunlight almost indefinitely.
Ways to use royal icing

More resources
Oh hey! Congratulations on making it all the way through this post. Before you go, here are a few more resources to help set you up for cookie decorating success:
- My favorite, fool-proof sugar cookie recipe complete with all of my best tips on working ahead and troubleshooting
- Creative ways to use your leftover royal icing
- My top 10 lessons learned from 10 years of cookie decorating
- How to make your own cookie cutters
Did you make this recipe? Please leave a ⭐ star rating and let me know how it went in the comments below! I regularly update these posts and feedback from wonderful readers like you help me make them better.
Recipe
Royal Icing Recipe

If you're new to working with royal icing and want to learn the basics, this is the post for you! In it you'll find my go-to royal icing recipe, a break down of the basic royal icing consistencies, answers to frequently asked questions and how to troubleshoot common royal icing issues.
- Prep Time: 10 minutes
- Total Time: 10 minutes
- Yield: Enough for 2 dozen cookies
- Category: Dessert
- Cuisine: American
Ingredients
- ¼ cup meringue powder (affiliate link) or powdered egg whites
- ½ cup lukewarm water
- 1 lb powdered sugar
- Optional: 1 teaspoon of an extract of your choice
Instructions
- In the bowl of a stand mixer, combine the meringue powder/powdered egg whites and lukewarm water. In this context, "lukewarm" means just slightly warm to the touch.
- Use a whip attachment to whip the mixture on high until frothy. Scrap down the sides as you go to make sure there's no residual powder.
- Pro tip: Use a water bottle to lightly spray the sides before scraping them. This will help ensure that the powder dissolves and your royal icing is lump free.
- Sift the powdered sugar and add it to bowl. Continue whipping the icing, this time on medium speed. Stop the machine every 2-3 minutes to spray and scrape down the sides.
- If you're adding additional flavoring to your royal icing, you can add it during one of the stops to scrape down the sides of the bowl.
- Whip the royal icing until you've reached the desired consistency.
- If you need more than one consistency, whip your royal icing to the stiffest consistency and add a few drops of water at a time to the remaining icing to water it down to the desired consistency.
Notes
- Use gel food coloring: using powdered or watery food coloring can affect the consistency of your royal icing. Gel food coloring is extremely pigmented so you shouldn't need much, and the consistency is already like that of the icing itself.
- Royal icing darkens as it dries: whatever color you want on your cookie, you'll want to mix it slightly lighter as it will darken as it dries.
- Some colors are hard to mix: red and black in particular can be difficult colors to mix. The good news is that they will darken as they dry. It also helps to use a highly pigmented gel food coloring like "super black" or "super red" by Americolor.
- Make more of each color than you think you'll need: because royal icing darkens as it dries, it's very hard to match a color if you end up not having enough. It's always a good idea to make more of a color than you think you'll need.
- If you need an outline for your design, draw it directly onto your cookies with a food pen/marker.
- For easy loading, place the piping bag into a tall glass and pull the top down around the sides of the glass. This will hold the bag in place while you pour.
- Use a toothpick or a quilling tool to work the icing into place. A gentle tap or two will help the icing settle.
- If you end up with any little air bubbles, you can pop those with your toothpick or quilling tool.
- Allow the icing to dry completely before packing or adding additional decorations (about 6-8 hours).
- To prevent butter bleed, cool your cookies on a cooling rack rather than the pan, make sure they're completely cool before working with them (I like to leave them out over night so they cool and dry as much as possible) and use a thicker icing (a thinner, more porous icing is more likely to suck up more butter).
Adapted from Bake at 350
Nutrition
- Serving Size: 1 cookie worth (~⅔oz)
- Calories: 77
- Sugar: 18.5g
- Sodium: 4mg
- Fat: 0g
- Saturated Fat: 0g
- Unsaturated Fat: 0g
- Carbohydrates: 19.5g
- Fiber: 0g
- Protein: .3g
- Cholesterol: 0mg
Update Notes: This post was originally published in September of 2013 but was republished with step-by-step photos and tips in November of 2018.


Dina says
Hello! Thank you for such great tutorials. What is that pick you use to smooth the icing ?
The Simple, Sweet Life says
Hi Dina! Although there are a lot of options out there, I typically just use a toothpick. 🙂
Veena Azmanov says
Such a detailed post. Love reading all the tips and notes you shared. I usually have no patience with Royal Icing and cookies but I love how they look when done.
Kelly Anthony says
What a wonderful recipe! Thanks so much for sharing. Royal icing seems intimidating but it's really not!
Kiki Johnson says
OMG these are the prettiest cookies EVER! I bake a lot but I have never really decorated with royal icing before! I cannot wait to play around with it!
Nicoletta De Angelis Nardelli says
Your posts are always so detailed and helpful and with gorgeous photography. I have never made royal icing but with your tips, it seems less intimidating. Thank you!
Michelle says
This is such a great post! I'm not a great baker and have always been a bit intimidated by icing but you have definitely made me feel like it is within reach, thank you. Saving this x
lauren says
I am absolutely in love with this. The last time I made piping icing it came out terrible. I didn't realize there were three different types of icing. Look forward to trying out your tips this holiday season!
Anne Lawton says
There are some great tips here. Thank you for sharing them and your recipe!
Sri Mallya says
Such a detailed post. Thank you so much for sharing. Pinned! Much needed
Tammy says
Sugar cookies are a must for the holidays and this royal icing recipe is great to have on hand. I love all your tips. Thank you!
Jessica (Swanky Recipes) says
I had no idea that there are so many different types of royal icing recipes to craft desserts. Since December is cookie making month in our house, I'll be pinning these quick recipes to use with our sugar cookies next week!
Nicole says
i was just looking for a royal icing recipe for christmas cookies. Your cookies look amazing and detailed. I don't know if I could get my cookies to look that pretty.
Holly says
Wow - you have laid out such thorough instructions on making Royal Icing! I actual feel like I could attempt it now. Thanks!
Christina says
This is the first time I use this recipe for royal icing. I usually use Wilton but was looking for something less sweet. The only thing is they don't seem to be crusting over as quickly as the Wilton recipe and I'm worried. The consistency is like Marshmallow fluff. They have already been drying for 4 hours. Are these typical results or did I do something wrong?
The Simple, Sweet Life says
Hi Christina! Great question! Dry time depends on how much icing you're using/how much cookie you're trying to cover as well as humidity and temperature of the room you're working in. My experience is that a large, round cookie (say about 4 inches across) covered in royal icing can take about 8 hours to fully dry out (and I don't live in a particularly humid environment). Small patches of icing will take less time to dry, but humidity will increase your dry time.
Angela says
Hi thank you sooo much for sharing your knowledge and experiences. I would like to ask how many egg whites to use in place of meringue powder for your recipe please?
We don't have in our local stores and will need to research where I can get meringue powder. Thank you
The Simple, Sweet Life says
Hi Angela! Great question! I ran into a similar issue while I was living abroad so I know what a pain it can be to special order meringue powder. 🙁 For this recipe, you'd want to use about 4 egg whites in place of the meringue powder and water. If it's available, I'd recommend using pasteurized egg whites to reduce any risk of food poisoning resulting from raw egg.
Nichole says
How do you adhere the royal icing transfer to a cookie?
I’m keeping your page up as my go to info. Thanks.
The Simple, Sweet Life says
Hi Nichole! That's a great question! There are two ways you can do it: 1. Ice the cookie and drop the transfer directly onto the still wet icing or 2. Use a little royal icing to "glue" the transfer to the top of the dried cookie.
There are advantages and disadvantages to both methods. The advantage to the first method is that the transfer sits on top of the icing seamlessly. The disadvantage is that the transfer can soak up some of the color from the wet icing below it (I wouldn't use this method if my transfer were lighter than the wet icing it's dropped onto).
With the second method, the disadvantage is that the transfer does not sit seamlessly on top of the cookie and you will need extra icing to "glue" it on. The advantage, however, is that you don't have to worry about discoloration from the wet icing to dry icing and it gives you the option to paint on top of the cookie or add additional details that you don't otherwise want to work around. For the cookies pictured in this post, I used the second method.
Nichole says
Thank you!
Carmen says
Have not made it yet, but plan to make it today or tomorrow to cover the turrets of a princess cake, and then cover them with sprinkles. It is very hot and humid here and I don't have A/C. Also, the party is at the park.
Will the royal icing melt or once it hardens on the turrets will be safe?
Thanks for the great tutorial and explanation!!!!🌝
The Simple, Sweet Life says
Hi Carmen! The heat shouldn't be a problem but humidity can be. Humidity will typically effect your icing in two ways: 1. It can make the icing runnier and 2. It can increase your drying time. To combat the first issue, it's really just a matter of closely watching the consistency of your icing and adding a little extra powdered sugar if it ends up too thin. As for the drying time, the only way to combat that is to give yourself extra time to allow the icing to dry completely. If you don't have extra time for drying, I've heard other cookie decorators have found success with drying cookies in a dehydrator or oven. I haven't tried these methods myself so I can't speak to how safe or effective it is, but here's a thread that can walk you through some options: https://cookieconnection.juliausher.com/topic/drying-cookies-in-the-oven Good luck on your princess cake! 🙂
Ana says
Hi! How long do you typically beat to make the 20 second icing? thanks!
The Simple, Sweet Life says
Hi Ana! I'd say it takes my icing about 3-5 minute to reach a 20 second consistency, but the best way to tell if it's ready is to stop and test it regularly.
Ana says
Thank you!! Will try it tonight!
Sara says
This is the best royal icing post I've been able to find...I especially love the photo showing the different consistencies for flood icing, piping icing, and stiff icing. Thank you!
April says
I had almost given up on Royal icing! This was my last attempt! This icing turned out amazing! Thank you!
The Simple, Sweet Life says
Hi April! Your comment absolutely made my day! Royal icing can be a tricky one, but I'm glad to hear you hung in there. 🙂
Valerie Coffman says
Hi there!! I made royal icing for the first last night using your recipe. I am ew to cookie decorating, and I could totally use some help troubleshooting. My icing never got to 20 sec let alone flood consistency. It was super thick, like frosting/ marshmallow fluff consistency. I added over a cup of liquid (vanilla flavoring and water). Even with shaking and tapping the cookie the frosting just stayed put. I’d like to give this another go today if possible. Any I put would be greatly appreciated! Aside from adding all that water, I followed your recipe exactly. Thank you!
The Simple, Sweet Life says
Hi Valerie! Yes, getting the consistency right when you're first starting out or trying a new recipe can be tricky, so I definitely understand the frustration of it not turning out the way you'd like it to. As a rule of thumb, the longer you beat the icing, the thicker it will get. So if you ended up with a really thick, fluffy icing, I'd recommend beating it less and stopping regularly to test the consistency. Hope that helps! Don't hesitate to let me know if you run into any other issues. 🙂
Valerie Coffman says
Thank you so much for the reply! I’m going to give it another go tonight. You might be right in that I beat the frosting for some time. The frosting hasn’t completely dried; but it actually tastes like a macaron! Thanks again!!
Anjanette says
I made the recipe however it seems as if its taking longer than 8 hrs to dry, still a bit sticky...any advice for me?
The Simple, Sweet Life says
Hi Anjanette! Depending on the humidity in your home, it may take longer than 8 hours for the royal icing to dry. Whenever possible, I would recommend simply giving them extra time. I know a few cookie decorators who swear by dehydrators but having not used them myself, I can't speak to how effective they might be. Lila Loa has a great tutorial on using dehydrators if you're interested: https://www.lilaloa.com/2016/01/decorated-cookies-and-dehydrator-what.html
Lyn says
Hello-these were great tips! Thanks so much. I have a question regarding bleeding which I didn’t see in your post (I don’t think the butter issue you addressed led to bleeding right?)
I was making treats for a casino themed party and had made about 2 dozen square cookies and covered them with white icing and let them dry overnight and the next day I added black dots to create “dice”. They turned out SUPER cool looking. I was so proud but as the time passed, maybe 6 hours the black dots bled into the white icing. By the time it was time to go to the party they had bled so
badly I left the cookies at home. What do you think I did wrong? I’m not in a humid area..Any suggestions for the future?
The Simple, Sweet Life says
Hi Lyn! Ugh, royal icing bleed is the worst! And I'm so sorry to hear it resulted in you leaving your cookies at home. 🙁 There are a number of reasons icing bleed can happen, and more often than not it occurs when you're working with colors that are on opposite ends of the spectrum from each other (like black and white). Icing bleed is more prone to happening when the icing seems dry but is, in fact, still a little moist. I would recommend icing your cookies with the white icing and then letting them dry for 24-48 hours so that they're certain to be 100% dry. Another thing you could try is to make royal icing transfers with the black dots so that your putting dry royal icing on top of dry royal icing. To do this, you'd simply pipe your black dots onto parchment paper, ice your cookies with white royal icing, and then once both have dried completely, you can "glue" the black dots on with any royal icing you have left over. It also helps to use a high quality black food gel so you don't have to use any more coloring than absolutely necessary. Finally, it's always a good idea to store your cookies somewhere where you're sure they're not absorbing any extra moisture (like away from stoves where they might get hit with some steam from cooking or near refrigerators). I hope this helps and I hope it works out better the next time around!
Amy says
Did I read correctly.... you don’t have to beat until stiff peaks form? You can stop when it gets to the flow consistency you want!!?? I was beating until stiff peaks resulting in having to add sooo much water. I’m assuming that isn’t the way to go unless I’m needing the stiff, is that right? Uh. This is complicated!
Lynette says
Wow, such a fantastic, detailed post. Thank you so much. Very excited to try this.
Wanda says
Do you have to use a stand mixer? I don't own one.
The Simple, Sweet Life says
Hi Wanda! You can absolutely use a handheld electric mixer. I, personally, just like the stand mixer because it's hands-free. 🙂
Kerry says
This is great, I have been trying to find a recipe that separates between piping and fill royal icing. I see that the filling icing should have a 10-12 second consistency. What would you consider for piping icing? Something higher than your 20 second? Having some families come over to decorate cookies next week!
The Simple, Sweet Life says
Hi Kerry! Great question! The reason there isn't a consistency listed in seconds for the piping icing is that it should be thick enough to hold a stiff peak. This means that if you scooped up a spoonful and dropped it back into the bowl, it wouldn't fully reabsorb. Ultimately you're going to want it to look something like this image:
Nicole says
We made royal icing with meringue powder around 8pm on December 24 and it was probably a 12-second icing (after adding lots of extra water). We divided the recipe into 6 different colors and used Wilton gel colors. The icing was perfect, and we made 8 beautiful cookies. We left the icing in piping bags on their sides on the kitchen counter in a 70°F air conditioned house with not much humidity. The cookies dried beautifully overnight. We didn't have time to decorate any more cookies on December 25 or 26, but decided to decorate some on the morning of December 27. However, after only 60 hours or so, the colored icings (and the plain "white" icing with no color added) were already very much separated, with the part at the bottom being really dark with the coloring and a different liquid consistency, as well. I mixed them in the piping bags the best I could, but the texture of the icing was closer to a flood icing, and after 5-10 minutes on their sides, all the icing had already started to separate again. How can we prevent this separation from occurring? What is the fix for this? I thought you should be able to store this at room temperature for up to two weeks without issue, so I am confused.
The Simple, Sweet Life says
Hi Nicole! I'm sorry to hear your icing separated on you and made it more difficult to decorate the second batch of cookies! You're right; You can store the icing at room temperature but it will start to separate after a couple of days. In my experience, the best way to store it is in a container with plastic wrap pressed down against the surface of the icing. This will keep it from developing a crust in the same way the piping bags helped prevent this from happening, but it will also allow you to whip the icing before use and get it back to the consistency you need it to be.
Nakia says
How many cups is in a pound of powdered sugar?
The Simple, Sweet Life says
Hi Nakia! I recommend weighing your powdered sugar as it will be more accurate than using volume based measurements like cups. If you aren't able to weigh your powdered sugar, this site estimates that you'd need about 4 1/2 cups of sifted powdered sugar to get a pound: https://www.bhg.com/recipes/how-to/bake/cups-in-one-pound-powdered-sugar/
Mariana says
Hi! this was a great blog..quick question so you add the 1/2 cup of water and meringue powder all at once and then the powder sugar..but during the whipping you keep adding more water from the spray bottle correct? so u ended up using more than a cup of water? am i right?
thank you cant wait to try this.
The Simple, Sweet Life says
Hi Mariana! Great question. You'll end up with just slightly more than a 1/2 cup of water; Spraying the sides of the bowl with water is meant to help keep the powdered sugar from sticking. It's not meant to add more liquid to the recipe. I'd use the additional water sparingly.
Risa says
Thanks for the tips!
I’m wondering if you’ve ever shipped sugar cookies? I normally use a poured fondant over my cakes but have been having issues with shipping (it completely melts due to white chocolate chips in poured fondant?) so I wanted to try using royal icing, which will be around 3x thicker than what you would put over a cookie.
Hailey says
Hi! I was wondering how many cups/ounces that recipe makes?
Laura says
Couple of questions: (1) I have usually used royal icing without meringue powder (just powdered sugar, milk, corn syrup and flavoring), but it gives a shiny look to it and takes forever to dry. So when I used meringue powder, it gave me the look I wanted and dried faster, but the icing got so hard that it broke off and didn't have a long shelf life outside of a few hours. Any tips on how to make meringue powder (your recipe) icing not so hard it breaks off?
(2) How far in advance can you decorate cookies for an event? I have a potential order next week for a friend, but would need to make them in advance due to going out of town last minute to take care of my mom. So if the event is on Saturday, and I am leaving Wednesday night, would decorated cookies survive in the same condition from Wednesday to Saturday (3-4 days) in storage? And how do I store them??
I hope you can help!! Thanks!
Ayah says
Hey..
I need to know why my royal icing is sooo hard to beat and work with when mixing.. And if I add more water it gets a bit runny and don't t help me with the flowers and the stiff designs!!
Kristine Porter says
Help please! I have tried this twice now and my icing has not dried either time. It looks fantastic and correct consistency when icing cookies however when it has sat for 8-12+ hours to dry it becomes blotchy and spongy. Centers definitely stay moist. I have let them sit for 48hours and still no luck.
Do you have any idea what I'm doing wrong? I have watched videos and can not find my mistake. Any help appreciated.
Aimee says
Hi Claire! I just wanted to thank you for your excellent royal icing recipe. I usually make sugar cookies in the fall, and usually they’re covered in royal icing but this year, I was really considering not making them because I was unhappy with the royal icing recipe I had been using. I know it’s risky to switch horses in the middle of the race, so to speak, but I’m soo glad I did!! Your icing recipe is perfect: it’s easy to make, delicious, and it dries perfectly stiff in a short amount of time. It will be my default R. I. recipe from now on! I also appreciated the “scale” function in your recipe—this allowed me to make the perfect amount of icing for the cookies I made. Thank you again!!
Cindy says
Hi Claire! I've been using your recipe for a few years now and I wondered have you ever added light corn syrup to add shine to it? I'd like to try but don't want to ruin all the work decorating only to have the icing turn out with spots or something. Thanks!
Patricia says
I have just come across this article and tutorial and want to thank the author, it is the best that I have found in providing all the information that is needed for successful royal icing on biscuits. I have done a batch of gingerbread ladies and have put aprons on them in white, they are drying prior to decorating. This tutorial has made the process so very easy. Thank You.
Jaleigh Levine says
If I used liquid food coloring would I just use less water
Kiara Little says
This is my favorite royal icing recipe! I use it to make transfers, to pipe intricate details, and to flood my cookies. I recommend to use a 15 second icing to both outline and flood the cookies. I tried to use a 10 second icing for flooding and a 15 second icing to pipe. The 15 second icing was fine, but my flood icing had quite a bit of butter bleed. Thank you for this detailed tutorial! It is very useful!
Colin Purrington says
Can you give me advice on whether royal icing on a Christmas cake would survive being shipped via the mail? Or would fondant be better for that? Or should I include a bag of frosting ingredients along with instructions on how to ice it when the cake arrives. Thanks you for any thoughts.
Claire | The Simple, Sweet Life says
Hi Colin! That's a great question, and a tough one! While cookies tend to ship really well, cakes can be tougher. I'd recommend avoiding royal icing because it will likely crack and, if it's piped directly onto buttercream frosting, can absorb fats from the butter and become discolored. I think fondant or another sugar paste-like medium (for example, marzipan or modeling chocolate) will likely be your safest bet.
Amber says
I am brand new to this, and intimidated by the Royal Icing part of things, so thank you for this! I am almost ready to try. Question: say I want to make pink icing. I make the whole batch and get the color right where I want it. I assume I need to separate some out if I'm going to use both a piping consistency and a flood consistency. I'll need to add water to get my flood consistency. Is that going to change the color? How do I make sure the color matches no matter if I separate it and add water to one part?? Thanks again!!
Claire | The Simple, Sweet Life says
Hi Amber! I'm so excited to hear you're feeling ready to tackle royal icing! 🙂 As long as the only thing you're adding to the royal icing after you get the color the way you want it is water, you'll be fine; You'll be adding such a small amount of clear liquid and food gel coloring is so pigmented that you won't be able to see a difference in the color between the two consistencies. Happy icing!
Caitlin says
Have you ever frozen the decorated cookie with this royal icing? Wondering if they turn out ok after doing so. Also how long do yours last in terms of freshness?
Claire | The Simple, Sweet Life says
Hi Caitlin! Yes, decorated sugar cookies freeze really well and because you've sealed the moisture in with a layer of icing, they stay fresh longer than other kinds of cookies. Although freshly baked cookies are always best, decorated cookies will often keep up to a week or two at room temperature and up to 6 months to a year frozen. If you're new to freezing royal icing decorated cookies, I highly recommend this post from Bake at 350: https://www.bakeat350.net/2012/05/yes-you-can-freeze-decorated.html
Fiona says
How many grams in a quarter of a cup please?