Whether you're looking for a Halloween cake for kids or something spooky cute for your Halloween party, this almost-all-buttercream cake is sure to please! Scroll down to grab the recipe, my best bundt cake-making tips and all the how-tos you need to make this fun treat!
It's officially October which means it's high time for a few of my favorite things:
- Sweaters ✔️
- Crisp fall days ✔️
- All the Halloween things ✔️
- Pumpkin everything ✔️
Which is exactly the vibe I was rocking during this crisp fall weekend when I donned my favorite fuzzy fall sweater and carved myself up this sweet jack-o-lantern cake.
And best of all, it's all cake and buttercream dreams with none of the pumpkin goop.
How to make this Halloween cake
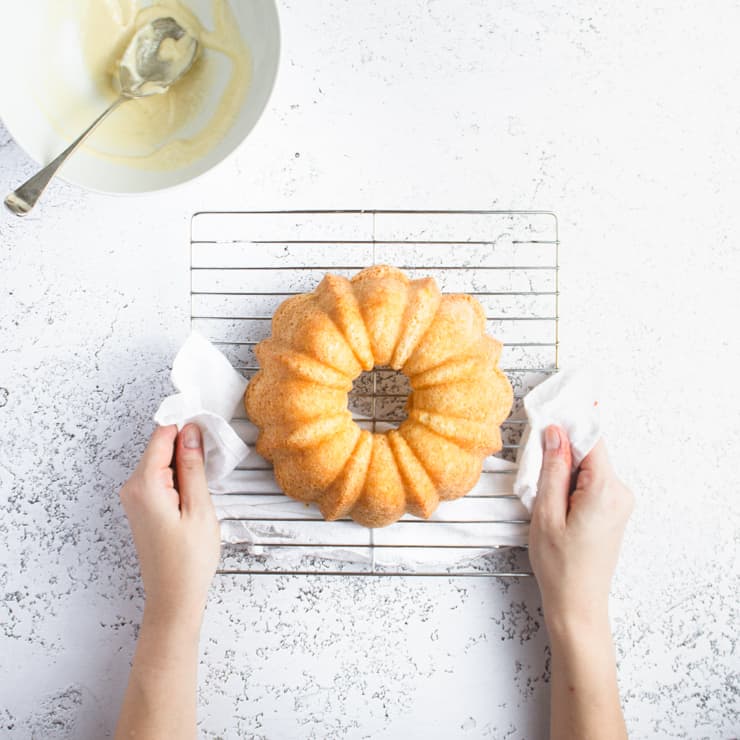
First, bake your bundt cakes.
For this recipe, I used a 6-cup bundt pan and made half of the cake recipe at a time.
Pro tip: It's important to only make as much batter as you can bake immediately. Leaving batter on the counter will result in a cake that's dense and doesn't rise well. This is due, in part, to the fact that leavening agents are active for only a short time, and they activate as soon as you combine them with wet ingredients. For more information, check out this short Q&A on baking cake layers with Nigella.
To make the cake, combine the milk and butter for the cake in a small bowl, and melt it in the microwave using 20 second increments until you can stir it smooth.
In the bowl of a stand mixer, whip the eggs and sugar until light and fluffy. Add the dry ingredients and mix on low until just combined. Add the remaining ingredients and, again, mix on low until just combined.
Pour the batter into a well-greased bundt pan.
Pro tip: Getting a bundt cake out of its pan can be difficult. One of the ways you can make this process a little easier is by making sure the pan is well greased. One of my favorite pan-greasing options: Homemade pan release. The recipe is equal parts vegetable oil, shortening and flour. Simply whisk it all together until smooth and coat the pan with it liberally.
Bake at 350F for 25-30 minutes or until a toothpick inserted into it comes out clean.
Second, make the frosting
While you can often interchange store bought and homemade frosting, I'm going to strongly recommend you don't do that for this cake. This is because store bought frosting doesn't contain butter, which will keep it from developing a "crust," something you'll need in order to create the smooth buttercream ridges of the pumpkin.
Trust me, I tried doing it with the store bought stuff. It 100% did not work.
To make the frosting, combine the water and granulated sugar in a small pan over high heat. Bring the syrup to a boil, cooking until it becomes clear. While the syrup cooks, whip your egg whites until stiff peaks form.
Pour the sugar syrup into the egg whites (with the mixer on high) and whip until cooled to room temperature.
Decrease the mixer to low, add the butter and vanilla extract, and continue beating on high until the frosting is thick and smooth.
Reduce the speed to low and add the orange food coloring. Beat for another 5 minutes to work out the air bubbles.
Third, fill and crumb coat the cake
Turn one of your bundt cakes upside down so the flat side is facing up. Spread a layer of frosting on it and top with the second bundt cake, flat side down.
Coat the entire cake with frosting. Use your spatula to create grooves in the frosting. These will act as a guide when you later create the ridges.
Place the cake in the refrigerator and allow it the frosting to become firm (about 15 minutes). This will lock in the crumbs.
Fifth, create the ridges of the pumpkin.
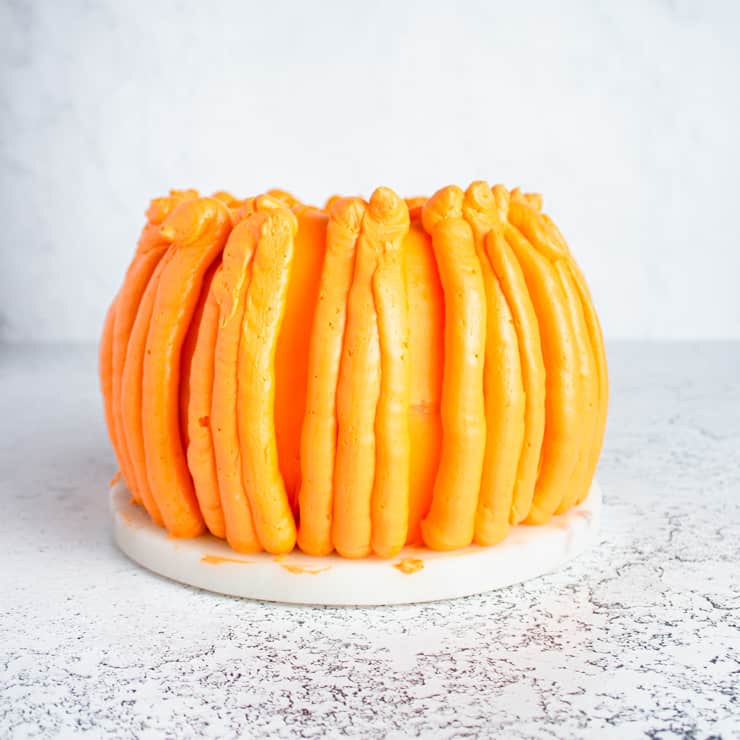
Spoon the remaining frosting into a piping bag with a medium-size, round tip (I used a Wilton 2A). Using the grooves you created as a guide, pipe columns of frosting in between them, starting at the bottom of the cake and running the frosting up to the top.
Place the cake in the refrigerator and allow it to firm until the frosting has developed a "crust" (about 20-30 minutes). You'll know the frosting has a crust when you can run a finger over it without having frosting pull away.
Once the frosting has crusted, use your fingers to gently rub the frosting smooth, working one ridge at a time. The warmth of your skin will soften the frosting, allowing you to rub it smooth while the crust will keep it from getting stuck to your fingers.
If the frosting does start to stick to your fingers, simply return it to the refrigerator util it's cool enough to work with again.
Pro tip: You'll want to keep your fingers free of any excess frosting so it doesn't smudge or scratch the frosting your working with. I recommend having a dry paper towel on hand so you can frequently wipe your fingers.
Once the ridges are smooth, return the cake to the refrigerator until the frosting is firm.
Sixth, carve the jack-o-lantern
Roll your black fondant out on a powdered sugar-dusted surface. Use a small carving knife to cut out the nose, eyes and mouth.
Position the fondant onto your cake and use the small pairing knife to trace around the fondant pieces. Remove the fondant from the cake and use your knife to carve out the features.
Gently press the fondant features into the carved areas.
Finally, decorate the cake
To finish off your cake, you can fill the center with sprinkles and candy, or make your own fondant candy decorations. Finish with a clean piece of black wire for the handle.
Tips for making this Halloween cake
- Only make as much batter as you can bake immediately: If you only have one 6-cup bundt pan, make half the batter at a time. This may be a little more work, but it'll result in much better cakes.
- Greasing a bundt pan: Getting your bundt cake out of the pan depends, in part, on it being well greased. One of my favorite options is a homemade cake release that's equal parts vegetable oil, shortening and flour. Mix those three ingredients together, until smooth, and coat the pan liberally.
- Releasing a bundt cake: Bundt cakes can be tricky to get out of the pan, even in a well-greased one. To improve your odds, be sure to turn you cake out while the pan is still hot (I usually do this about 5 minutes after it comes out of the oven).
- Air bubble-free frosting: If the frosting has a lot of air bubbles, reduce the speed on your stand mixer to low and beat for 3-5 minutes, or until smooth.
- Use a frosting that crusts: A homemade, crusting buttercream frosting will work better than the store bought variety for this cake and technique. You can use a Swiss meringue, Italian meringue or American buttercream.
- Keep your fingers free of frosting while you're creating the ridges: You'll want to keep your fingers free of any excess frosting so it doesn't smudge or scratch the frosting your working with. I recommend having a dry paper towel on hand so you can frequently wipe your fingers.
- Storage: This cake will keep at room temperature, uncut, for 3-4 days. For best results, cover it with a plastic lid, bowl or place it in a cardboard box.
- Storing cut cake: Once your cake is cut, you’ll want to protect the exposed cake area. The easiest way to do this is with a piece of plastic wrap or two.
Did you make this recipe? I’d love to hear how it went in the comments below. Better still, snap a photo and tag it on Instagram with #thesimplesweetlife. I love seeing your creations!
PrintRecipe
Jack-O-Lantern Treat Bucket Cake
Not a fan of fondant? No problem! This cute Halloween cake is almost all buttercream goodness.
- Prep Time: 2 hours 30 minutes
- Cook Time: 30 minutes
- Total Time: 3 hours
- Yield: 16 slices 1x
- Category: Dessert
- Cuisine: American
Ingredients
For the bundt cakes:
- ½ cup whole milk
- ½ cup unsalted butter
- 3 eggs
- 1 ½ cups granulated sugar
- 1 tsp vanilla extract
- 2 tsp baking powder
- 1 ½ cup all purpose flour
For the vanilla buttercream frosting:
- 10 egg whites
- 2 ¼ cup granulated sugar
- 10 tbsp water
- 1.25 lb unsalted butter, cold
- 1 tsp vanilla extract
Other supplies:
- Orange gel food coloring
- 2 oz black fondant
- Black wire
- Assorted candies and sprinkles
Instructions
- In a bowl, combine the milk and butter for the cake, and microwave using 20 second increments until you can stir the mixture smooth.
- In the bowl of a stand mixer, whip the eggs and sugar until light and fluffy. Add the dry ingredients and mix on low until just combined. Repeat with the remaining ingredients.
- Pour into two well-greased 6 cup bundt pans. Bake at 350F for 25-30 minutes or until a toothpick inserted in the cake comes out clean.
- In a small saucepan, combine the water and granulated sugar for the frosting over high heat and bring to a boil, cooking until the sugar becomes clear. While the syrup cooks, whip your egg whites until stiff peaks form.
- Pour the sugar syrup into the egg whites (with the mixer on high) and whip until cooled to room temperature.
- Decrease the mixer to low, add the butter and vanilla extract, and continue beating on high until the frosting is thick and smooth.
- Reduce the mixer to low, add the orange food coloring and continue beating on low for 5 minutes.
- Spread the frosting onto the flat side of one of the bundt cakes. Top with the other bundt cake.
- Spread a thin layer of frosting around the entire outside of the cake. Use your spatula to create grooves to guide your piping later.
- Refrigerate until the frosting is firm.
- Spoon the remaining frosting into a piping bag with a medium-size round tip (like a Wilton 2A). Pipe ridges onto the cake between the grooves you created.
- Refrigerate the cake until the frosting "crusts."
- Remove the cake from the refrigerator and use your fingers to gently rub the ridges smooth.
- Refrigerate the cake again until the frosting is firm.
- Roll out the black fondant on a powered sugar-dusted surface and use a small pairing knife to cut out the nose, eyes and mouth.
- Place the fondant on the cake and trace around them with your knife. Remove the fondant and use your knife to carve out the eye, nose and mouth area.
- Gently press the fondant back into the carved out areas.
- Top with candies, sprinkles and a clean, black wire for the handle.
Notes
- Only make as much batter as you can bake immediately: If you only have one 6-cup bundt pan, make half the batter at a time. This may be a little more work, but it'll result in much better cakes.
- Greasing a bundt pan: Getting your bundt cake out of the pan depends, in part, on it being well greased. One of my favorite options is a homemade cake release that's equal parts vegetable oil, shortening and flour. Mix those three ingredients together, until smooth, and coat the pan liberally.
- Releasing a bundt cake: Bundt cakes can be tricky to get out of the pan, even in a well-greased one. To improve your odds, be sure to turn you cake out while the pan is still hot (I usually do this about 5 minutes after it comes out of the oven).
- Air bubble-free frosting: If the frosting has a lot of air bubbles, reduce the speed on your stand mixer to low and beat for 3-5 minutes, or until smooth.
- Use a frosting that crusts: A homemade, crusting buttercream frosting will work better than the store bought variety for this cake and technique. You can use a Swiss meringue, Italian meringue or American buttercream.
- Keep your fingers free of frosting while you're creating the ridges: You'll want to keep your fingers free of any excess frosting so it doesn't smudge or scratch the frosting your working with. I recommend having a dry paper towel on hand so you can frequently wipe your fingers.
- Storage: This cake will keep at room temperature, uncut, for 3-4 days. For best results, cover it with a plastic lid, bowl or place it in a cardboard box.
- Storing cut cake: Once your cake is cut, you’ll want to protect the exposed cake area. The easiest way to do this is with a piece of plastic wrap or two.
Nutrition
- Serving Size: 1 slice
- Calories: 567
- Sugar: 50.5g
- Sodium: 283mg
- Fat: 35.9g
- Saturated Fat: 22.3g
- Carbohydrates: 59.8g
- Fiber: .3g
- Protein: 5.3g
- Cholesterol: 127mg
Keywords: halloween cake, jack o lantern cake, pumpkin cake
If you liked this recipe, you might also like...





Sue says
I love, love , love this! What a creative cake!! The photos and instructions are wonderful too...
★★★★★
Amanda says
This is the cutest Halloween cake, and I just love the photo with your sweet cat! I'm ready for all things Halloween, so I can't wait to make this. Thanks for sharing!
★★★★★
Amy Dong says
Claire! How talented are you? 🙂 This bundt-turned-jack 'o lantern cake is so creatively done. Super adorable for all of October!
★★★★★
Leslie says
This is seriously the cutest Halloween cake I've ever seen! So creative and fun! YUM!!!
★★★★★
Paula Montenegro says
I can go as far as the bundt cakes, haha! This is a wonderful cake and much simpler than it looks, even for someone like me. Beautiful Halloween idea to decorate with kids!
★★★★★
Veena Azmanov says
This is really cute, creative and festive. Awesome presentation.
★★★★★
Tammy says
This is SO cute and creative! OMG what a fun idea for Halloween...I'd love to try this out for my party 😀 That is such a perfect slice! The cake looks so soft and frosting is so creamy <3
★★★★★
Marisa F. Stewart says
What an adorable Halloween cake. And what's ever better it also serves as a centerpiece. You've got dessert and a decoration all in one. That slice you've cut has me wishing I was the recipient of that piece.
★★★★★
Eden says
This is literally the cutest cake EVER!!!! Oh my gosh! It was such a hit at our party! We can't wait to make it again!
★★★★★
Jess says
Oh my goodness! You are so talented. What a beautiful and festive cake!
★★★★★
Aline says
Awwww I love this and will totally try to make it this halloween!! Yay! Thanks for the instructions!
★★★★★