

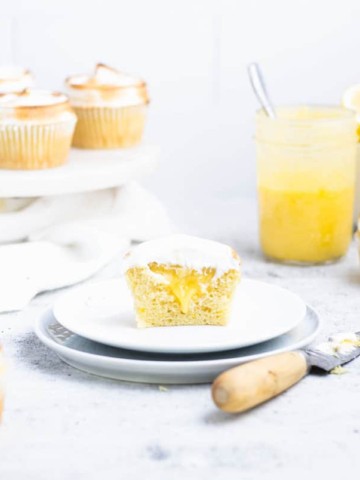
New to the wonderful world of cookie decorating? Here are 10 tips to set you up for cookie decorating success! You'll find everything you need to know about common royal icing mistakes, making custom cookie shapes without a traditional cutter, stenciling without fancy equipment and more.
Disclaimer: Please note that some of the links below are affiliate links and I will earn a commission if you make a purchase using those links. I use all of the products included in this post and recommend them because they are products I personally love and trust. All affiliate links are clearly marked.
As anyone who's started something new knows, the hardest part is, inevitably, getting all of the information you need to be successful. It's often a time marked by trial and error (and in the case of my cookie decorating journey... So. Much. Error) and a whole lot of "I wished I'd known that!"
And after decorating cookies for over 10 years, I'm putting everything I've learned the hard way into this short and sweet little post.
So if you’re new to cookie decorating and don’t know where to start, this is a great place to be! Let’s take some of that guess work out of your decorating endeavors.
Jump to:
- 1. Always make more royal icing of each color and consistency than you think you'll need
- 2. Dough thickness makes a difference
- 3. Freeze your cut-out cookies for 5 minutes
- 4. You don't need a custom cookie cutter to make a custom shape
- 5. You don't need to pipe AND flood your base layer of royal icing
- 6. Watch out for bleeding with royal icing transfers
- 7. You can stamp your cookies for some quick and easy decorating
- 8. You don't need a fancy projector to transfer designs to your cookies
- 9. Invest in some edible food markers
- 10. There's cookie inspiration everywhere
- Bonus: Don't throw out your leftover icing
1. Always make more royal icing of each color and consistency than you think you'll need
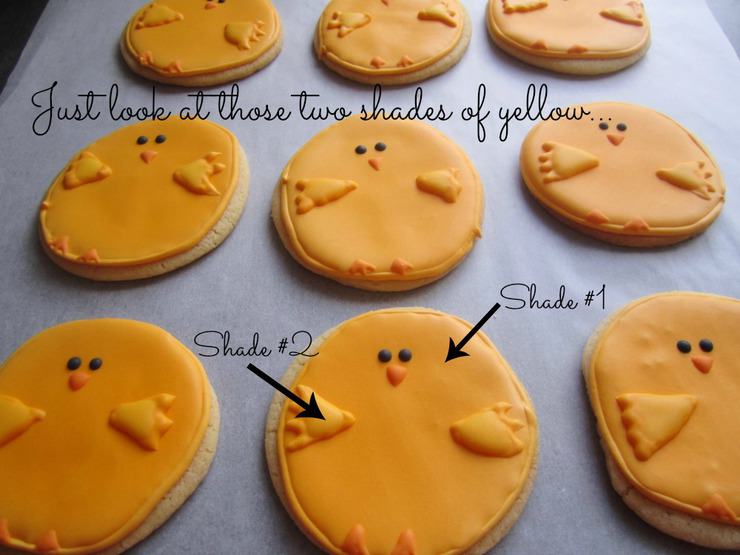
I made the mistake once, and ONLY once of not coloring enough royal icing for my cookies. If you're working with uncolored royal icing, it's not big deal because you won't notice slight differences in consistency once the icing has dried.
BUT, if you're working with colored icing, it's very hard to get the color just right. And in case you didn't know, icing darkens as it dries.
2. Dough thickness makes a difference
When I first started making sugar cookies to decorate, I'd had a long history of making pastries but not so much cookie cutouts. My instinct was to make my sugar cookies thinner so I could get more mileage out of the dough.
Unfortunately, going too thin will cause your cookies to spread, lose their shape and develop an uneven surface. When rolling out your dough, you really don't want it to be thinner than about ¼".


3. Freeze your cut-out cookies for 5 minutes
I no longer remember where I read this, but I remember reading several bakers' suggestions to cut out and refrigerate or freeze the unbaked cookies for about 5 minutes. The extra dose of coolness will help your cookies retain their shape and keep from spreading in your hot oven.
Cookies with a higher proportion of flour are also less likely to spread. You can find my go-to sugar cookie recipe here on the blog.
4. You don't need a custom cookie cutter to make a custom shape
It's natural when you come up with a cookie you want to make to immediately go in search of a corresponding cutter. However, you can make a lot of different designs simply by turning your cutters in different directions or by combining cutters you already have.
For an awesome example, check out this Christmas elf out of a snowman cutter by Make Me Cake Me or these grim reaper cookies by Semi Sweet Design. If you're not sure where to start with your cookie cutter collection, Sugarbelle has a great post on the 20 cutters every cookie decorator should have.
If that's just not doing it for you, you can also make your own cookie stencils or tinfoil cookie cutters.
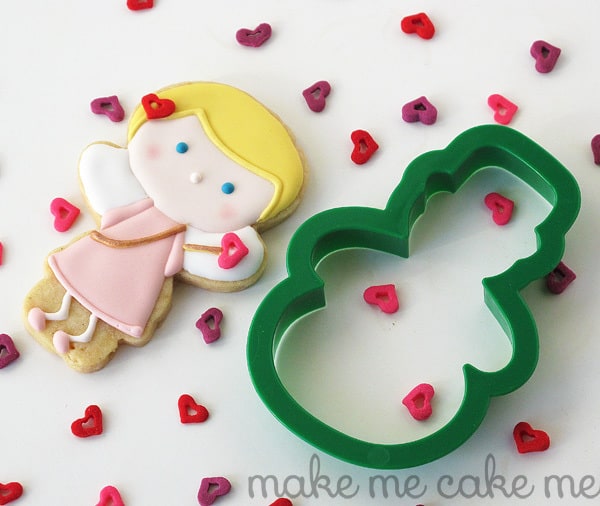
Photo courtesy of Michelle from Make Me Cake Me
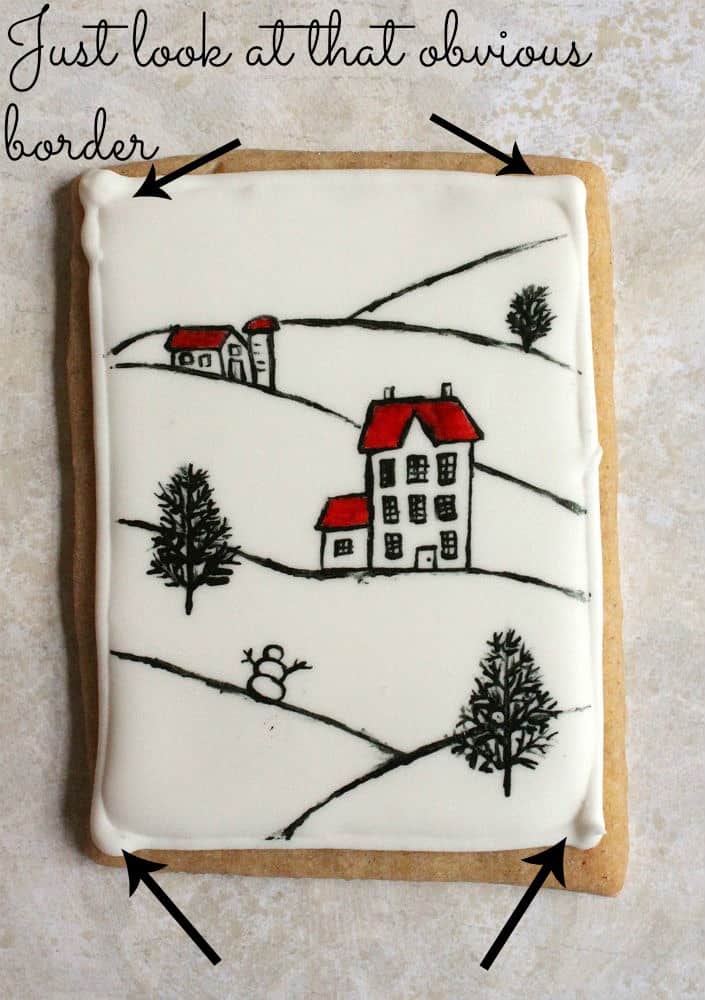
5. You don't need to pipe AND flood your base layer of royal icing
I love cookie decorating, but I kind of hate mixing up two consistencies of every color of icing I'm going to use. And I have an awfully hard time getting my piping icing to blend with my flood icing when I'm giving my cookies a base coat.
If you haven't totally given up on this method, Sugarbelle has a good tutorial on how to achieve an invisible border.
But if you're like me and you struggle to get that perfectly seamless border around your flood icing, you're in luck! A stiffer consistency icing, like a 20-second icing, is perfect for covering an entire cookie, no border or flood icing needed.
For an in-depth tutorial on how I ice my cookies, check out my royal icing tutorial.
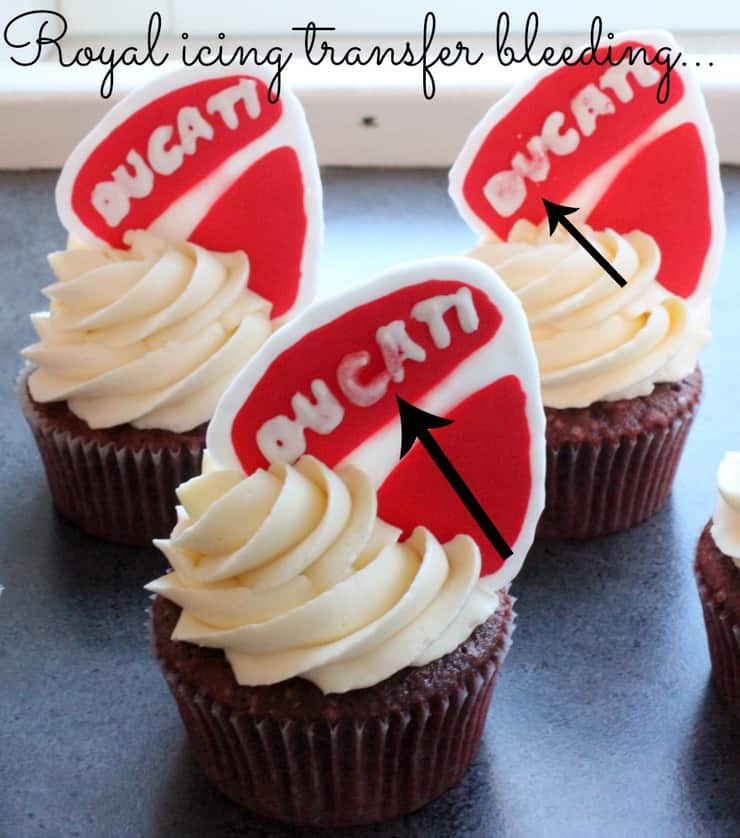
6. Watch out for bleeding with royal icing transfers
For those of you not familiar with royal icing transfers, they involve piping a design onto parchment paper with royal icing, letting it dry, and then applying it something else (like cookies).
When I first started using royal icing transfers, I'd drop my transfer onto the wet surface of my royal icing. I quickly learned that if your royal icing transfer is a light color while the royal icing you're dropping it onto is a dark color, your transfer may very well soak up the dark coloring.
This doesn't always happen, but to be on the safe side, I now "glue" my transfers onto the surface of the dried royal icing with a little white royal icing.
7. You can stamp your cookies for some quick and easy decorating
Whether you're stamping your dough directly before baking or using food coloring to stamp a design on dried royal icing, stamps (clean, food-only stamps) can be a great way to give your cookies some extra flair without too much extra time and work.
Mike over at Semi Sweet Designs has a great tutorial on using food coloring and stamps to create beautiful chalkboard art cookies.
I've even seen people use stuff like lace to emboss their cookies. Either way, the results are pretty stunning!

Picture courtesy of Mike at Semi Sweet Design
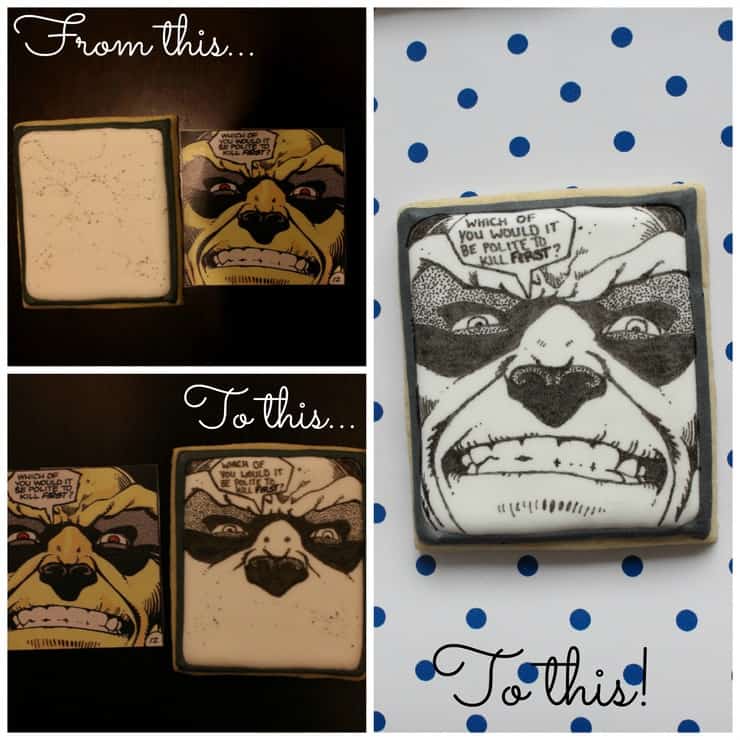
8. You don't need a fancy projector to transfer designs to your cookies
Admittedly, I definitely would not say no if someone offered me a kopykake and it's definitely on my list of "things I'd buy if I opened my imaginary bakery."
That being said, there are tons of workarounds you can use in the meantime! For one thing, you can use royal icing transfers. Mike over at Semi Sweet Designs has a great post where he does a side-by-side comparison of a design using royal icing transfers, and the same design using a kopykake.
Of course, royal icing transfers don't work for everything. Sometimes the design has details that are simply too small, and other times you may not want to do the design entirely in royal icing.
I wrote a post a while back about how I transfer a basic design outline using tissue paper, an edible pen, and a small needle/pushpin. Although it involves some extra time and work, it can definitely help give you a place to start.
9. Invest in some edible food markers
There are SO many uses for edible food markers. I seriously cannot stress their versatility enough!
They're fantastic for drawing on your cookies to outline where you're going to put your icing, you can make hand drawn designs on royal icing with them, they're perfect for adding small details...
Take home message: go buy yourself some food markers! I would suggest at least investing in some black markers with fine and thick tips. Personally, I use Rainbow Dust's double end pen in Jet Black (affiliate link). If you're looking for a good starter pack with multiple colors, FooDoodler has a great set (affiliate link).
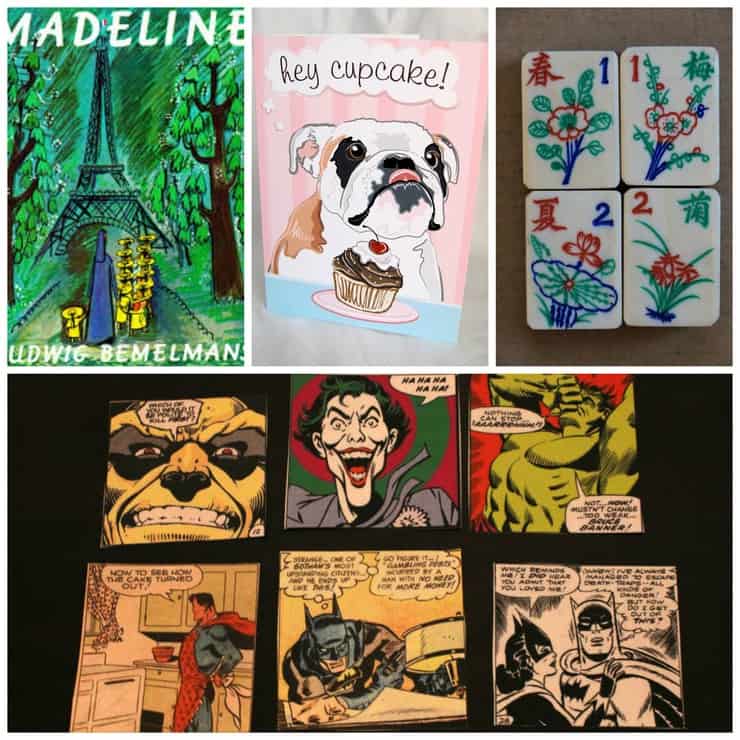
10. There's cookie inspiration everywhere
Just ask a cookier about where they find their inspiration and they'll probably tell you everywhere. Seriously, it's true! I try not to Google cookie designs when I'm in need of inspiration. It just gets my mind stuck in things that have already been done.
Instead, I'll look around my house, go to the store, take a walk... And I always have my phone or camera with me so I can snap a picture if I find something I want to cookie.
I also keep a small spiral binder for drawing my designs, or at the very least, writing a description of how I see the designs. Once you start finding your inspiration, being inspired probably won't be a problem.
The problem will be having enough time to make all the designs that are in your head.
Bonus: Don't throw out your leftover icing
For years I made more icing than I knew I'd need and then wondered what to do with all of the leftovers. While there are a number of ways to save icing for a limited amount of time, I rarely had a project in mind for the oddball colors I had on hand.
Luckily, there are still lots of things you can do with that leftover icing. From making your own sprinkles (yes, you read that right and it's every bit #bakinggoals as it sounds) to making Oreo pops, I have some fun suggestions in my 6 ways to use leftover royal icing post.
If you found this helpful, you might also like...
- Royal icing basics + recipe
- How to make cut-out sugar cookies like a pro
- Making custom cookie shapes
- Creating dimension with royal icing
For more great resources:
- How to Bake the Perfect Sugar Cookie
- A Beginner's Guide to Cookie Decorating Supplies
- Painting on Cookies
- Using Stencils
- Brush Embroidery
- Beginner's Guide to Cookie Decorating
Update Notes: This post was originally published in February of 2014 but was republished with more photos and tips in January of 2019.

Michelle @ MakeMeCake.Me says
A fantastic post with TONS of useful tips! I would literally second everything you included! And of course, thanks for thinking of my work and for the shout-outs 😉
The Simple, Sweet Life says
Thanks for letting me use one of your pictures! 🙂 I never cease to be amazed with how many designs you can get out of a single cookie cutter! 😀
Debbie says
Thanks. Great ideas confirming my own cookie decorating trial an errors.
Sue says
This is such a well written, beautifully illustrated set of great ideas and tips! Thank you so much for sharing all that you've learned 🙂
Dawn says
Love all these tips! I don't often make decorated cookies, but this definitely inspires me to do so! Some of them are like little works of art!
Sarah says
If you're just using the edible pen as a guide for where you will ice details or a design, will the Rainbow Dust pen you recommend bleed through or be visible through a lighter or brighter color icing?
Lori says
Great tips! Thank you!!!
Patricia Bell says
This truly is a great post! Recipes,tips, ideas &all in one place. Your cookies are beautiful! I believe there is hope for me yet! Thank you for sharing.
Jeanne James says
Wonderful post!!! How nice of you to share such useful information! Beautiful work by the way! ❤️
Heather says
These are awesome tips! I was debating buying the Kopycake but now I think I'll hold off and see how I do with your method. Thanks!
Misty Palombo says
I'm trying to create basic wedding cake cookie for my daughter's bridal shower. However I can't get the right consistency with royal icing to add some basic decoration to the wedding cake shape. any ideas or video tutorials?
Terry says
Can you tell me how to paint on details, like gold, on cookies. I have tried mixing dust with some kind of alcohol, but the gold isn't thick enough. I'm thinking I'm doing it wrong. Any suggestions?
I put a pile of luster dust in a little cup, then put a drop or two of rum in it, and tried to paint that on for a unicorn horn. It was sort of shiny gold, but mostly see thru. Not what I wanted.
Also a good method for painting on cheeks, like blush.
Amy says
How long in advance of an event can you make the cookies?
Bre says
This was so useful for a beginning decorator! Thank you for sharing all your tips. I’m a cake decorator and everyone keeps asking me for cookies so I’m taking the leap. Reading this makes the process seem a little less intimidating.
Penny says
Cookie decorating...my final frontier of Cooking Things I Totally Screw Up. (Well, besides biscuits, pie crusts and fried corn...)
This is amazing! I’m ready to dig out those a-hole cookie cutters and show them who’s boss in this kitchen! Thanks so much! I feel like it’s a whole new day!!
Jan says
Hi Claire! Thank you so much for sharing this invaluable information with us. I came across this post by accident, but it looked so interesting I read every bit of it and was amazed. I have never decorated a cookie and you have now inspired me!
Nicole says
Thank you so much for all the tips! I've always loved baking, but the current state of the world (and being at home a lot more) makes me want to branch out and try cookie decorating!
Kelli says
Thanks for the awesome tips.