
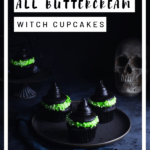
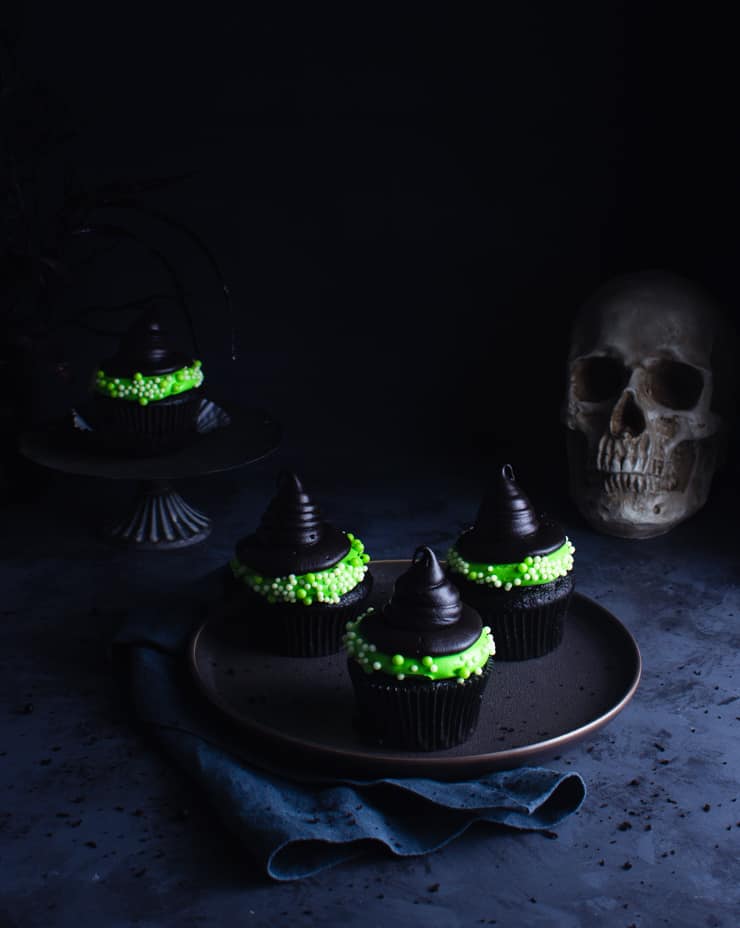
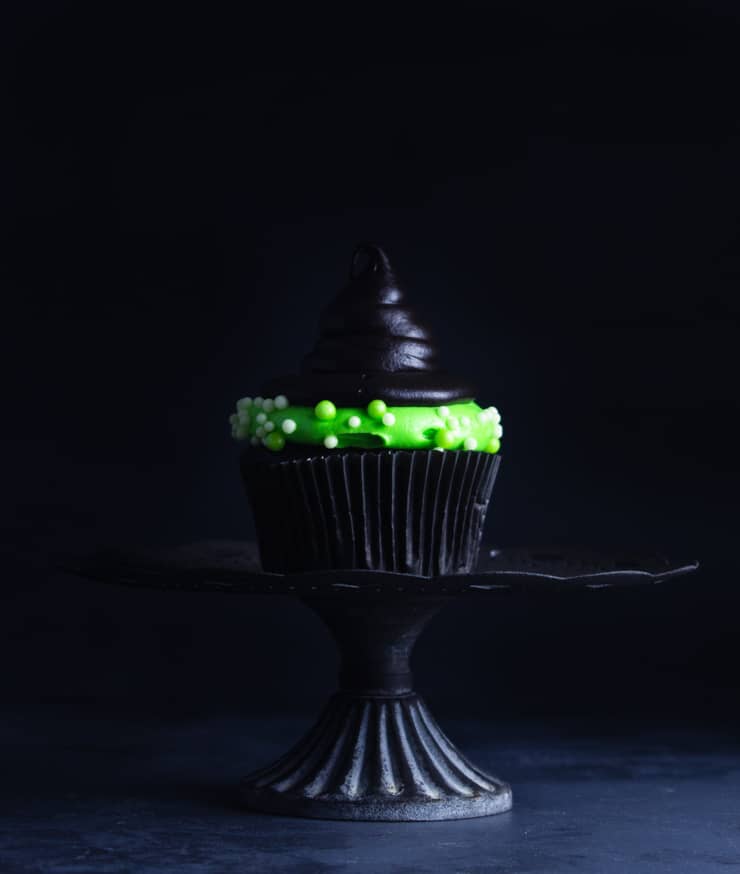
No need to break out the fondant because these witch hats are pure frosting goodness! Whether you’re throwing a Halloween party for the kids or just throwing it down at the office potluck, these cupcakes are sure to delight ghouls both big and small! And with the help of some store-bought frosting and cupcakes, they come together in just 30 minutes.
Disclaimer: Wilton provided me with some of the products I used to make these cupcakes, but all words and thoughts are my own.
You guys know that I love a good fondant creation now and again. But I think we all know that fondant is ex-pen-sive and most people just peel it off anyway. Ain’t nobody got time to make stuff people aren’t even going to eat! Also, who doesn’t want more frosting in their life?!
Which is exactly why you’re going to LOVE these all-frosting witch hat cupcakes. They have all the cuteness of those fondant witch hat cupcakes but with none of the extra work. Plus, you know, they’ve got lots of frosting going for them.
Prefer to watch the process?
How to make witch hat cupcakes
These cupcakes are SO easy to make! And with the help of some store-bought frosting and cupcakes, they come together in just 30 minutes. What’s not to love about that?
Here’s how to make them:
First, you’ll need 12 cupcakes and 2 ½ cups vanilla frosting (about 1 ½ store-bought containers) and 1 ¾ cup chocolate frosting (about 1 store-bought container). Tint your frosting lime green and your chocolate frosting black.
To get this exact shade of green, I used Wilton’s color right system. It took 37 drops yellow and 4 drops blue.
Second, scoop your green frosting into a piping bag and, using a large round tip (like an Ateco 809), pipe a swirl of frosting onto the tops of each cupcake. Add some green nonpareils (like these adorable sprinkles from Wilton).
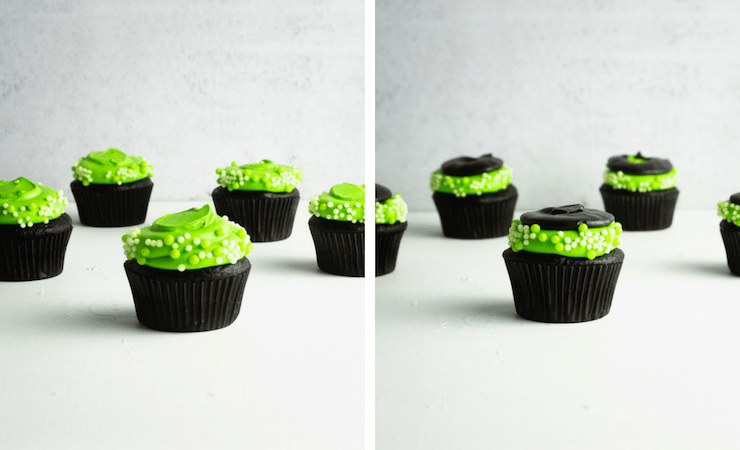
Third, scoop ⅓ of your black frosting into a piping bag with a Wilton 127 tip. With the narrow end of the tip in the center of your cupcake, turn the cupcake while piping to create the brim of the hat. Repeat for each cupcake.
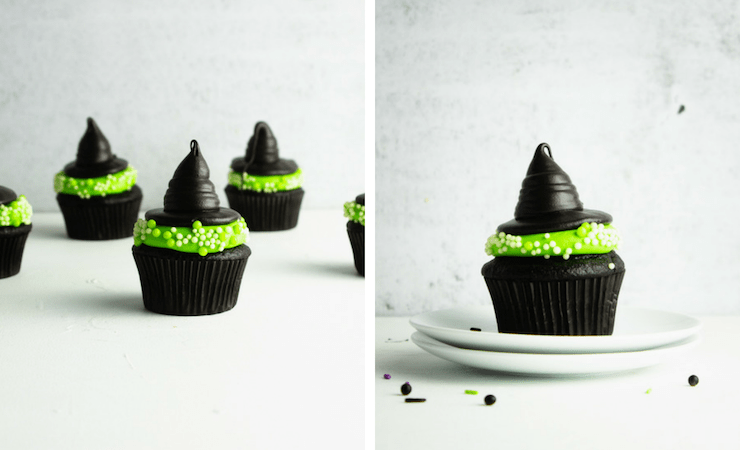
Finally, scoop the remaining black frosting into a bag with a large round tip (like the Ateco 809). Pipe a large dollop of frosting in the center of the cupcakes and release the pressure as you pull up to create the tapered end of the hats.
How to make perfect witch hat cupcakes
If you haven’t worked with all-frosting creations much, no worries! Here are some expert tips to help you make these cupcakes perfectly the first time around.
- A fluffy frosting pipes more easily than a thick buttercream. If you’re making your own, an Italian or French meringue buttercream work best. If you’re buying something from the store, try a “fluffy” vanilla frosting and a “creamy” chocolate frosting.
- Want the same shades of frosting? Using Wilton’s color right system, I used 37 drops of yellow and 4 drops of blue for the lime green. The black took 50 drops of black.
- To get really black frosting you have to add a lot of black food coloring. This will change the consistency of your frosting and may make it too soft to use initially. If this happens, simply refrigerate it for 30-45 minutes until it’s firmed up.
- Fill that piping bag like a pro: Spoon your frosting onto a large piece of plastic wrap, roll and twist the ends. Trim one end so there’s about ½" in length, drop your frosting into the piping bag (short end first) with the tip already on and pipe!
- Make sure you have the right piping tips for the job. Here are all of the tips I used and how I used them:
- Initial layer of green frosting: Ateco 809
- Hat brim: Wilton 127
- Hat body: Ateco 809
- Storing frosted cupcakes: While cupcakes are always best when eaten the same day they’re made, these can be stored in an air-tight container at room temperature for 1-2 days.
Did you make this recipe? I’d love to hear how it went in the comments below. Better still, snap a photo and tag it on Instagram with #thesimplesweetlife. I love seeing your creations!
PrintRecipe
The Easiest Witch Hat Cupcakes

No need to break out the fondant because these witch hats are pure frosting goodness! Whether you’re throwing a Halloween party for the kids or just throwing it down at the office potluck, these cupcakes are sure to delight ghouls both big and small! And with the help of some store-bought frosting and cupcakes, they come together in just 30 minutes.
- Prep Time: 30 minutes
- Total Time: 30 minutes
- Yield: 12 cupcakes
- Category: Dessert
- Method: Baking
- Cuisine: American
Ingredients
- 12 cupcakes
- 2 ½ cups vanilla frosting
- 1 ¾ cups chocolate frosting
- Wilton color right food coloring in yellow, blue and black
- Wilton 127 tip
- Ateco 809 tip
- Sprinkles
Instructions
- Tint your vanilla frosting lime green and your chocolate frosting black.
- To get this exact shade of green, I used Wilton’s color right system. It took 37 drops yellow and 4 drops blue.
- Scoop your green frosting into a piping bag and, using a large round tip (like an Ateco 809), pipe a swirl of frosting onto the tops of each cupcake.
- Roll the sides of your frosting in sprinkles (if using).
- Tint your chocolate frosting black. I used approximately 50 drops of Wilton’s color right system in black.
- Scoop ⅓ of your black frosting into a piping bag with a Wilton 127 tip.
- With the narrow end of the tip in the center of your cupcake, turn the cupcake while piping to create the brim of the hat. Repeat for each cupcake.
- Scoop the remaining black frosting into a bag with a medium round tip.
- Pipe a large dollop of frosting in the center of the cupcakes and release the pressure as you pull up to create the tapered end of the hats.
Notes
- A fluffy frosting pipes more easily than a thick buttercream. If you’re making your own, an Italian or French meringue buttercream work best. If you’re buying something from the store, try a “fluffy” vanilla frosting and a “creamy” chocolate frosting.
- Want the same shades of frosting? Using Wilton’s color right system, I used 37 drops of yellow and 4 drops of blue for the lime green. The black took 50 drops of black.
- To get really black frosting you have to add a lot of black food coloring. This will change the consistency of your frosting and may make it too soft to use initially. If this happens, simply refrigerate it for 30-45 minutes until it’s firmed up.
- Fill that piping bag like a pro: Spoon your frosting onto a large piece of plastic wrap, roll and twist the ends. Trim one end so there’s about ½" in length, drop your frosting into the piping bag (short end first) with the tip already on and pipe!
- Make sure you have the right piping tips for the job. Here are all of the tips I used and how I used them:
- Initial layer of green frosting: Ateco 809
- Hat brim: Wilton 127
- Hat body: Ateco 809
- Storing frosted cupcakes: While cupcakes are always best when eaten the same day they’re made, these can be stored in an air-tight container at room temperature for 1-2 days.
Mimi says
OMG They look awesome! I need to try to make them
Paula @ I'm Busy Being Awesome says
Super spooky recipe, you pretty much got the perfect shade of green!
Annette Dattilo says
Those really are cute. You did a great job explaining the process. Thanks for sharing.
Heather Perine says
Oh these are sooooo cute!! Love the step by step tutorial as well. Definitely following along with you! Love your stuff.
Sue says
I love these.... spooky, spooky!
Leigh Suznovich says
Oh these look so amazing for a Halloween treat! So cute.
Indya | The Small Adventurer says
These look awesome! I love the use of sprinkles as bubbles - so creative ☺️
Karen Roldan says
The witch cupcakes look good! I have been planning to bake cupcakes for quite a while now, but I haven't done it yet. I'll add this to my list, thanks for sharing!
Noel Lizotte says
Such a fun treat for the school party! Heck, I'd take them in to the office as well!
Jill says
These look so cool. Definitely need to make them. Thanks for sharing.
Veena Azmanov says
Aww, these are so cute. My kids would be all over these. Love how black you managed to get the buttercream. Perfect for Halloween.
Kiki Johnson says
These look absolutely perfect and I love that you don't need to buy any edible sugar pearls and what no to give them a proper Halloween Look! Aweseom job on the piping! Chapeau!
Michelle says
These are amazing! Perfect for Halloween parties and I love the step by step guide, perfect for making with the kids Xx
Anne Lawton says
These are so cute. Just perfect for Halloween celebrations. Thanks for sharing this recipe!
Karyl Henry says
These are so cute! I saw another witch hat recipe online the other day, but looked way too involved...yours is exactly the opposite, which is why I love it! Perfect for entertaining or kid's parties
Katie Crenshaw | A Fork's Tale says
Awe... these are so fun and cute. I love them. I am definitely going to make a batch for Halloween. My family and friends will enjoy them so much!
Jagruti Dhanecha says
OMG..these witch cupcakes look so cute and fun. Just loving the colour scheme and your pictures are gorgeous, perfect set and moody.
Daniela says
I can't believe that these cupcakes take only 30 minutes to make! They are so beautiful and creative. Thank you for the great recipe!
Tammy says
Your cupcakes came out beautiful! You make it look so easy. I'm definitely feeling inspired to pipe some little witch hats onto my cupcakes now....perfect holiday treat!
Jacque Hastert says
These are adorable! So easy and creative to throw together.