
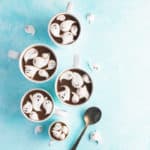
These homemade ghost marshmallows are sure to delight all the boys and ghouls this Halloween! Whether you're enjoying hot cocoa, a spooky s'more or just looking to learn some marshmallow making basics, this post has you covered!
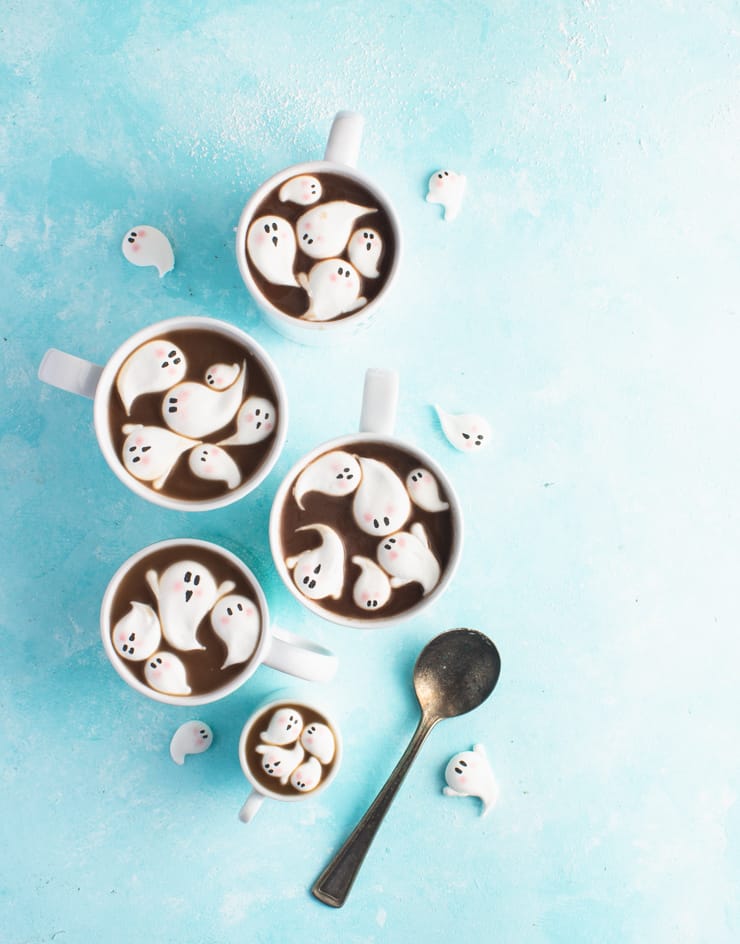
Homemade marshmallows are one of my favorite things to make. They're fun, the possibilities really are endless, and people are always impressed. But I'll let you in on a little secret: hand piped marshmallows like these are super easy to make. No, really. The hardest part is having the patience to wait for them to dry out over night.
Prefer to watch the process?
How to make marshmallow ghosts
First, make your marshmallow. You'll need to prepare your gelatin, make a sugar syrup, and whip up some egg whites. Add your gelatin to your syrup, combine with your egg whites, and whip until fluffy.
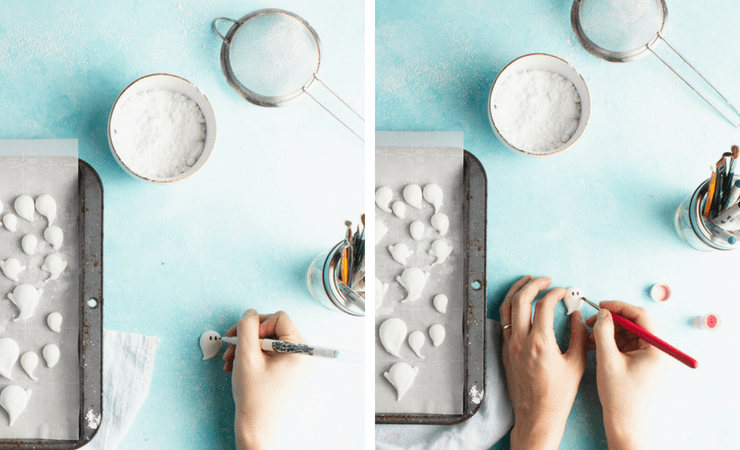
Second, pipe your marshmallows onto powdered sugar dusted parchment paper. Personally, I like to make ghosts of varying sizes, but you could do all large ghosts if you're pressed for time and don't want to make as many. I also added little arms to some of mine.

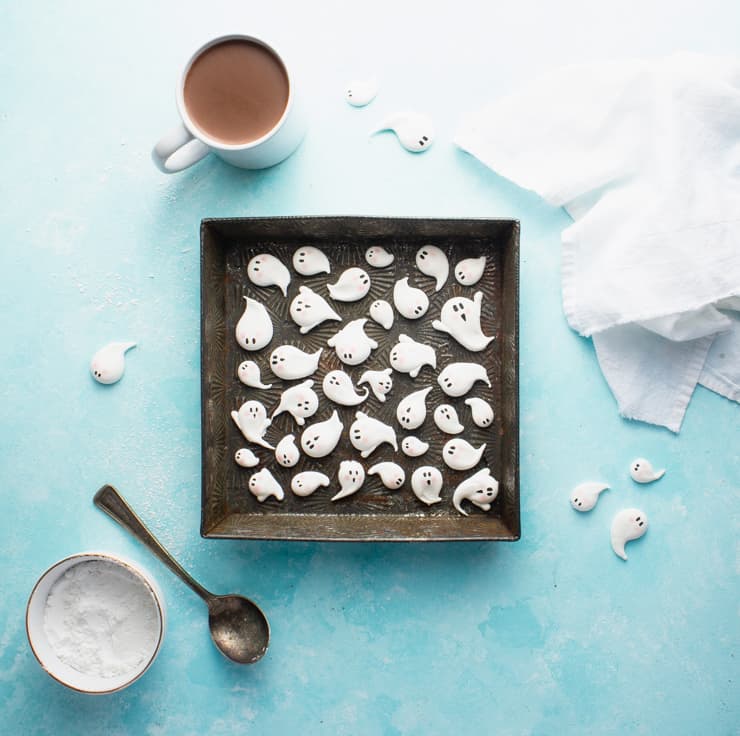
Third, wait for the marshmallows to dry (preferably over night, but at least 8 hours).
Fourth, coat in powdered sugar and decorate! I added simple faces to them using a black food marker and some pink powdered food coloring.
How to make perfect marshmallow ghosts
Never made hand piped marshmallows? No worries! Here are some quick tips to help you make them right the first time around:
- Hand piped marshmallows are all about consistency. You'll want to whip your marshmallow until light and fluffy but still very malleable. You've nailed your consistency if you can pick up a spoonful of your freshly whipped marshmallow, drop it back into the bowl, and it reabsorbs in about 20 seconds.
- Once your marshmallow is the right consistency, put it in a piping bag and pipe immediately. Marshmallow will slowly firm up, even in a warm room, so you'll want to pipe your marshmallow immediately.
- If your marshmallow gets too firm to work with, no worries. You can get it back to the right consistency by microwaving it using 5 second increments.
- Grease AND dust your parchment paper with powdered sugar to make peeling off those marshmallows a breeze.
- After drying overnight, the tops of your marshmallows will still be slightly sticky. Roll them in powdered sugar until they're no longer sticky, and then brush them off so the powdered sugar doesn't gum up your food marker.
- Storage: homemade marshmallows will keep for about a month when stored in an airtight container in a cool place.
Did you make this recipe? I’d love to hear how it went in the comments below. Better still, snap a photo and tag it on Instagram with #thesimplesweetlife. I love seeing your creations!
PrintRecipe
Marshmallow Ghosts
These homemade ghost marshmallows are sure to delight the boys and ghouls in your life this Halloween! Whether you're enjoying hot cocoa, a spooky s'more or just looking to learn some marshmallow making basics, this post has you covered!
- Prep Time: 8 hours
- Cook Time: 5 minutes
- Total Time: 8 hours 5 minutes
- Yield: ~70 marshmallows
- Category: Dessert
- Cuisine: American
Ingredients
- ¼ cup light corn syrup
- ¾ cup granulated sugar
- ¼ cup water + 2 tbsp.
- 2 egg whites
- 1 tbsp gelatin powder (1 packet)
- ½ tsp vanilla extract
- Powdered sugar (for dusting)
Instructions
- In a small bowl stir together the gelatin and 2 tablespoons of (ice cold) water. Set aside so the gelatin can absorb the water.
- In a small saucepan whisk together the corn syrup, granulated sugar, and ¼ cup water. Bring to a boil and allow to cook until a candy thermometer registers 235F/113C.
- In the meantime, beat your egg whites until they hold soft peaks.
- Once the sugar mixture reaches the right temperature, whisk in the gelatin (be careful with your hands because it’s likely to release hot steam when you do this) and stir to dissolve.
- Slowly add the hot mixture and vanilla extract to the egg whites and whip until light and fluffy (about 5-7 minutes).
- Cover a couple of baking sheets with parchment paper and dust with sifted powdered sugar.
- Spoon the marshmallow mixture into a piping bag and clip a small hole in the tip.
- To pipe the ghosts, pipe a circle of marshmallow. Ease up pressure on the piping bag and draw the marshmallow down and to a side to create a tail.
- Use the same technique to create arms.
- Allow your marshmallows to dry overnight.
- Gently peel the marshmallows from the parchment paper or dust a spatula generously with powdered sugar to gently lift them if they prove difficult.
- As you remove the marshmallows from the parchment, drag them through a small bowl of powered sugar to make sure they’re thoroughly coated. Dust them off so there's no excess powdered sugar to clog up your food marker.
- Using a food marker, add eyes. You can also use powdered pink food coloring to create rosy cheeks.
Notes
- Hand piped marshmallows are all about consistency. You want to whip your marshmallow until light and fluffy but still very malleable. If you pick up a spoonful of your freshly whipped marshmallow and drop it back into the bowl, it should reabsorb in about 20 seconds.
- Once your marshmallow is the right consistency, put it in a piping bag and pipe immediately. Marshmallow will slowly firm up, even in a warm room, so you'll want to pipe your marshmallow immediately.
- If your marshmallow gets too firm to work with, no worries. You can get it back to the right consistency by microwaving it in the microwave using 5 second increments.
- Grease AND dust your parchment paper with powdered sugar to make getting those marshmallows off a breeze.
- After drying overnight, the tops of your marshmallows will still be slightly sticky. Roll them in powdered sugar until they're no longer sticky, and then brush them off well so it doesn't gum up your food marker.
- Storage: homemade marshmallows will keep for about a month when stored in an airtight container in a cool place.
Marshmallow recipe adapted from Buttercream Blondie
Nutrition
- Serving Size: 1 marshmallow
- Calories: 12
- Sugar: 2.4g
- Sodium: 1mg
- Fat: 0g
- Saturated Fat: 0g
- Carbohydrates: 3g
- Fiber: 0g
- Protein: 2g
- Cholesterol: 0mg
Aditi Wardhan Singh says
These are so very adorable. I would loveeee these.
John Rhoe says
I will be welcoming spooks with these lil buggers.
Ali Gilbert says
Oh my goodness! This is ADORABLE! Pinning now so I can try it. My kids will love this!
Stephanie Kewin says
Beyond adorable idea! And so simple. Well done.
Lecy | A Simpler Grace says
Oh my gosh, these are the cutest! I am pinning this recipe so I can make these to go in hot chocolate when my niece and nephew come to go trick or treating!
Dawn - Girl Heart Food says
Seriously? These have got to be the cutest Halloween treat!! I'd have so much fun making these....and eating them 😉
Dawn - Girl Heart Food says
Seriously? These have got to be the cutest Halloween treat! I'd have so much fun making these...and eating them 😉
Amber Battishill says
These are seriously so adorable!! Pinning this because I have to make these adorable little ghosts!
Sue says
These have got to be.... "a few of my favorite things" ...ever!! And I love how easy you make them sound 🙂 Thanks for the tips.
Mariah Klee says
I cannot get over how cute these are!!! I'm totally making these for my Halloween cocoa while we walk the kids around the neighborhood.
Laura Kennedy says
This is by far my favorite Halloween post this year, I absolutely LOVE these and the photos are outstanding. Pinned!
Justine says
Unbelievably adorable!! I wouldn't even want to eat them. I have got to try making these myself.
lisa@hooplapalooza says
GAAAAH! I DIE AT THE COLOSSAL CUTENESS!!! :>D
Krisin Prough says
These are literally the cutest things I ever have seen!
Gloria says
These are super cute. I know my grandkids would love a batch of these for their hot chocolate. They would probably just eat them as is!!
Shelley says
Oh Claire! These are absolutely adorable! My very favorite part is the sweet, rosy little cheeks - that's a darling touch! Terrific step-by-step photos and great tips to make sure they come out perfectly, too!
Georgie says
Dying!!!! These are the cutest little ghosts I’ve ever seen!!! I love your simple step by step process to make them too!! They are the coolest thing I’ve seen in a long time!
Monica | Nourish + Fete says
These are so incredibly cute - I always prefer "cute spooky" to "creepy spooky," and these are right on the money! Halloween hot cocoa just got WAY more adorable and exciting!
Nicolas Hortense says
Claire, this is such a cool idea!! And I love how you put them into hot cocoa! Really nice work (:
Nicoletta Sugarlovespices says
They are amazing and I am always amazed at your skills! I would love to drink a cup of hot chocolate with those super cute marshmallow ghosts floating on top!! 🙂
Sam | Ahead of Thyme says
Wow, these marshmallow ghosts are sooo cute! And so creative! I am totally trying this for Halloween this year 🙂
Anne Murphy says
How adorable! I love the little arms... too cute. Perfect in hot chocolate on a chilly evening!
Sharon says
This is such a creative Halloween treat! I love them so much. Looks like they are very easy to make too.
Julie says
These are adorable!!! I love "cute" Halloween things so much more than spooky so these are right up my alley. I hope I have time to make them with my 3 year old before Halloween!
Holly says
Oh my goodness! These marshmallow ghosts are just adorable! Pinning to make soon!
Emily Leary says
These gorgeous marshmallow ghosts are so perfect for Halloween - the kids would love helping to make and eat them I'm sure! Thanks for a fab recipe!