
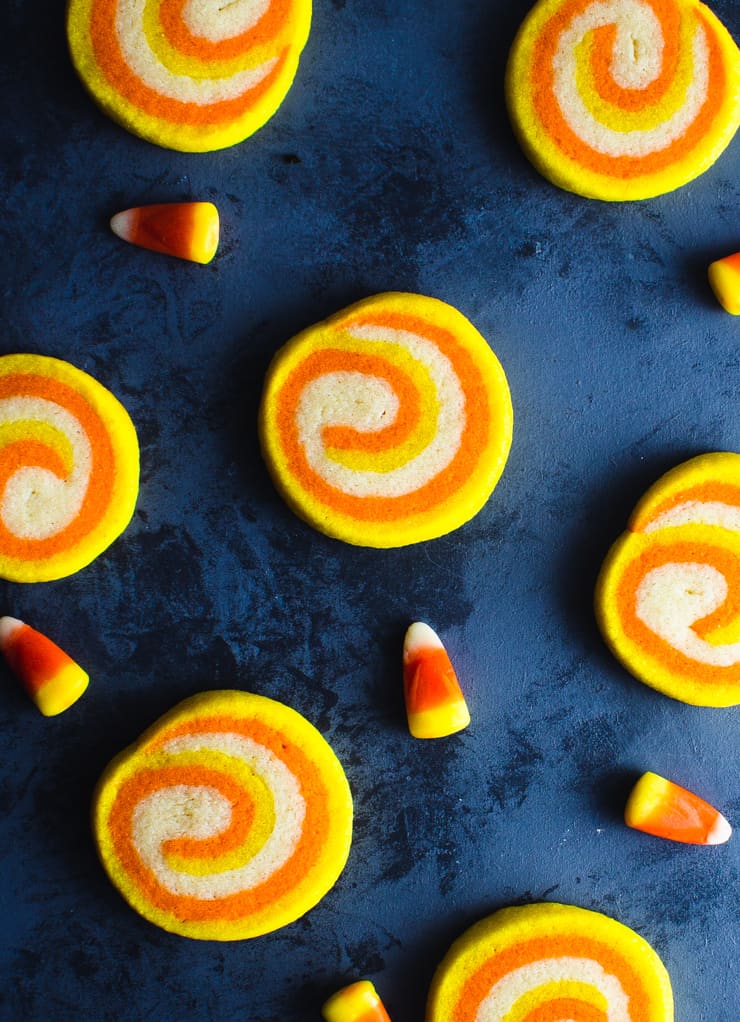
These 5-ingredient, candy corn cookies are decked out in true Halloween style! And best of all: they’re every bit as tasty as they are easy to make!
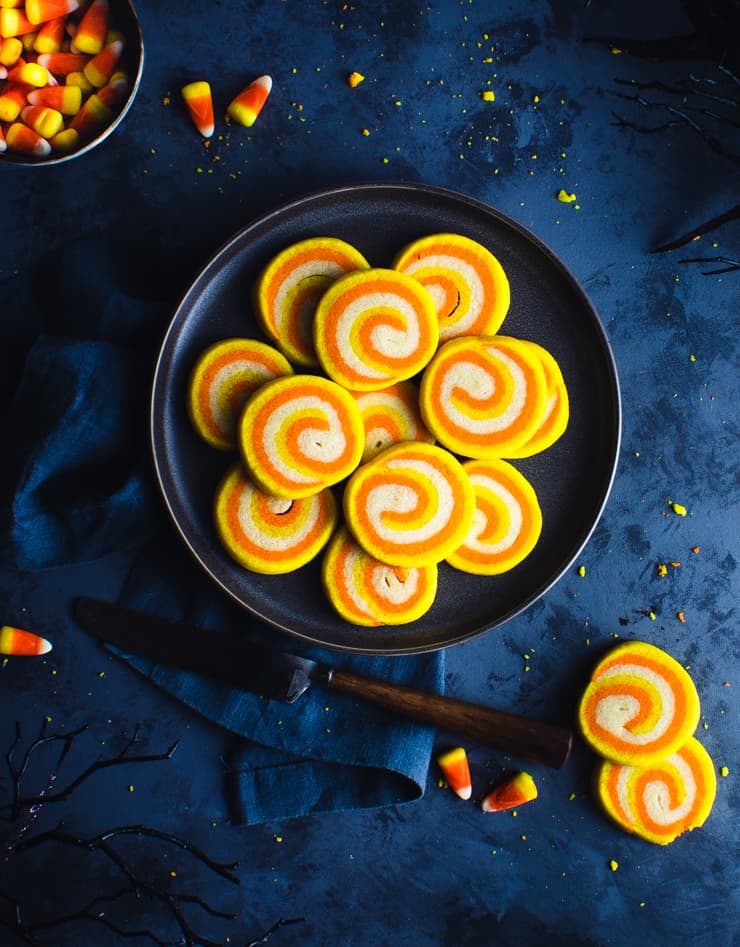
You guys know me, I love an elaborate, show-stopper of a dessert. But sometimes... Sometimes I just don’t have the time... or the energy... or the motivation... or the desire to make that sort of thing. Sometimes you just need something that meets you at the intersection of easy, delicious and fun. Like these pinwheel candy corn cookies (weird waxy texture need not apply).
How to make candy corn cookies
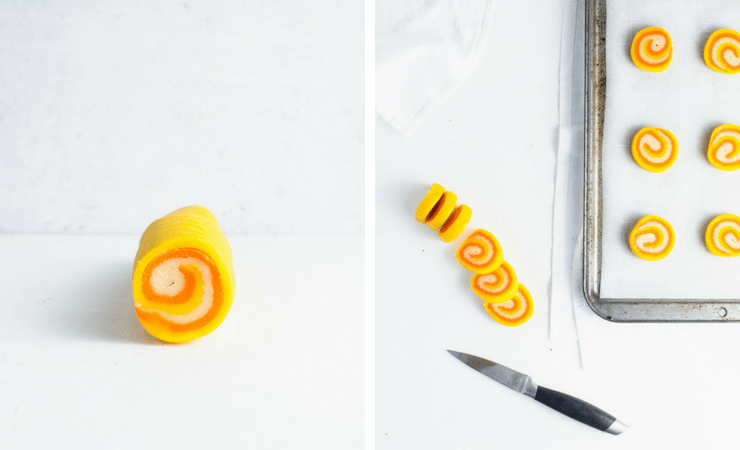
First, make your sugar cookie dough.
Second, divide the dough into three equal parts. Tint one part yellow, one part orange and leave the other part plain.
Flatten each piece of dough into a disc, wrap in plastic wrap and refrigerate for approximately 20 minutes.
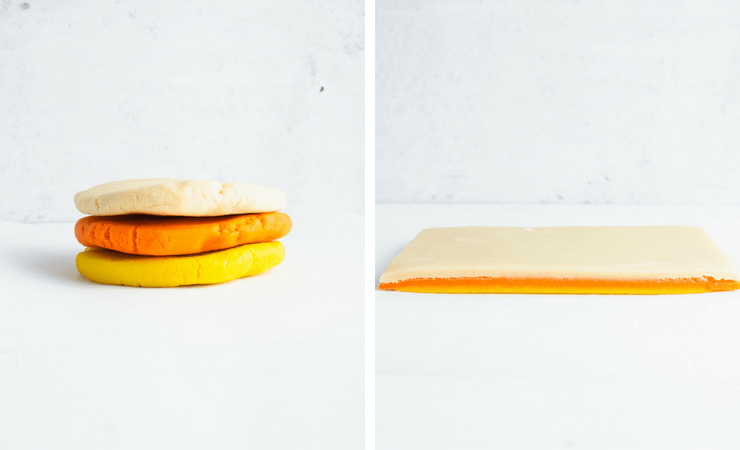
Third, roll each piece of dough out on a lightly floured surface until it’s a rectangle about ½" thick. Stack your dough yellow, orange, white.
Finally, roll your dough into a log and refrigerate for about 40 minutes. Slice, bake and enjoy!
How to make perfect candy corn cookies
Haven’t made sugar cookie swirls before? No worries! Here are some expert tips to help you make them perfectly the first time around.
- To get equal amounts of dough in each color, I recommend weighing them. Each piece should be approximately 8.4 oz.
- Don’t skip or shorten those refrigeration times! This dough needs that time to become firm enough to be workable.
- Once you’ve stacked your layers of colored dough, gently go over them with a rolling pin to make sure the layers stick together.
- To make sure you have a perfect swirl, trim the edges of your dough once they’re stacked and stuck together. A pizza cutter works well for this.
- The best tasting sugar cookies are the kind that are taken out just before they start to brown. You can tell they’re done when the tops are no longer shiny.
- Storage: These cookies will keep for 3-4 days in an airtight container at room temperature.
- Freezing: Alternatively, you can store these cookies in the freezer for up to 3 months. Simply stack them in layers separated by wax paper and seal them in an airtight container.
Did you make this recipe? I’d love to hear how it went in the comments below. Better still, snap a photo and tag it on Instagram with #thesimplesweetlife. I love seeing your creations!
PrintRecipe
Candy Corn Swirl Cookies

These 5-ingredient, candy corn inspired sugar cookies are decked out in true Halloween style! And best of all: they’re every bit as tasty as they are easy to make!
- Prep Time: 1 hour
- Cook Time: 9 minutes
- Total Time: 1 hour 9 minutes
- Yield: 24 cookies
- Category: Dessert
- Cuisine: American
Ingredients
- 2 sticks unsalted butter, room temperature
- 1 cup granulated sugar
- 1 large egg
- 1 tsp vanilla extract
- 2 ½ cups all-purpose flour
- Food coloring in yellow and orange
Instructions
- Cream the butter in the bowl of a kitchen mixer. Add the granulated sugar and beat until combined.
- Scrape the sides. Add the egg and vanilla extract, and again mix until combined.
- Add the all-purpose flour 1 cup at a time, beating between each new addition.
- The dough should be pliable but not sticky once you've added all the flour. If the dough is still sticky, add more flour (about ¼ cup at a time) until the dough is no longer sticky.
- Separate the dough into 3 equal parts and tint one yellow, one orange and leave the other plain.
- Flatten the dough into discs, wrap and refrigerate for 15-20 minutes.
- Once the dough is firm, roll each color out into a ½" thick rectangle.
- Stack the dough one on top of the other with yellow on the bottom, orange in the middle and the plain dough on top.
- Starting on the long side of the rectangle, roll the dough into a log. Wrap in plastic wrap and refrigerate for about 40 minutes.
- Once the dough is firm, cut the cookies into ½" thick discs and place on a parchment paper lined baking sheet.
- Bake at 350F for 8-9 minutes, or until no longer shiny on top.
Notes
- To get equal amounts of dough in each color, I recommend weighing them. Each piece should be approximately 8.4 oz.
- Don’t skip or shorten those refrigeration times! This dough needs that time to become firm enough to be workable.
- Once you’ve stacked your layers of colored dough, gently go over them with a rolling pin to make sure the layers stick together.
- To make sure you have a perfect swirl, trim the edges of your dough once they’re stacked and stuck together. A pizza cutter works well for this.
- The best tasting sugar cookies are the kind that are taken out just before they start to brown. You can tell they’re done when the tops are no longer shiny.
- Storage: These cookies will keep for 3-4 days in an airtight container at room temperature.
- Freezing: Alternatively, you can store these cookies in the freezer for up to 3 months. Simply stack them in layers separated by wax paper and seal them in an airtight container.
Sugar cookie recipe adapted from Make Bake Celebrate
Nutrition
- Serving Size: 1 cookie
- Calories: 111
- Sugar: 8.5g
- Sodium: 56mg
- Fat: 7.6g
- Saturated Fat: 4.8g
- Carbohydrates: 10.8g
- Fiber: .1g
- Protein: .5g
- Cholesterol: 20mg
Did you like this recipe? You might also like...
Update Notes: This post was originally published in October of 2013 but was republished with step by step photos and tips in October of 2018.
Sue says
Love them! What a punch of color 🙂
The Simple, Sweet Life says
Thank you! Nothing like something quick, easy, and brightly colorful! 🙂
Heidie Makes says
what an inspiring image!
The Simple, Sweet Life says
Thank you! 🙂
Sabrina - A Spoonful of Photography says
Wow, such bursting colours - these cookies look so lovely!
And a great Idea with the multi coloured swirl idea - knew it only in the chocolate-vanilla version, but definetly have to keep it in the back of my mind.
Thanks for the inspiration!
The Simple, Sweet Life says
Thank you! 🙂 In all honesty, I was just looking for something simple when I made these as I've been making and plan on making more complicated stuff. But you're right, these have incredible versatile potential, and these may just become my easy go-to cookie for all holidays. 🙂 By the way, I took a look at your blog, and I have to say, your photography is stunning!
Maggie Cooks says
These def have the "wow" factor! I know my nephew would go crazy for this cookies! 🙂
The Simple, Sweet Life says
Thank you! 🙂
Elizabeth @ SugarHero.com says
I am dying, these are awesome! I don't like candy corn but I sure do like candy corn-inspired cookies!
The Simple, Sweet Life says
Thank you! And although I enjoy an occasional candy corn every now and then, I'm with you, I'd definitely prefer the cookies. 🙂
Susan S. Bradley says
I LOVE these! I'm looking for non-scary Halloween cookies for my 3-year-old and these are perfect.
The Simple, Sweet Life says
Aw, thank you! I hope you and your three year old enjoy them! 🙂
MJ says
Love these too! And I have to say you take really great photos of your creations 🙂 the backdrop, the details, very impressed! *stares sadly at own baking pics which are nowhere near as impressive*
The Simple, Sweet Life says
Aww, thank you for such a sweet comment! Honestly, it's taken A LOT of work to get to the point where I can take even semi-decent photos. Just give it time and keep working at it! 🙂 If you're looking for some tips, I've written a couple of posts on the subject, one on improving your food photography and one on editing your food photos. I'm sure you'll get the hang of it! 🙂
Betty Underwood says
So very, very, cute and fun to eat!
Thx
Kristy Hegner says
These cookies look amazing! Awesome photography! I just baked them last week using your sugar cookie recipe but shaped them into a candy corn shape. Do you mind if I use the recipe on my blog, but put a link to your site? (I'm new to the blogging world).
The Simple, Sweet Life says
I'm so glad you liked them! And I wouldn't mind one bit if you linked to this post. 🙂 My experience with blogging is that as long as you give credit, other bloggers don't mind (and, in fact, enjoy) if you draw inspiration from them. 🙂
Kristy Hegner says
Great! Thanks for the response and advice!
Maria says
This recipe needs salt to balance the sugar . I made them following this recipe and didn't like them they taste bland . Need salt !!!
mycasita says
Hi, Just a quick question, can I refrigerate the dough over night, instead of just an hour? Is that too long?
The Simple, Sweet Life says
Absolutely! 🙂 I sometimes store my sugar cookie dough (this recipe included) in the refrigerator for up to a week, and it can be frozen as well if you really want to make some in advance (I wouldn't go over a month or two, just to be on the safe side). The only thing to keep in mind when you refrigerate for an extended period of time is that you might actually need to work a little bit of warmth back into to make it workable. For me, this usually involves a little bit of hand kneading until the dough becomes smooth again and doesn't crack or crumble. 🙂
Rachael says
I added almond flavor to one batch, orange zest to another, both came out very nicely, the recipe is great! My kitchen was very warm and making the dough difficult to work with, so after rolling the colors together I wrapped it in parchment paper and froze the roll for about 20 mins. That was just long enough to make it easier to cut, and fishing line was tough enough to easily slice the cookies through the demi frozen dough. I did red, green, and white for Christmas, they were an awesome addition to my Christmas party spread.
The Simple, Sweet Life says
Way to get creative! I love seeing people take a recipe and make it their own. 🙂 I bet the orange zest and almond extract was delicious!
Tabitha says
These are so cute! I was wondering why you picked that color order? Candy corn has orange in the middle. I'd like to try these with the color order different, but I don't want to mess them up or look silly.
The Simple, Sweet Life says
I chose this particular color order to go from darkest to lightest, but you could certainly put the colors in another order. 🙂
Lauren says
These look adorable! And so easy to make
Rachel says
This looks so cute and fun. I would love to try to make these. Plus add in other colors and things can get a little crazy!
Peachy @ The Peach Kitchen says
This are just the cutest cookies!! I love it.
Linda says
Candy corn cookies are so addictive! Especially when they're freshly baked. Yum!
Indya | The Small Adventurer says
I ADORE these colours! 😍 I find colouring dough SUCH a drag, or else I would do it a lot more, but these adorable cookies have really inspired me to be less lazy in the kitchen. I love how vibrant the orange is!
Mallorie Owens says
These are so fun and sound so tasty!
nicole (thespicetrain.com) says
How fun! Love the colors!
Janet says
I baked these for my grandkids for Halloween. They were very pretty; but, they had no flavor to them. They were very bland. I would like to bake these again because they were so easy to make; but, before I do I will try something different to give them some flavor.
Chloe says
WOW!!!! Such a great and easy recipe to make. it is a great idea to make for Halloween and tastes so good.
I love making them.