

Be the talk of your next event by showing up with a show-stopping cookie board! From selecting treats to picking boards, maximizing your time if you plan on baking to creating a visually stunning arrangement, this post has everything you need to know about cookie boards.
If you've been to my home, you know that I have A LOT of books about food. Food writing, food photography, recipes, cake decorating... They're in the living room, hallway, multiple giant piles next to my side of the bed...
I mean, a girl never tells how many food related books she owns, but let's just say it might be enough to open up a small, niche bookstore.
Even so, I couldn't help but get my little hands on Lisa Dawn Bolton's gorgeous On Boards (not sponsored, but you should totally get it) when it came out in October and boy, it did not disappoint! Lisa dose a beautiful job laying out stunning board after board for appetizers, breakfasts, entrees and special occasions.
But as I'm sure many of you already know, I see the world through dessert colored glasses. And I've had boards on the brain (Best or worst medical condition? I'll let you decide) ever since.
So much so that I recently found myself up to my eyeballs in a literal 150 cookies (yes, that's ONE. FIVE. ZERO.). Yes, this IS what heaven looks like. Or it could be your next Christmas get together!
Choosing a theme
Taking a little time to plan ahead is key to making a stunning cookie board and the best place to start is a theme. Choosing a theme will not only help you select the treats that go on the board, but it'll help you select the board itself, accompanying dishware and flatware, and any styling or additional presentation elements you might want to include.
As you think about your theme, it's helpful to consider where your board will be served and what its purpose will be: Is it for a themed gathering? Who will be eating it and what do they like? Where is the gathering taking place?
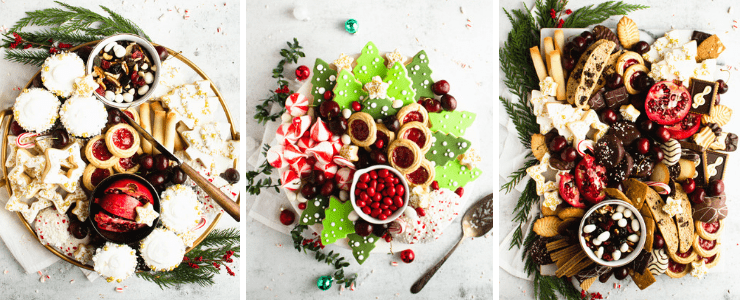
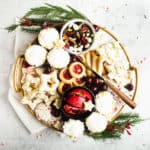
For the three boards you'll see throughout this post, I chose the themes "classic cookie," "white Christmas" and "red, white and green - or classic Christmas." Here's a little bit more about my thought process behind each and how the theme influenced the board.
Classic cookie: Warm, buttery flavors; neutral colors; the kinds of cookies your grandmother made when you were growing up; simple, understated deliciousness.
White Christmas: Elegant golds, whites and silvers; decadent and rich; classic desserts with an elevated twist; almost too pretty to eat... but just almost.
Red, white and green - classic Christmas: Classic Christmas flavors like peppermint; bright, bold greens and reds; classic Christmas treats.
Selecting a board
Boards come in all shapes and sizes and are readily available almost everywhere you look these days. The sky is truly the limit, but here are a few things you might consider when selecting a board for displaying your beautiful Christmas treats.
- Size: The size of your board can vary greatly depending on the size of your gathering, how many varieties of treats you plan to serve, the size of your treats and how much you anticipate your guests eating. We'll dive into how many treats you should budget, but I found my 14" round board held about 30 cookies and 6 cupcakes (enough for 10-12 people), my rectangular 12"x16" board held almost 70 cookies (enough for 18-23) and my 12" cake stand held about 30 cookies and 15 meringues (enough for about 10).
- Shape: Boards come in a range of shapes and styles, and you can really use whatever strikes your fancy. A board with handles makes for easier transportation, and if you know where your board will be placed, it can help to consider that space. Using a round board to display round treats can provide a nice sense of symmetry, but using a square or rectangular board can add nice visual variety.
- Material: Boards come in a wide range of materials. When choosing your board, it's important to keep in mind how the color of your board will compliment or clash with the colors in your cookies (i.e. predominantly brown cookies could get lost against a wooden board), and how the buttery nature of cookies might complicate clean up (i.e. porous materials like marble can stain when buttery treats are placed directly on them).
Selecting treats
Now that you've picked out a theme and a board, it's time to select some treats. Here are some things you might consider adding to your board.
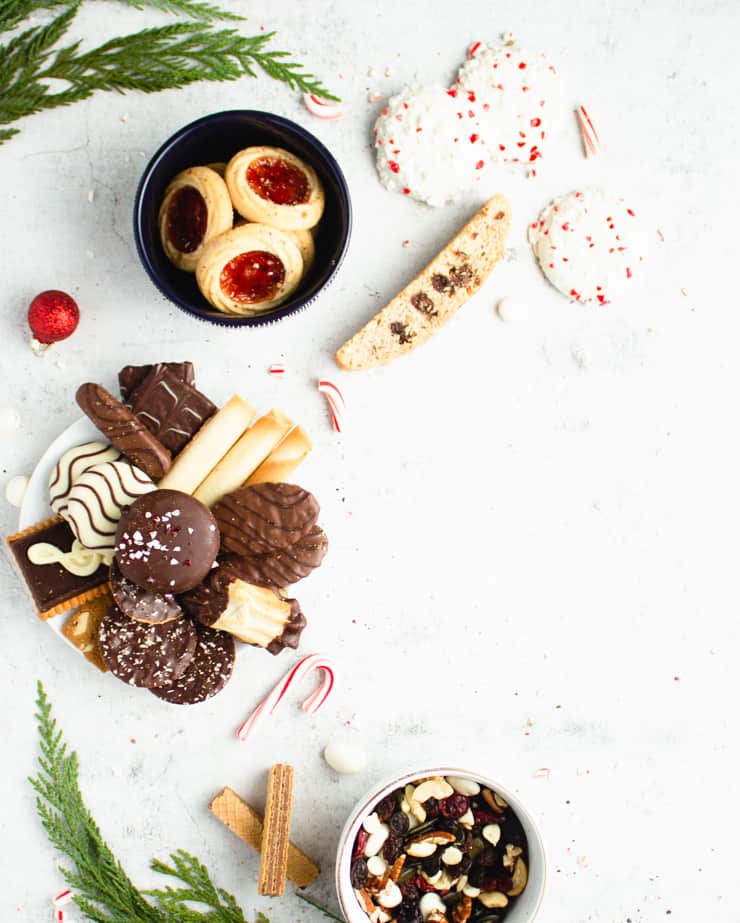
- Cookies of varying sizes, shapes and colors: Having a variety of cookies will not only make it easier to fill in all those spaces big and small on your board, but it'll make your board more visually interesting.
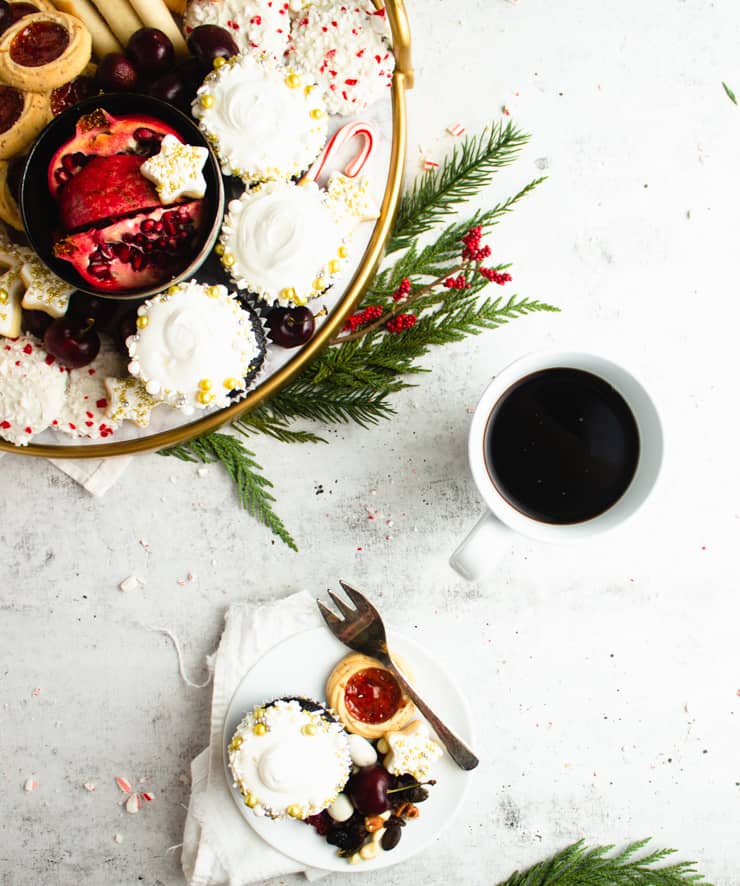
- Cupcakes: Who says a cookie board has to be just cookies? Cupcakes make a nice addition to a cookie board because they have a similar shape to cookies but offer additional visual interest by being taller.
- Doughnuts: For similar reasons to the cupcakes, doughnuts make a nice addition to cookie boards for added visual interest. These are an easy item to buy from a local baker or grocer and customize to fit the theme of your board with coordinating glaze and sprinkles.
- Fresh fruit (whole and sliced): Fruit is a great sugar-free option to add to your cookie board. Whole and sliced fruit can fill up large areas of your board while smaller fruits make great garnishes.
- Nuts and trail mixes: Nuts and trail mix are also a great sugar-free sweet option for your board. They can fill up large spaces when placed in bowls and can double as a small garnish.
- Candies: Like the nuts and trail mixes, small candies can fill up large spaces when placed in bowls and can double as a garnish. Larger candies like truffles can be grouped and used to fill up larger spaces.
Sourcing treats
Whether you love to bake or would be more interested in purchasing your goodies, treats are readily available most everywhere you go. Here are some of my favorite cookie board items and where to find them.

- Homemade: As a baker my first inclination for sourcing treats is my own kitchen. If you're doing a board for an intimate gathering, you may be able to get away with baking everything yourself. For a larger group, treats that are simple and can be made in large batches will save you time and help fill up your board quickly. A couple of my personal favorites include peppermint marshmallows, sugar cookies with royal icing, and even reindeer cupcakes for a little visual variety.
- Your local bakery: You local baker is great pick not only because you're supporting a local business but because you can often customize your treats to match your board.
- Store-bought: From your local grocer to big department stores, treats are everywhere. A few of my favorite places to find treats includes World Market, Trader Joe and Sees Candies, and Harry and David. And when all else fails, Amazon.
Working ahead
You lead a very busy life and I get that. And as much as you love baking your own cookies, it can be hard to get it all done. Girl, I got ya! If you plan on baking several varieties for your board, here are some easy ways you can work ahead:
- Make, bake, freeze: Many varieties of cookies freeze well once baked. To freeze baked cookies, place the cooled cookies on a baking sheet (make sure they're not touching) and place in the freezer until frozen completely. Place in an airtight container or bag and return to the freezer. Iced cookies should be stored with parchment paper between each cookie.
Thawing frozen cookies: Place frozen cookies on a cooling wrack and let sit at room temperature.
Cookies this works well for: Biscotti, drop cookies, bars and sugar cookies (including cookies that have been iced with royal icing). - Freezing cookie dough: Freezing your dough is a great way to get ahead on your cookie baking without sacrificing that fresh baked goodness. While most kinds of cookie dough freeze well, a very loose, liquid batter will not do well in the freezer. Drop cookies freeze best as balls placed on a baking sheet and transferred to an airtight bag once frozen. Icebox and cutouts freeze best as logs tightly wrapped in plastic wrap and enclosed in an airtight bag.
Thawing/baking frozen cookie dough: For cookies that need to be shaped or cut out, you can thaw the cookie dough in the refrigerator for a few hours. Drop cookies can be baked straight away - simply add an extra minute or two to your bake time.
Cookies this works well for: Sugar cookies, gingerbread, drop cookies, shortbread and icebox cookies. - Refrigerating cookie dough: Most cookie dough can be made and refrigerated for 3-5 days before use. Chilling the dough can help control the spread of your cookies during baking and, depending on how long you refrigerate the dough, may lead to a more concentrated flavor and a crisper cookie post-baking.
Cookies this works well for: Drop cookies, gingerbread and sugar cookies

How many treats do I need for a cookie board?
The number of cookies you'll need can vary greatly depending on the size of your gathering, how many varieties of treats you plan to use, the size of your treats, how many other treats will be available at your gathering and how much you anticipate your guests eating. You know your guests and their eating habits best, but when in doubt budget 3-4 treats per person. This will be enough for people to sample a range of sweets and satisfy that sweet tooth. Even if you wind up with leftover, that's better than running out!
Utensils and bowls
Small, shallow bowls make great additions to cookie boards for holding candies, nuts/trail mixes and small pieces of fruit. It's helpful to consider your theme when selecting bowls, but when in doubt, white bowls work well with most setups.

Cookie boards don't necessarily require utensils as everything on your board is essentially finger food. However, you might consider including utensils like tongs or small spoons (particularly for candies, nuts and trail mixes) to make serving easier and more sanitary. If you have whole pieces of fruit, you might consider making a knife available for slicing.
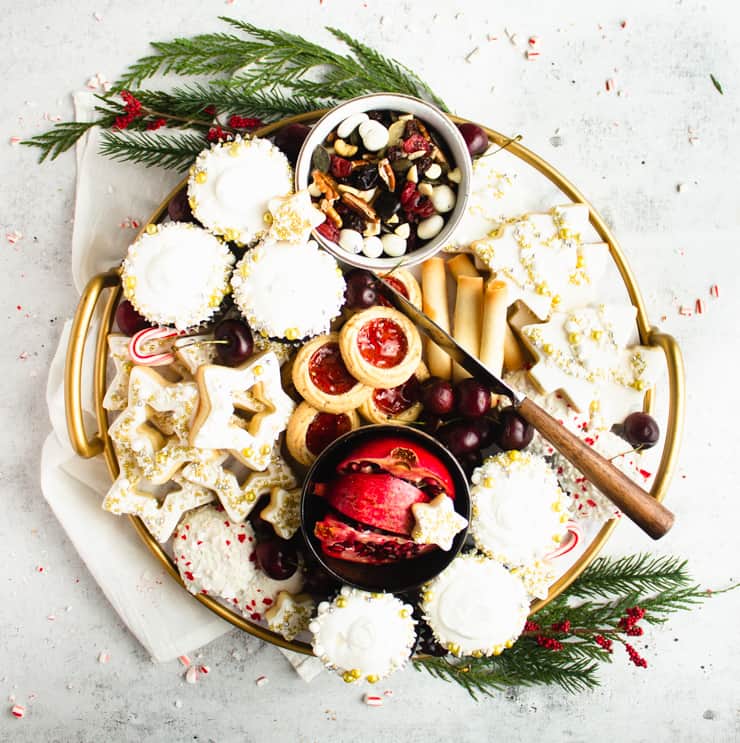
In a nutshell, arranging a cookie board comes down to working from largest to smallest. It's also helpful to think about how you can create visually interesting boards by grouping or breaking up items based on shapes and colors, working in odd numbers or creating patterns within the food itself.

Get all of your treats in one place (I found laying them out on a baking sheet or two to be really helpful for organizing and transporting to the table where I was working): Having all of your goodies in one place will not only help you keep track of what you have to work with but it will help you keep everything in mind as you consider where you might want it to go.
Start with bowls: In many cases the bowls you're using to hold candies, trail mix, or other small items may very well be bigger than the treats you're placing directly on the board. Because these items take up the most space, it's helpful to put them down first. I like to put my bowls near but not necessarily on the edge of my board.
Add large cookies and fruit: Large cookies and whole or sliced pieces of fruit are likely to be your next largest items. These are great for filling in space around the edges of your board or your bowls.
Add remaining cookies: Small to mid-size cookies like thumbprints and meringues are great for filling in space between the large items you've already places on your board. You can also use them to fill any small gaps that remain around the edges.
Garnish: Once all of your treats are down, you can fill in any empty spaces will small garnishes like small pieces of fruit, loose candies, mini candy canes, chocolate covered pretzels or any other bite size treat you might have on hand.
Make final adjustments and add utensils: With everything finally on the board, now's the time to make any final adjustments to your layout and add any utensils that may be needed for cutting or serving. Now give yourself a high-five because you just created a stunning cookie board!
PrintRecipe
How to Create a Christmas Cookie Board
Be the talk of your next event by showing up with a show-stopping cookie board! This post has everything you need to know about cookie boards, from choosing treats to where to find them, how to maximize your time if you plan on baking to creating a visually stunning arrangement.
- Prep Time: 30 minutes
- Total Time: 30 minutes
- Yield: 1 cookie board
- Category: Dessert
- Cuisine: American
Ingredients
- Cookies of varying sizes, shapes and colors
- Cupcakes
- Doughnuts
- Fresh fruit (whole and sliced)
- Nuts and trail mixes
- Candies
Instructions
In a nutshell, arranging a cookie board comes down to working from largest to smallest. It's also helpful to think about how you can create visually interesting boards by grouping or breaking up like items, shapes and colors, working in odd numbers or creating patterns in the foods themselves.
- Get all of your treats in one place: Having all of your goodies in one place will not only help you keep track of what you have to work with but it will help you keep everything in mind as you consider where you might want it to go.
- Start with bowls: In many cases the bowls you're using to hold candies, trail mix, sliced fruit or other small items take up the most space, so it's helpful to put them down first.
- Add large cookies and fruit: Large cookies, whole and sliced pieces of fruit are likely to be your next largest items. These are great for filling in space around the edges of your board or your bowls.
- Add remaining cookies: Small to mid-size cookies like thumbprints and meringues are great for filling in space between the large items you've already places on your board. You can also use them to fill any small gaps that remain around the edges.
- Garnish: Once all of your treats are down, you can fill in any empty spaces will small garnishes like small pieces of fruit, trail mix or loose candies.
- Make final adjustments and add utensils: With everything finally on the board, now's the time to make any final tweaks to your layout and add any utensils that may be needed for cutting or serving.
Notes
Selecting a board:
- Size: The size of your board can vary greatly depending on the size of your gathering, how many varieties of treats you plan to serve, the size of your treats and how much you anticipate your guests eating. We'll dive into how many treats you should budget, but I found my 14" round board held about 30 cookies and 6 cupcakes (enough for 10-12 people), my rectangular 12"x16" board held almost 70 cookies (enough for 18-23) and my 12" cake stand held about 30 cookies and 15 meringues (enough for about 10).
- Shape: Boards come in a range of shapes and styles, and you can really use whatever strikes your fancy. A board with handles makes for easier transportation, and if you know where your board will be placed, it can help to consider that space. Using a round board to display round treats can provide a nice sense of symmetry, but using a square or rectangular board can add nice visual variety.
- Material: Boards come in a wide range of materials. When choosing your board, it's important to keep in mind how the color of your board will compliment or clash with the colors in your cookies (i.e. predominantly brown cookies could get lost against a wooden board), and how the buttery nature of cookies might complicate clean up (i.e. porous materials like marble can stain when buttery treats are placed directly on them).
Utensils and small bowls
- Small, shallow bowls make great additions to cookie boards for holding candies, nuts/trail mixes and small pieces of fruit. It's helpful to consider your theme when selecting bowls, but when in doubt, white bowls work well with most setups.
- Cookie boards don't necessarily require utensils as everything on your board is essentially finger food. However, you might consider including utensils like tongs or small spoons (particularly for candies, nuts and trail mixes) to make serving easier and more sanitary.
- If you have whole pieces of fruit, you might consider making a knife available for slicing.
Sources:
Lisa Dawn Bolton - On Boards
The Kitchn - The Best Types of Cookies to Freeze (and How to do That)
Flourish - Chilling Cookie Dough: Does it Make a Difference?
If you liked this post, you might also like...


Sue says
These are simply stunning! I love the set of pictures showing how you laid them out. Lots of helpful tips too! Beautiful!!
Anna says
This is such a great idea! Who needs a cheese board when you can have cookie board! They all look simply stunning!
Dominique | Perchance to Cook says
These cookie boards are so beautiful! I've never thought to do one before but I'm going to now. I really love the idea of making them have a theme beforehand to get the color scheme and style down in advance. LOVE
Jessa Nowak says
Love this guide!
Katherine Chase says
YAS!! Love this! I don't need any more cheese boards.. give me the cookie board!
Allison says
This is such a great idea! What a fun and beautiful way to display holiday treats!
Michelle says
I love this idea! Such a lovely thing to do for Christmas and some really great tips too! Pinned!
Chef Markus Mueller says
Great little detailed guide! A great addition to any holiday party along with a charcuterie board and cheese platter!
Jagruti Dhanecha says
Wow..cookie board such a good idea! Never thought about it, now that I have your post, I am sure I can arrange a cookie board with ease 🙂
Sam | Ahead of Thyme says
Wow what a great idea! Love your cookie boards, they are gorgeous! A board like this would be such a treat after a holiday party.
Georgie says
I didn't even know this is a thing! These are so beautiful, they'd be gorgeous for a christmas gift! It's like a charcuterie board for cookies, best idea ever!
Sues says
Awesome tips and gorgeous cookie boards!! I just did something similar and it was so much fun. Cheese and cookie boards for life!
Nicole says
A chessboard with cookies? Sign me up!
Karyl Henry says
These are all fabulous tips and ideas! And really, these tips work for entertaining all year round, because I find myself super busy getting everything ready every time I host guests. I'm bookmarking this list for sure
Jessica (Swanky Recipes) says
I've heard Christmas cookie platters are making a comeback. I'm over here wondering when they ever when out of date because I've been making them since I was young with my mom. I love this elevated look and will have to style my cookies to look this beautiful!
Julie says
This is beautiful -- but so, so dangerous! I have no self control around cookies and having so many beautifully arranged all at the same time.... danger alert!
Holly says
These cookies boards are just gorgeous! I love all of your tips and ideas!
nicole (thespicetrain.com) says
What a great post, each and every photo here is mouthwateringly beautiful and your tips are awesome. I had no idea that it's possible to freeze baked cookies, that should come in might handy in the future, thanks so much! 🙂
Burcu says
Lovely! 😍