

A staple of Norwegian Christmas cookie baking, krumkake more than earns its place in the cookie tin with its simplicity, delicate flavor and crisp texture. Keep scrolling to learn how to make this easy 5 ingredient treat.
Disclaimer: Please note that some of the links below are affiliate links and I will earn a commission if you make a purchase using those links. I use all of the products included in this post and recommend them because they are products I personally love and trust. All affiliate links are clearly marked.
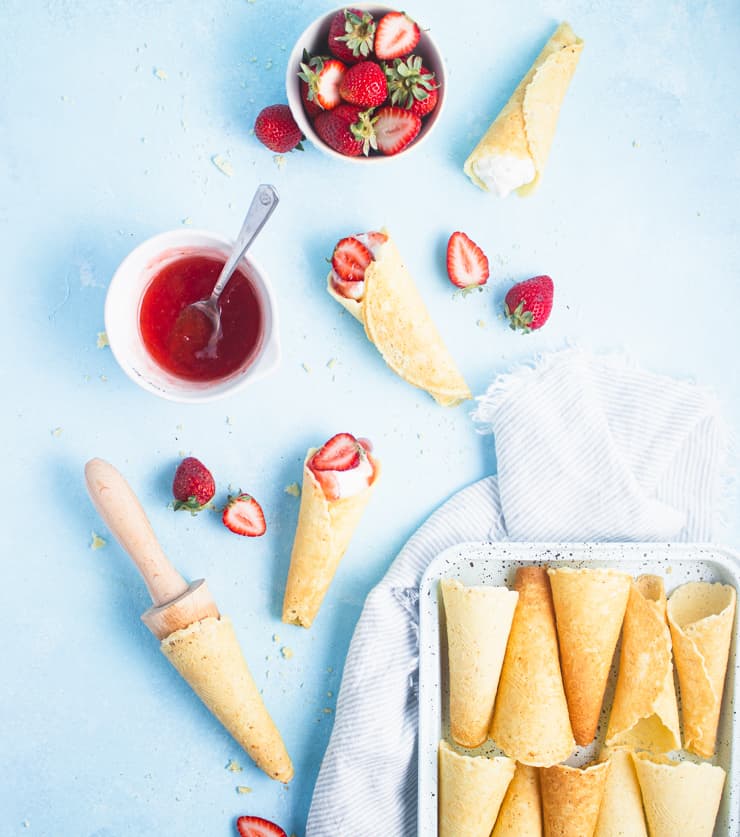
Krumkake (pronounced kroom-ka-ka) is a staple of the Norwegian Christmas cookie line-up (right up there with pepperkaker and rosettes) and for good reason: They're irresistibly crisp, have a deliciously subtle spice flavor and are often served filled with whipped cream and topped with jam, berry flavored syrups and/or fresh fruit.
When I moved back to the States, I was excited to recreate this Scandinavian favorite for my friends and family. But as I looked at recipes, I was surprised to see a major difference in the American and Norwegian versions: A large addition of milk in the former.
I decided to try both versions (so you don't have to) and the winner was pretty clear: The version without milk came out crisper, with a better flavor, and ultimately stored better than it's milky counterpart.
Ready to make this delicious treat? Keep scrolling!
Equipment you'll need
While simple to make, krumkake does require a few special pieces of equipment.
- Krumkake iron: Irons come as both traditional stove top cast aluminum units as well as plug-in-the-wall electrical units. Either one works fine, although the electric ones make it easier to regulate the temperature of the iron, which can be tricky when working with a cast aluminum iron on the stove.
- Krumkake cone roller: These wooden cones come both with and without handles in a variety of sizes. Make sure whichever size you get fits your iron.
How to make krumkake
First, make the batter.
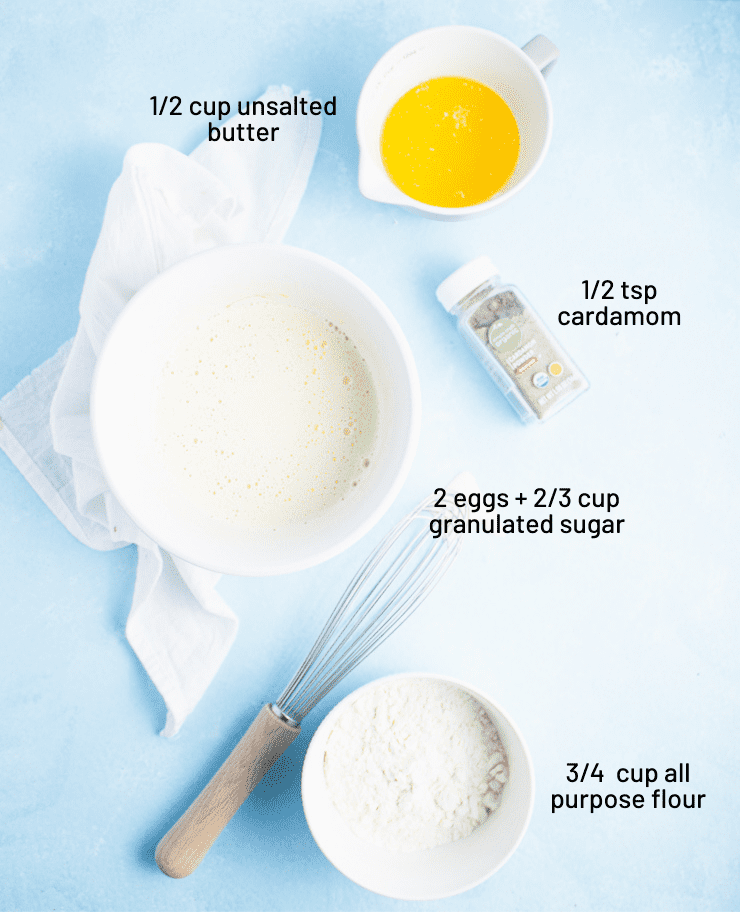
In a medium bowl, whip the eggs and sugar until light, fluffy and thickened. Gently whisk in the flour, melted butter and cardamom.
Let the batter sit for 15 minutes or until thickened.
Although the batter should be thick, it should still be smooth. If you spoon up a bit of batter and it tears apart from the rest with jagged edges, it's too thick. To fix this, simply add a few tablespoons of milk until the batter becomes smooth but still holds stiff peaks.

Second, cook the cookies.
Lightly grease your iron with cooking spray and heat it on your stove top for 3-5 minutes over medium heat. You'll know it's ready when the batter immediately starts to sizzle when dropped on the iron.
Drop a heaping teaspoon of batter towards the back of the iron and gently close it.
Important note: You do not need to use more than a heaping teaspoon of batter and if you overfill the iron, the batter will seep out the sides, run down the inside and outside of the base and will burn, which may result in some serious smoking or even fire. If you do happen to overfill it, immediately lift up the irons and use a towel to wipe up the batter. Please be careful as the irons and base all get very hot.

Cook for 30 seconds, then flip the iron and cook for another 30 seconds. The cookies are done with they're a very light golden brown.
If the iron wasn't hot enough and the cookies take more than 30 seconds to cook on each side, you'll want to continue flipping them at regular intervals so one side doesn't get browner than the other.
Use a fork to gently lift the side of the cookie and wrap it around the roller. Allow to cool on the roller until the next cookie is ready.

Finally, fill the krumkake and serve.
Krumkake are traditionally served filled with whipped cream and topped with raspberry or strawberry syrup. For this many krumkake, you'll need about 2 cups of heavy whipping cream whipped to soft peaks.
If you don't plan to serve the krumkake immediately, you'll want to wait to fill them; The whipped cream will soften the krumkake.

Tips for making the perfect krumkake
- Use a krumkake iron: For best results, you'll want to use a krumkake iron. If you don't already have one, this is the one I personally use and love (affiliate link).
- Make sure your iron is evenly heated: If you're using an electric stovetop, it will turn on and off as it heats, meaning one side of the iron may become considerably hotter than the other. I found a just-below-medium heat to result in the most even heating of the iron.
- Load the batter slightly towards the back of the iron: As you lower the top iron, it'll push the batter forward. Loading it in the center will push the batter out the front of the iron without coating the back of it.
- Immediately wipe away any batter that comes out the sides of the iron as it will burn if it drops down. To do this, simply lift the iron and whip around the edges/bottom with a paper towel.
- Leave the krumkake on the roller and place it seam down as it cools to help it hold it's shape.
- Storing krumkake: Krumkake will soften if exposed to humidity, even for a short period of time. To keep it crispy, store it in an air tight container (preferably not a plastic as this can cause them to lose their crispiness) for up to a couple of weeks.

Frequently asked questions
Your krumkake may turn out soft if it's not cooked long enough or if you use a recipe that includes too much milk (traditional Norwegian krumkake recipes, like this one, typically don't call for it at all). Krumkake can also soften after its cooked if it's not stored properly; Be sure to let it cool completely before placing it in an air tight container.
In addition to using an air tight container for storing your krumkake, it's also important to choose a container made from the right material. Even once fully cooled, plastic can trap moisture from the cookies making them soft. I recommend storing krumkake in a glass or metal container.
How you care for your krumkake iron will depend on what it's made of. I recommend checking the manufacturer's care instructions. When in doubt, hand wash with warm water and a gentle soap and avoid scrubbing with materials that might scratch your iron, like steel scrubbers.
Did you make this recipe? I’d love to hear how it went in the comments below. Better still, snap a photo and tag it on Instagram with #thesimplesweetlife. I love seeing your creations!
PrintRecipe
Krumkake Recipe

A staple of Norwegian Christmas cookie baking, krumkake more than earns its place in the cookie tin with its simplicity, delicate flavor and crisp texture.
- Prep Time: 20 minutes
- Cook Time: 25 minutes
- Total Time: 45 minutes
- Yield: 25
- Category: Dessert
- Cuisine: Norwegian
Ingredients
- 2 eggs
- ⅔ cups granulated sugar
- ½ cup unsalted butter, melted
- ¾ cup all purpose flour
- ½ tsp cardamom
Instructions
- In a medium bowl, whip the eggs and sugar together until light and fluffy.
- Gently whisk in the flour, melted butter and cardamom.
- Let sit for about 15 minutes or until thickened.
- If the batter is too thick, add a few tablespoons of milk, stirring until the batter is cohesive.
- Heat the krumkake iron over a burner for 3-5 minutes.
- Spoon a heaping teaspoon onto the back, center area of the iron
- Cook for 30 seconds on each side.
- Use a fork to gently wrap the krumkake around the roller.
- Allow the krumkake to cool on the roller until the next one is ready to come off the iron.
- Serve plain or with whipped cream and berries.
Notes
- Use a krumkake iron: For best results, you'll want to use a krumkake iron. If you don't already have one, this is the one I personally use and love (affiliate link).
- Make sure your iron is evenly heated: If you're using an electric stovetop, it will turn on and off as it heats, meaning one side of the iron may become considerably hotter than the other. I found a just-below-medium heat to result in the most even heating of the iron.
- Load the batter slightly towards the back of the iron: As you lower the top iron, it'll push the batter forward. Loading it in the center will push the batter out the front of the iron without coating the back of it.
- Immediately wipe away any batter that comes out the sides of the iron as it will burn if it drops down. To do this, simply lift the iron and whip around the edges/bottom with a paper towel.
- Leave the krumkake on the roller and place it seam down as it cools to help it hold it's shape.
- Storing krumkake: Krumkake will soften if exposed to humidity, even for a short period of time. To keep it crispy, store it in an air tight container (preferably not a plastic as this can cause them to lose their crispiness) for up to a couple of weeks.
Nutrition
- Serving Size: 1 krumkake
- Calories: 71
- Sugar: 5.4g
- Sodium: 6mg
- Fat: 4.1g
- Saturated Fat: 2.5g
- Carbohydrates: 8.3g
- Fiber: .1g
- Protein: .9g
- Cholesterol: 23mg
If you liked this, you might also like...


Laurie says
I have an electric pizzelle iron and am wondering if it will suffice for making this Krumkake.
My cabinets are groaning with overload of baking equipment and wonder if some things might do double-duty!
Claire says
Hi Laurie! Uff, I can relate to the overload of baking equipment! I currently have "Clean out kitchen cabinets" on my to-do list and have massively been putting it off... 😬
I don't have a pizzelle iron myself, but as I understand it, pizzelle irons make a slightly thicker cookie than a krumkake would traditionally be. So can you use a pizzelle iron? I don't see why not! Could it affect the thickness and overall texture? It very well could. If I were you, I'd give it a try and see what you think. It could totally work for your needs and save you some of that sweet cabinet space.
Ann Derson says
Thank you for sharing this krumkake recipe. I'm an ethnic Norwegian and the first generation to speak English as a first language. I foolishly tried a recipe with milk. Uffda! What a soggy mess! The old recipes haven't been used since I bought a glass topped stove. Where are they?? The local Nordic store sold electric Cucina Pro krumkake irons. It bakes two 5" cookies at once. Instead of a cone, a 1" dowel serves as a roller.
Your recipe is a classic. I'm very pleased with the krumkake.
Is there a way to share a photo?
Nicole says
I tried this recipe today. It's great! It's a good batch size, too! Thanks!