

If you’re looking for a fudge recipe for beginners, look no further! In this beginner's guide, you’ll learn how to make microwave fudge with just 5 ingredients. Be sure to scroll all the way to the bottom for easy variations and tips and tricks to help you tackle common fudge problems like a pro!

If you've ever wanted to try making fudge but felt daunted by the candy thermometers, precise temperatures and drip tests of traditional candy making, this is your sign to make this fudge!
All you'll need for this recipe is five ingredients, a microwave and the patience to wait the full two hours for it to set before diving in (the latter being the most difficult).
And if plain ol' chocolate fudge just isn't doing it for you anymore, this recipe has one more trick up it's sleeve: It's highly adaptable.
We'll start with the basic recipe and then I'll walk you through a few variations based on the type of food being added that will help you understand how these additions change the recipe and how to make your own adaptations.
How to make microwave fudge
First, combine and melt your ingredients.
In a microwave safe bowl, combine the chocolate, sweetened condensed milk, and butter. Microwave for 30 seconds and then stir the ingredients.
Continue microwaving the mixture using 15 second increments, stirring between each session, until the chocolate stirs smooth. It should be thick and will pull away from bowl and spatula.
Add the vanilla extract and salt, and stir until combined.

Second, prepare the fudge for chilling.
Line a 9"x9" square cake pan or casserole dish with parchment paper. I use two narrow sheets of parchment paper, which I clip to the sides of the pan using binder clips.
Note: You do not need to add any grease to your prepared pan.

Finally, chill the fudge.
Pour the fudge into your prepared pan and press it into place. Cover with plastic wrap or a lid and refrigerate for two hours, or until firm.

Easy fudge variations
Now that you know how to make fudge, let's talk about the near endless ways you can adapt this recipe.
Adding spices
Depending on the spice and it's potency, you'll want to add anywhere from ¼ to one teaspoon of it to a full batch of fudge. This can be mixed in right before you pour it into the prepared pan and after you've mixed in the vanilla.
For my Mexican hot chocolate fudge (pictured below), I added ¼ teaspoon cayenne and one teaspoon cinnamon.

Nuts, dried fruits, cookies, marshmallows and candies
To add nuts, dried fruits, marshmallows or other large, dry ingredients to your fudge, I recommend adding about a cup for a full batch. You may want slightly more or less depending on the size of the pieces. These kinds of ingredients can be folded in right before you pour the fudge into the prepared pan.
For the Mexican hot chocolate fudge (above), I added one cup of marshmallows.
Note: Some dry ingredients, like cereals, will absorb some of the moisture from the fudge and will no longer be crispy.
Using other chocolates
If you'd prefer to use a different kind of dark or milk chocolate, you can substitute it at a one to one ratio. For white chocolate, you'll want to use a half can of sweetened condensed milk (about seven ounces) instead of the full can.
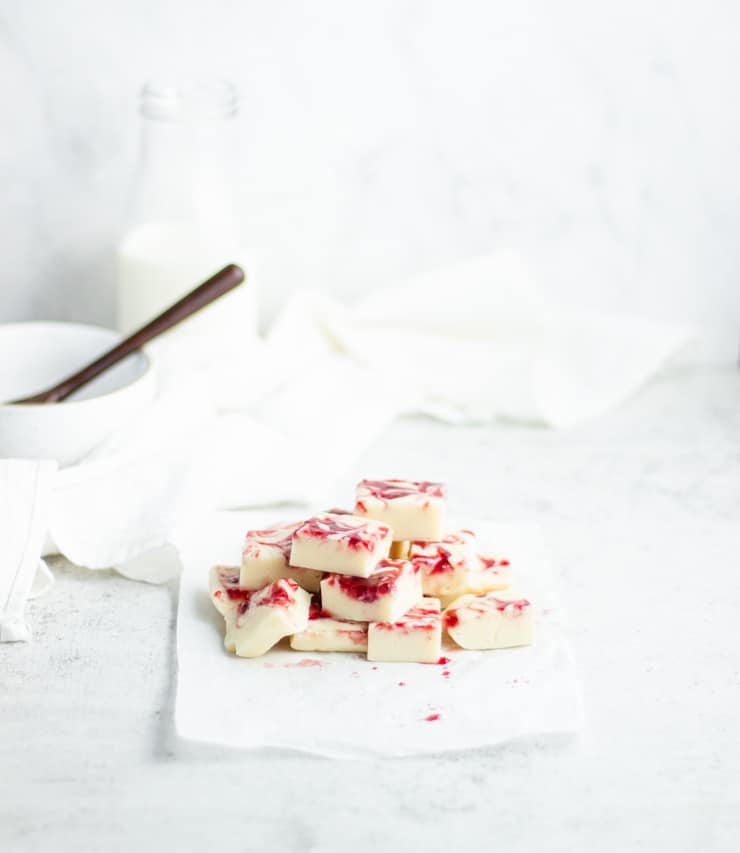
Thick sauces
Thick sauces and jam can be added to the top of your fudge once it's been poured into the prepared cake pan or casserole dish and swirled to blend. I don't recommend using more than ¼ cup, otherwise your fudge may become too soft.
For the white chocolate raspberry fudge pictured above, I used a ¼ cup of raspberry jam.
Tips for making fudge
- Keep your kitchen equipment/utensils free of water when melting the chocolate. Getting water in the melting/melted chocolate will cause it to seize.
- Making multiple flavors in a single batch: A full batch of the basic fudge weighs approximately one pound ten ounces. You can divide it accordingly to make multiple variations out of a single batch (I like to divide mine in half - so 13 ounces each - and make two different kinds).
- Some dry ingredients, like cereals, will absorb some of the moisture from the fudge and will no longer be crispy.
- Storage: Fudge can be stored in an air-tight container for up to 3 weeks in the fridge or 3 months in the freezer.

Troubleshooting common fudge making problems
Fudge won't set
For this recipe, a fudge that won't set is an indication that the sweetened condensed milk to chocolate ratio is off. Remember white chocolate fudge will require half the amount of sweetened condensed milk.
For traditionally made fudge it can be an indication that the candy wasn't cooked long enough or didn't get hot enough.
Fudge is grainy
Because this recipe uses sweetened condensed milk, which acts much the way the sugar syrup in traditional fudge would, graininess shouldn't be an issue. That's because this recipe skips that syrup step all-together, thus eliminating the chance that something might go awry.
For traditional fudge, graininess is often a sign that the fudge was stirred when it shouldn't have been, creating sugar crystals.
Fudge is crumbly
For this recipe, crumbly fudge can be an indication that the fudge has not been stored properly; If it's not kept in an air tight container, it will likely get crumbly over time.
For traditional fudge, being crumbly is often a sign that the fudge was overcooked.
Common fudge questions
Yes! Fudge can be stored in an air-tight container for up to 3 months in the freezer. To thaw it, simply place it in the refrigerator and let it thaw overnight.
Fudge can be stored for up to 3 weeks in the refrigerator or up to 3 months in the freezer.
Yes. Although you'll see some recipes that direct you to line your dish with foil, you'll want to make sure to lightly spray it with cooking spray first to keep your fudge from sticking to it. Personally, I prefer to use parchment paper. For this microwave fudge, you do not need to oil the parchment paper.
No, fudge (the candy) and fudge sauce are different and one cannot be used to make the other.
The basic recipe, which calls for chocolate, butter, sweetened condensed milk, vanilla extract and salt is gluten-free. However, depending on what you add, the end product may not be. Some cereals, spice blends, cookies and other additives may contain gluten.
Recipe
Easy Microwave Fudge Recipe

This microwave fudge takes just 5 ingredients and a few minutes to make!
- Prep Time: 10 minutes
- Chill Time: 2 hours
- Total Time: 2 hours 10 minutes
- Yield: 36 pieces
- Category: Dessert
- Cuisine: American
Ingredients
- 2 cups semi-sweet chocolate
- One 14oz can sweetened condensed milk
- 2 tbsp unsalted butter
- 2 tsp vanilla extract
- ¼ tsp salt
Instructions
- In a microwave safe bowl, combine the chocolate, sweetened condensed milk, and butter.
- Microwave for 30 seconds and then stir.
- Continue microwaving the mixture using 15 second increments, stirring between each session, until the chocolate stirs smooth.
- It should be thick and will pull away from bowl and spatula.
- Add the vanilla extract and salt, and stir until combined.
- Line a 9"x9" square cake pan or casserole dish with parchment paper.
- Pour the fudge into your prepared pan and press it into place.
- Cover with plastic wrap or a lid and refrigerate for two hours, or until firm.
Notes
- Keep your kitchen equipment/utensils free of water when melting the chocolate. Getting water in the melting/melted chocolate will cause it to seize.
- Making multiple flavors in a single batch: A full batch of the basic fudge weighs approximately one pound ten ounces. You can divide it accordingly to make multiple variations out of a single batch (I like to divide mine in half - so 13 ounces each - and make two different kinds).
- Some dry ingredients, like cereals, will absorb some of the moisture from the fudge and will no longer be crispy.
- Storage: Fudge can be stored in an air-tight container for up to 3 weeks in the fridge or 3 months in the freezer.
Nutrition
- Serving Size: 1 piece
- Calories: 122
- Sugar: 14.9g
- Sodium: 38mg
- Fat: 5.3g
- Saturated Fat: 3.4g
- Carbohydrates: 16.6g
- Fiber: 0g
- Protein: 2g
- Cholesterol: 7mg
If you liked this, you might also like...


Allyssa says
Thank you so much for sharing this amazing fudge recipe! Will surely have this again! It's really easy to make and it tasted so delicious! Highly recommended!
Sue says
This is sooo..... delicious!!
Jessica says
I decided a month or so ago that I would be making fudge for my holiday treat boxes this year. I have never made it, however, so I'm thrilled to have come across this post with such thorough directions and tips. I'm feeling pretty confident I will be able to pull it off. Thanks a million!
Liz says
Love making fudge for the holidays! Thanks for sharing!
Sue says
I just made the vanilla fudge again for my cookie boxes. It is so easy and probably took me fifteen minutes to make! So delicious 🙂 I would add this to the other delicious cookie recipes from your e-book to make for the holidays!
Shelley says
Maybe dumb question, but I loved it using regular butter. What is the reason for unsalted butter & then adding salt?