
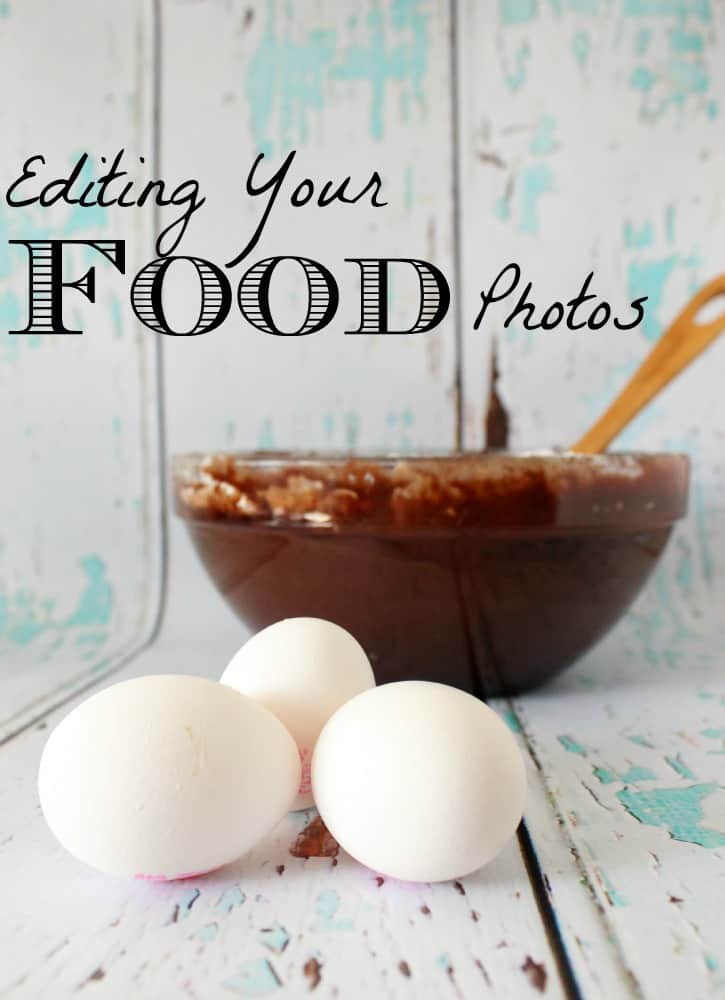
Having photographs is an integral part of any blog. It doesn't matter if you write a fashion blog, food blog, craft blog, or even a news blog; people are drawn in by photographs. And not just any photos, but pretty photos. When it comes to blogging and photography, your best case scenario is that you're able to take beautiful photographs that require very little editing. Obviously, this isn't always possible. Sometimes you're working away from home and just don't have the set up you're used to, other times you're working in less than ideal conditions (I'm looking at you Norwegian winters with your 3 hours of "daylight" a day!). Whatever the case, you're going to need to be able to edit your food photos. So what programs should you use? Should you shell out the money for a fancy photo editing program? What sorts of things should you edit?
Should you pay for a professional photo editing program?
My quick answer to this question would be no. That's the quick answer. Of course, if you've already purchased a program you like, or have something you're familiar with, by all means use that! But if you haven't already bought a fancy program, I would recommend trying any one of a number of great free programs. Here's why:
1. They're free
2. The professional editing programs tend to have a lot of bells and whistles that the average user won't use and may even find intimidating
3. They're free
4. There are free programs that offer just as many bells and whistles as the purchased ones, if you like that sort of thing (more on that later)
5. Did I mention they're free?
As some of you may very well be aware, professional photo editing software doesn't come particularly cheap. Take the industry standard, Photoshop, for example. You can download this program from their site and use it for just $19.99 a month. Over a year, you're paying just about $240 to edit your photos. Or, you can buy it outright for somewhere in the ballpark of $500-600.
What free options are available for photo editing?
Photoshop is definitely one of those "bells and whistles" sorts of programs I was talking about earlier, and programs like it may not be the best option for those of you who are new to photo editing. However, if you've worked with something like Photoshop in the past, or want to learn to work with that sort of program, GIMP is a great, free option.

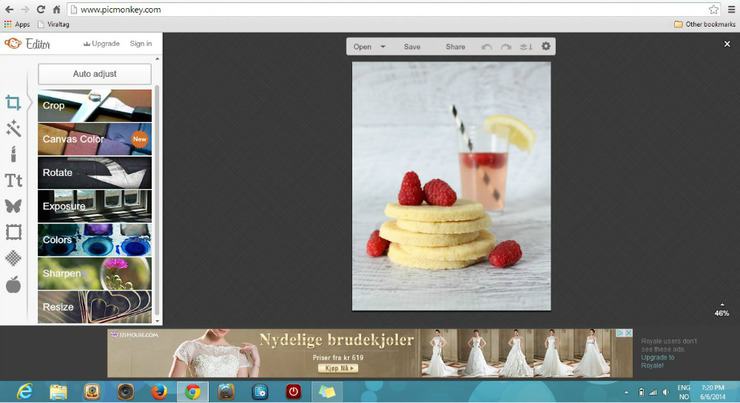
If you're looking at the picture above and going "Oh hell no! Too many buttons!" don't worry. There are much simpler options available. One of the easiest and most user friendly programs out there is PicMonkey. I'm sure if you've spent any time looking into editing (food) photos, you've already heard about this program, but it's worth a mention for those who might not have heard about it yet. It's very easy to use, but it's editing options are limited. That being said, it's a great option if you only plan on doing a little editing.
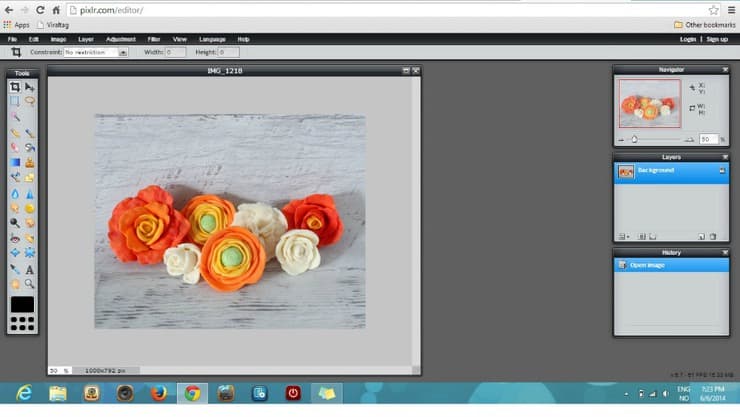
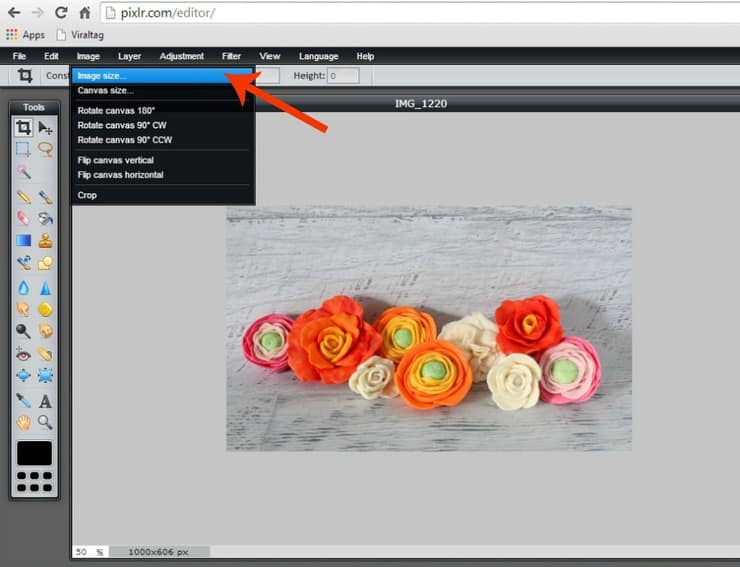
A nice intermediary program is Pixlr. It definitely has more editing options than PicMonkey, but it's not as complicated as GIMP and Photoshop. Ultimately, I'd recommend having a look at several of these programs, trying a little editing in each, and seeing what you like and what works for you.
So what sorts of things should you be editing?
There are a lot of editing features that are pretty self-explanatory; you probably already know how to rotate your pictures, and that increasing your color saturation will make your colors more vivid. So instead of going over ever single function you'll come across in photo editing programs, I want to, instead, talk about 3 of the important, but perhaps slightly more complicated functions: compressing, exposure, and color balance.
Compressing
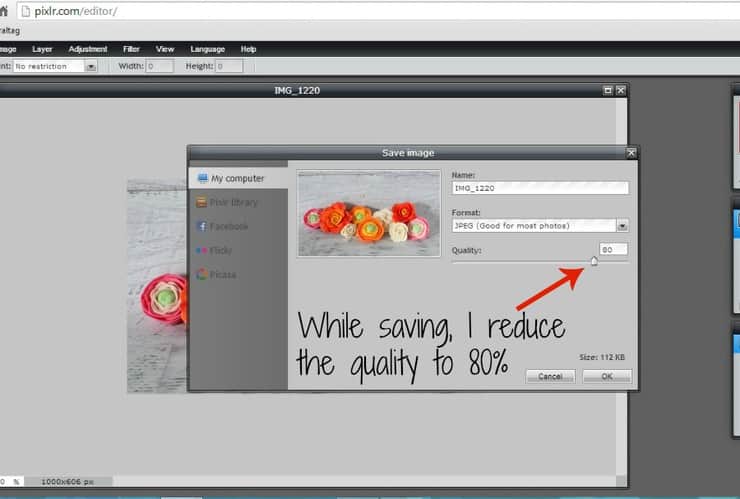
Whatever you do with your photos, always, always compress them. What is compressing, you ask? Well, as you probably already know, photos take up a lot of space. The larger they are, the more space they'll take up on your server, and it can even effect how long they take to load on your page. In most cases, you're not even displaying the picture at it's full size anyway, so why store all of those extra pixels? This is where compressing your photos comes in. In a nutshell, compressing makes your photos smaller (not just in terms of physical size but in terms of file size as well). To do this, you'll want to reduce their actual, physical size by pixels (although be sure not to make them smaller than you'll actually want to display them on your site).
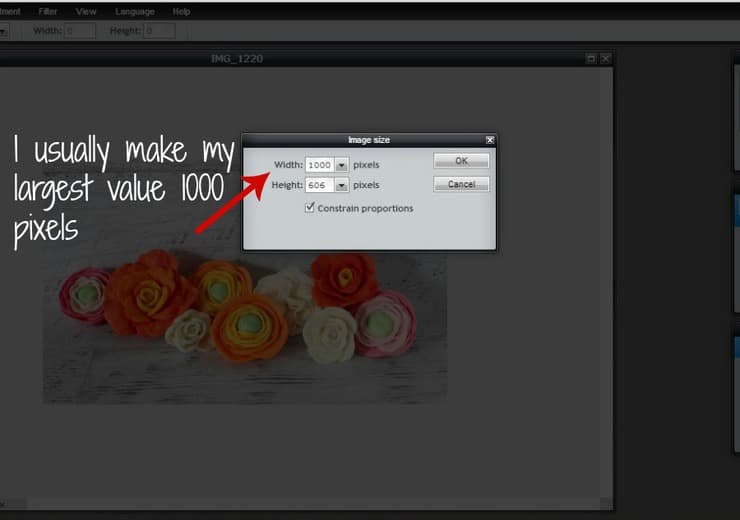
Most programs (and all of the ones I previously mentioned in this post) even let you choose the quality you save your photos at (lower quality=smaller file). If you can reduce the quality of the photo during the saving process, I recommend doing so. Think of it like printing a picture or document; you could print it at "best" quality, and in some instances you may want to. But in most cases, "normal" quality works just fine, and you wouldn't notice the difference without comparing the two qualities side by side. If you can reduce the quality of your photo, I recommend reducing it to 80%. This will save you a lot of file space, and no one will even notice the difference.
Exposure
Compressing your photos is something I always, always recommend. Exposure, on the other hand, is something that you'll sometimes want/need to mess with, but not necessarily always. In a nutshell, exposure has to do with the light in your photo (as in, how dark or light it is). Take the photo below, for example. It's kind of dark, right? And because it's a little on the dark side, the colors look faded, the shadows are really obvious, and it generally just isn't that appealing looking.
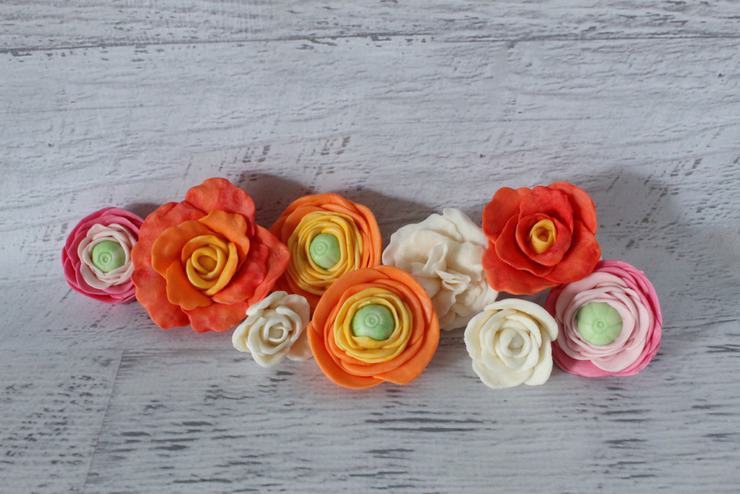
So how do you fix that? By changing the exposure! Since the photo we're working with is a little on the dark side, we'll want to increase the lightness/brightness in the photo.
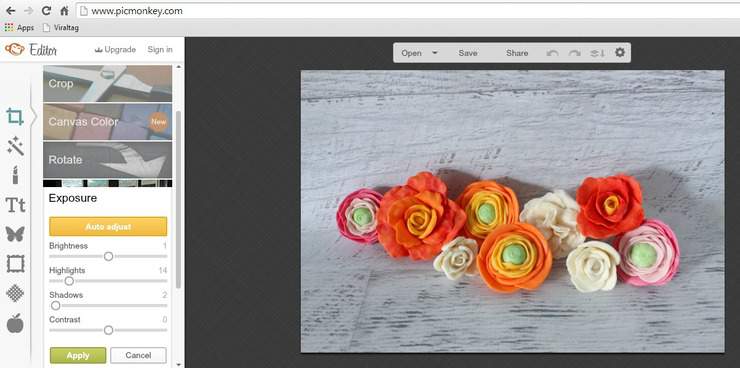
If you're unsure about what you should be changing in terms of exposure, all of the programs I've mentioned have an auto adjust function, which is a good place to start if you're feeling lost. Otherwise, work with your photo lightness, brightness, shadows, and contrast until your photo is the way you want.

Color Balance
Color balance is another feature that you may or may not need to edit, but that becomes particularly important when you're shooting photos at night. If you can shoot your photos during the day, with natural daylight, you have the best chance of having natural looking colors in your pictures. That being said, there are still times where your photos may come out looking tinted because of weather (you're more likely to encounter a blue tint on cloudy days and a yellow tint on overly sunny days). Night photos can also be tricky because they often involve light sources that don't look natural in your photos (most light bulbs give off a kind of yellowish light). Take the picture below, for example. I took this picture early in the morning before the sun had fully come up. The result: a low-light blue tint. Doesn't look great, right?
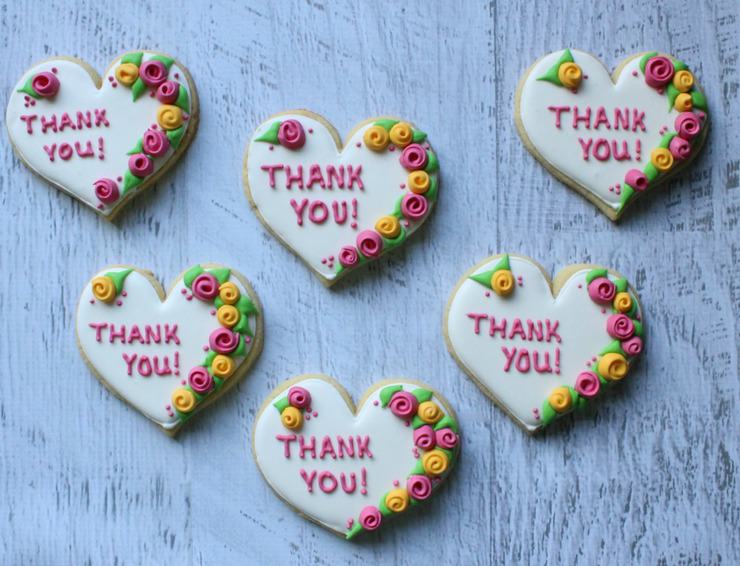
So how do you correct photos that look tinted? By adjusting the color balance! For this task, I really recommend using either Pixlr or GIMP (and I don't recommend PicMonkey) because these programs will let you individually adjust your red, blue, and green values. As you can see, the photo above has an overly blue tint to it. This means that you'll want to reduce the amount of blue in the photo (usually you'll want to decrease the green as well) and increase the red. If your photo has a yellow tint to it, you'll want to reduce your red and green values, and increase your blue.

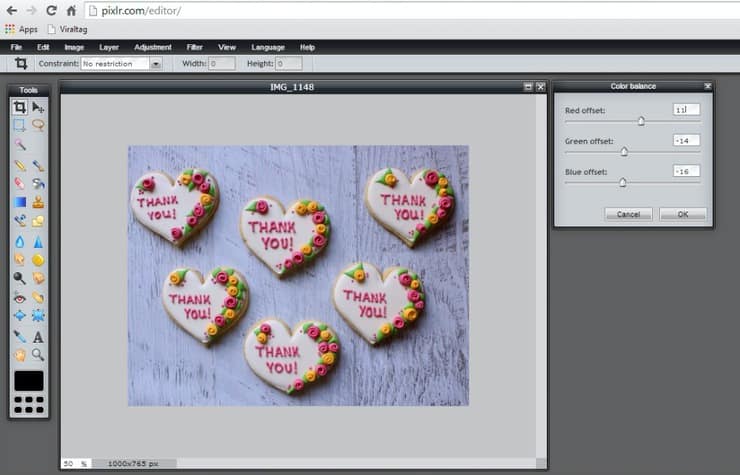
Obviously the photo needs some work on it's exposure, but you can start to see that things are the correct color, right? If you're struggling with getting your color balance right, a good point of reference is any white in your photo. You've reached the correct color balance if the white in your photo is a true white.
 TL;DR... The quick summary!
If you're still, in fact, reading this, thank you! I know it's kind of a long-winded post, but photo editing is kind of a long-winded topic. But just in case you're suffering from information overload or just couldn't get through everything, here's a super duper quick summary of the important points:
Should you buy a software program? Only if you really want to or already have one you've worked with. Otherwise, there are a lot of great free programs out there.
What free photo editing programs are available? I recommend GIMP, PicMonkey, Canva, and/or Pixlr.
What sorts of things should you be editing in your photos? Always compress your photos (this will make the file size smaller), but you may also consider working with the exposure and color balance, depending on the needs of the photo.


toozesty says
thanks for sharing this. I definitely found some tips that I can put to use!
The Simple, Sweet Life says
I'm so glad you found it helpful! 🙂
Kellyann McClennen (@Making_More) says
Really helpful post! I have found that photography has had the steepest learning curve since I started blogging.
Thanks for sharing
Kelly
- Pinned this!
The Simple, Sweet Life says
I completely agree with you! Photography has definitely been the most difficult part of blogging for me, too. I'm glad you found some helpful information in this post! 🙂
Sue {munchkin munchies} says
Thanks; I need all the help I can get! I'm going to pin this post for future reference:)
The Simple, Sweet Life says
I'm so glad you liked the post and found it helpful! 🙂
Bonnie says
This was a great post! I use pic monkey but I think I'm ready to move on to something with more options. Thanks so much for helping me figure out where to go next.
~Bonnie @ Our Secondhand House
The Simple, Sweet Life says
I'm so glad you found the post helpful! 🙂
Shanice says
Great post! I would love it if you joined and contribute your awesome posts at my link party at City of Creative Dreams, starts on Fridays 😀 Hope to see you there at City of Creative Dreams Link Party.
The Simple, Sweet Life says
Thank you for the invitation! I will definitely stop by on Friday! 🙂
Julie V says
I appreciate you putting this together. I have been using Picasa, but I may switch to PicMonkey, especially with your extra tips. I've pinned this.
The Simple, Sweet Life says
Thanks for the pin! 🙂 I'm so glad you found some helpful tips in this post!
PJ says
I didn't know most of this stuff. Thanks! Especially that bit about compressing my photos. I really need to start doing that.
The Simple, Sweet Life says
I think compressing is one of those little known internet things. If it weren't for that one web design class I took back in college, I certainly wouldn't have known about it either! 🙂
Dee says
I really loved this post! I use PicMonkey, but I'll have to check out the other editing sites too. Thanks so much for sharing these tips! 🙂
Kat Clayton says
What a great post! I found it through the Wednesday Round Up on Foody Schmoody. I'm just now learning about photography for blogging and its a struggle. You had some really great advice. Thank You!
The Simple, Sweet Life says
Learning to photograph (and edit) my recipes has DEFINITELY been the hardest part of blogging for me. Good luck! 🙂 It takes a little time to learn, but you can only get better!
Pure Grace Farms says
Great tutorial. I am always looking for good information on how to improve my photography. So much to learn! I would be honored if you would come by and share on The wonderful Wednesday Blog Hop. I know this would be a big hit! Blessings, Shari
http://puregracefarms.com/2014/06/wonderful-wednesday-blog-hop77/
The Simple, Sweet Life says
I'm glad you enjoyed the tutorial! I'll definitely stop by and check out your link party. Thanks for the invitation! 🙂
Pure Grace Farms says
I am so happy to see you came by and linked up! I love your tutorial and I am hoping you see a ton of traffic from our site! Tweeting, pinning and giving a shout out on FB to share the love and say thanks for coming!
Blessings, Shari
The Simple, Sweet Life says
Thank you! And thank you again for the invitation! 🙂
anglemoine says
Amazing tips!!!! Thanks so much for sharing at The Wednesday Roundup! Hope to see you again next week! ~Angela @ LeMoine Family Kitchen
The Simple, Sweet Life says
I'm glad you enjoyed the post! Thanks for hosting another great party this week! 🙂
toworkwithmyhands says
Thank you for your concise, straight-forward post. Photo editing is something I have been working hard on since the launch of my blog 7 months ago. I have learned that a great photo is key to a great post. I had a lot of flubs in the beginning (thankfully people still came back). I finally got things together with PicMonkey, but think I still have a long way to go. I'm interested in looking into Pixlr too. I have not heard of it before now.
Thanks for a great post. There's lots of great stuff here!
The Simple, Sweet Life says
I'm so glad you found the article helpful! 🙂 I definitely know photography has been one of the more difficult parts of food blogging for me. Hang in there! You'll only get better and it'll only get easier! 🙂
Zenda says
Great tips! Thanks for sharing!!
The Simple, Sweet Life says
So glad you found the post useful!
Eco Friendly Homemaking says
What great tips! Thanks.
Julie@Sweet and Spicy Monkey says
Thanks for your tips, I found them very helpful....I love free things!! Thanks for sharing 🙂
The Simple, Sweet Life says
Can't beat free! 🙂 I'm so glad you found the post helpful!
anglemoine says
Thanks so much for stopping by The Wednesday Roundup Link Party! These editing tips are fantastic! Congrats on being on of our featured picks! This is now pinned onto The Wednesday Roundup Pinterest Board! Hope to see you again next week!
The Simple, Sweet Life says
Wow, thanks so much for the feature and for hosting each week!
Mike Jackson says
This is really a great post about editing food photos. Just love your post so much. Many many thanks for everything.