
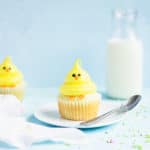
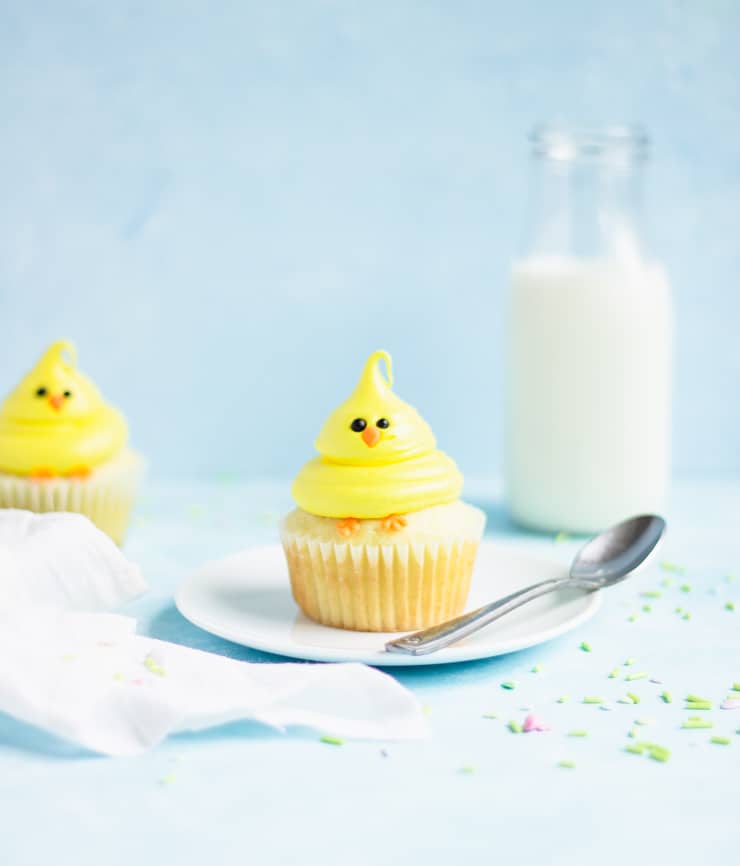
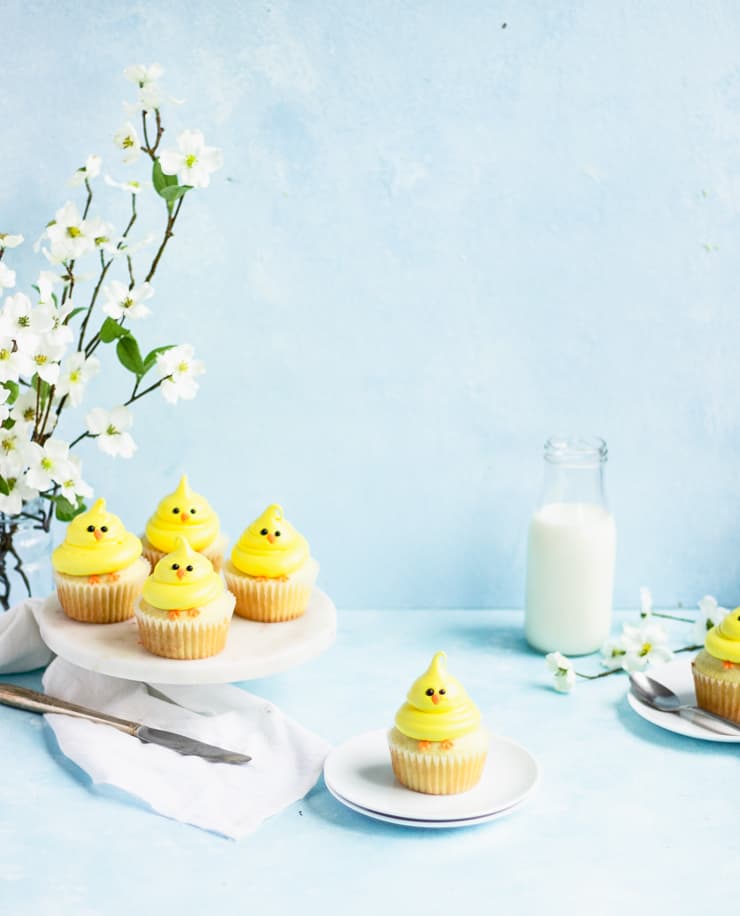
Your Easter festivities are sure to be every bit as sweet as they are bright with these easy Easter chick cupcakes. With a moist vanilla cupcake topped with a rich vanilla buttercream, these cupcakes are sure to appeal to even the pickiest eaters.
Have you had enough chick goodies yet?
Trick question, there is no such thing.
I mean, who could possibly resist a good rolly-poly chick? Especially when it's a rolly-poly chick cupcake?!
How to make these Easter cupcakes
First, whip up your cupcakes.
Although you can use any recipe you like, I've included a recipe for some easy vanilla cupcakes. To make these cupcakes, stir together the dry ingredients. Slowly beat in the butter, beating until the mixture has a fine, crumbly texture (about 3 minutes).
In a separate bowl, whisk together the sour cream, eggs, oil and vanilla. Whisk into the dry ingredients until just combined. Add the milk, whisking until lump free.
Pour the batter into a lined cupcake pan, filling the liners about ⅔ of the way full. Bake at 350F for 14-16 minutes, or until a toothpick inserted in the center comes out clean.
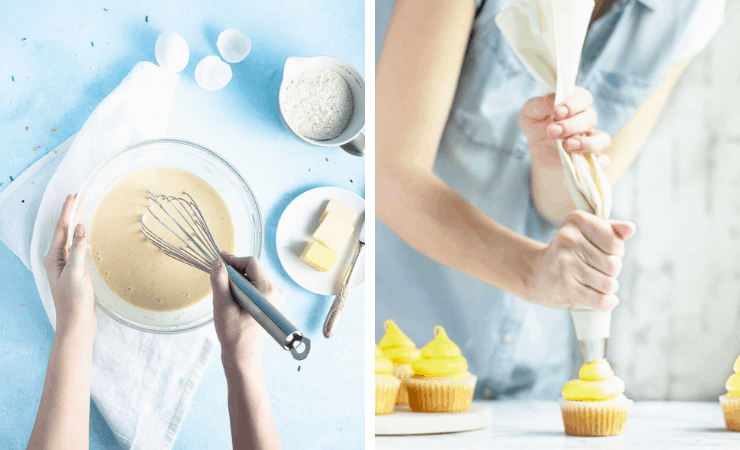
Second, making your frosting.
In a small saucepan, combine the water and sugar. Bring the syrup to a boil and cook until it’s completely clear. While the syrup cooks, whip your egg whites in the bowl of a stand mixer until stiff peaks form.
On high, pour the hot syrup down the side of the bowl and into the egg whites. Continue to whipping until the mixture has cooled to room temperature (about 10 minutes).
On low, begin adding 1″ slices of the butter until all the butter has been added. Whip the frosting on high until it becomes a thick frosting (it’ll look curdled first, but don’t worry. Just keep on whipping).
Turn the mixer down to low, add the vanilla extract and yellow food coloring, and continue whipping until the frosting is completely smooth.
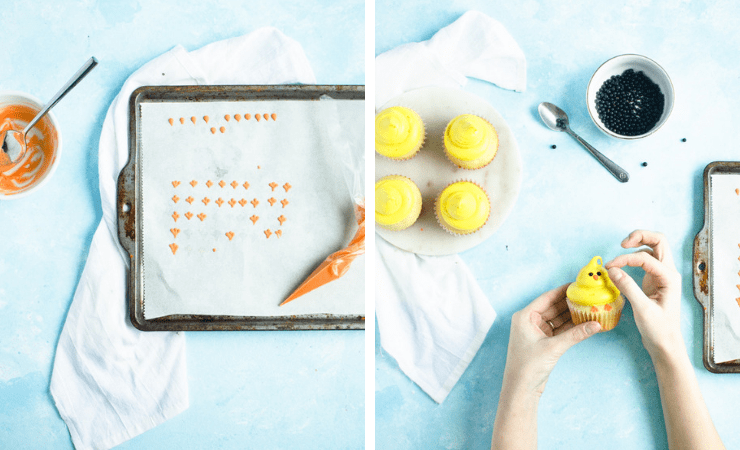
Third, create the chocolate feet and beaks.
In a small bowl, melt your orange candy melts with ¼ teaspoon vegetable shortening in the microwave using 10 second increments.
Pour the melted candy melts into a piping bag, clip a small opening in the tip and pipe your feet and beaks onto parchment paper.
To make the beaks: Gently apply pressure to your bag of candy melts to pipe a dollop of chocolate. Release the pressure on the bag and gently draw the tip of your bag down to create the point.
To make the feet: Pipe a small dot of chocolate onto the parchment paper. Release the pressure slightly, but not entirely, and drag your piping bag down. This will create the middle toe.
Repeat the same action on either side of the middle toe drawing your piping bag to the side and down to connect the lines of melted chocolate.
Draw the line of chocolate out on the last toe to create enough of an end to secure the feet in the frosting. Allow to harden completely.
To remove the candy melts from the parchment, gently pick of an end and peel it away from the chocolate. Do not try to grab the chocolate and peel it up from the parchment as this may result in breakage.
If the chocolate starts softened, try putting it in the freezer for a few minutes to harden it back up.
Finally, assemble your cupcakes.
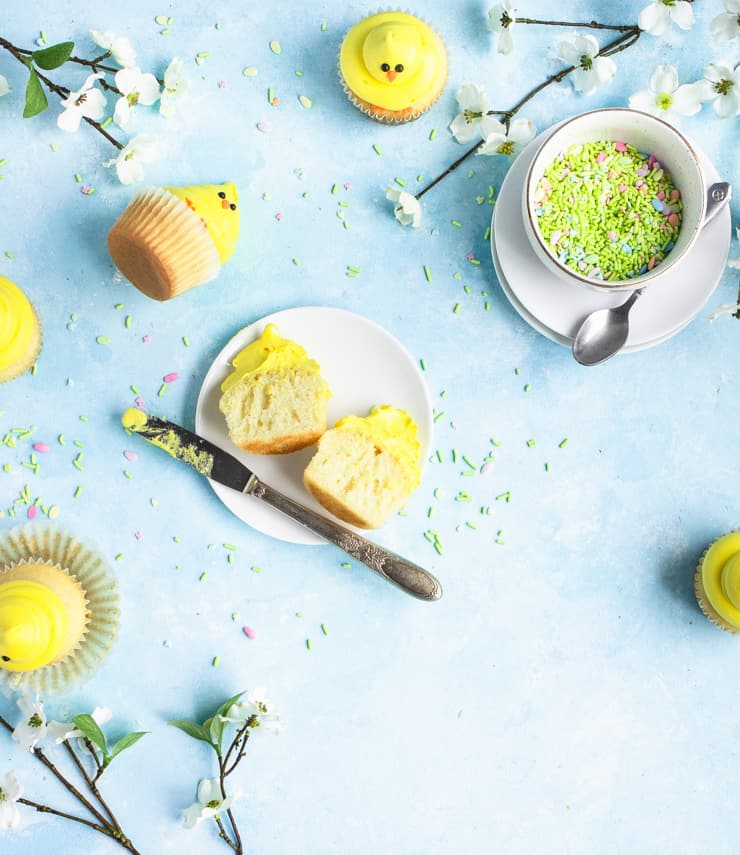
Spoon your yellow frosting into a piping bag with a large round tip (I used an Ateco 809). Pipe a large dollop onto each cupcake, and then go back and pipe a smaller dollop on top of it.
Press two black sprinkles into the front of the smaller dollop of frosting, add a candy melt beak and two of the candy melt feet.
Tips for making these cupcakes
- Knowing when your cupcakes are done: There are two ways to test for doneness. 1. Insert a tooth pick in the center of the cupcakes and if it comes out clean, it’s done. 2. Gently press the top of the cupcake and if it almost immediately springs back, it’s done.
- Looking to save a little time? You can skip the homemade frosting and opt for store bought. You’ll need approximately 1 ½ lbs (about 1 ½ containers) and I recommend a “thick and creamy” frosting over a “fluffy” one to help it hold it’s shape.
- If you're making the frosting in this recipe, don't be discouraged if it looks curdled after you add the butter. The butter and meringue will separate slightly before coming back together. Just keep whipping the frosting.
- The secret to smooth, air-bubble free frosting: Once the frosting has come together, turn your stand mixer down to low and continue whipping it for about 5 minutes. This should work out most of the air bubbles.
- Fill that piping bag like a pro: Spoon your frosting onto a large piece of plastic wrap, roll and twist the ends. Trim one end so there’s about ½” in length, drop your frosting into the piping bag (short end first) with the tip already on and pipe!
- Storing frosted cupcakes: While cupcakes are always best when eaten the same day they’re made, these can be stored in an air-tight container at room temperature for 1-2 days.
Did you make this recipe? I’d love to hear how it went in the comments below. Better still, snap a photo and tag it on Instagram with #thesimplesweetlife. I love seeing your creations!
PrintRecipe
Easter Chick Cupcakes
Your Easter festivities are sure to be every bit as sweet as they are bright with these easy chick cupcakes. With a moist vanilla cupcake topped with a rich vanilla buttercream, these cupcakes are sure to appeal to even the pickiest eaters.
- Prep Time: 30 minutes
- Cook Time: 16 minutes
- Total Time: 46 minutes
- Yield: 12
- Category: Dessert
- Cuisine: American
Ingredients
For the cupcakes:
- 1 cup granulated sugar
- 1 ¾ cups cake flour, not self-rising
- 1 ½ teaspoon baking powder
- ½ teaspoon baking soda
- ½ teaspoonsalt
- ¼ cup unsalted butter, at room temperature
- 2 eggs
- ⅓ cup full-fat sour cream
- ¼ cup vegetable oil
- 1 tablespoon vanilla extract
- ⅔ cup milk, at room temperature
For the frosting:
- 6 tbsp water
- 1 ⅓ cup granulated sugar
- 6 egg whites
- 3 sticks unsalted butter
- 1 tsp vanilla extract
For decorating:
- ¼ tsp vegetable shortening
- 2 oz orange candy melts
- Black nonpareils
Instructions
- Stir together the dry ingredients for the cupcakes.
- Slowly beat in the butter, beating until the mixture has a fine, crumbly texture (about 3 minutes).
- In a separate bowl, whisk together the sour cream, eggs, oil and vanilla. Whisk into the dry ingredients until just combined.
- Add the milk, whisking until lump free.
- Pour the batter into a lined cupcake pan, filling the liners about ⅔ of the way full.
- Bake at 350F for 14-16 minutes, or until a toothpick inserted in the center comes out clean.
- In a small saucepan, combine the water and sugar for the frosting.
- Bring the syrup to a boil and cook until it’s completely clear.
- While the syrup cooks, whip your egg whites in the bowl of a stand mixer until stiff peaks form.
- On high, pour the hot syrup down the side of the bowl and into the egg whites. Continue to whipping until the mixture has cooled to room temperature (about 10 minutes).
- On low, begin adding 1″ slices of the butter until all the butter has been added.
- Whip the frosting on high until it becomes a thick frosting (it’ll look curdled first, but don’t worry. Just keep on whipping).
- Turn the mixer down to low, add the vanilla extract and yellow food coloring, and continue whipping until the frosting is completely smooth.
- In a small bowl, melt your orange candy melts with ¼ teaspoon vegetable shortening in the microwave using 10 second increments.
- Pour the melted candy melts into a piping bag, clip a small opening in the tip and pipe your feet and beaks onto parchment paper.
- To assemble the cupcakes, spoon your yellow frosting into a piping bag with a large round tip (I used an Ateco 809).
- Pipe a large dollop onto each cupcake, and then go back and pipe a smaller dollop on top of it.
- Press two black sprinkles into the front of the smaller dollop of frosting, add a candy melt beak and two of the candy melt feet.
Notes
- Knowing when your cupcakes are done: There are two ways to test for doneness. 1. Insert a tooth pick in the center of the cupcakes and if it comes out clean, it’s done. 2. Gently press the top of the cupcake and if it almost immediately springs back, it’s done.
- Looking to save a little time? You can skip the homemade frosting and opt for store bought. You’ll need approximately 1 ½ lbs (about 1 ½ containers) and I recommend a “thick and creamy” frosting over a “fluffy” one to help it hold it’s shape while dipping.
- If you're making the frosting in this recipe, don't be discouraged if it looks curdled after you add the butter. The butter and meringue will separate slightly before coming back together. Just keep whipping the frosting.
- The secret to smooth, air-bubble free frosting: Once the frosting has come together, turn your stand mixer down to low and continue whipping it for about 5 minutes. This should work out most of the air bubbles.
- Fill that piping bag like a pro: Spoon your frosting onto a large piece of plastic wrap, roll and twist the ends. Trim one end so there’s about ½” in length, drop your frosting into the piping bag (short end first) with the tip already on and pipe!
- Storing frosted cupcakes: While cupcakes are always best when eaten the same day they’re made, these can be stored in an air-tight container at room temperature for 1-2 days.
Vanilla cupcake recipe adapted from Cupcake Project
Nutrition
- Serving Size: 1 cupcake
- Calories: 554
- Sugar: 42g
- Sodium: 190mg
- Fat: 33.9g
- Saturated Fat: 21.3g
- Carbohydrates: 58.1g
- Fiber: .4g
- Protein: 4.9g
- Cholesterol: 101mg
If you liked these cupcakes, you might also like...
Update Notes: This post was originally published in March of 2015 but was republished with an improved recipe, step-by-step photos and tips in April of 2019.
Oh yay! You made it all the way to the bottom. High five!
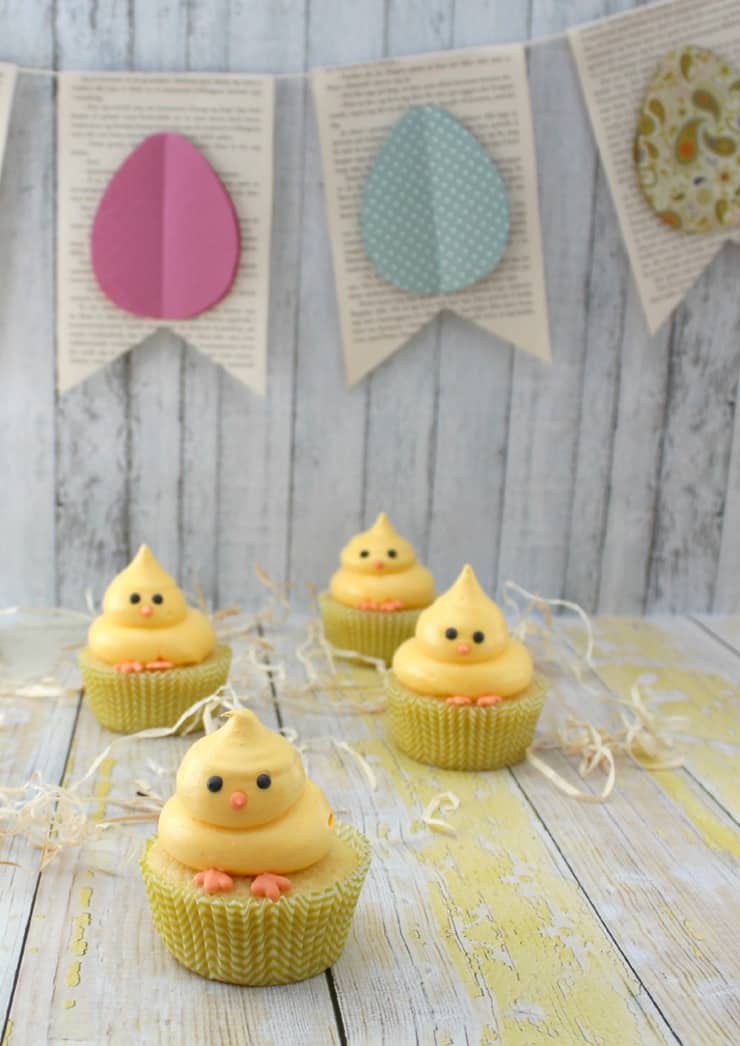
And in doing so, you probably noticed that this is in updated version of an older recipe from my blog. And maybe that has you wondering what the doughnuts originally looked (or maybe not… I’m no mind reader). Was it pretty? Did she even know how to use a decent camera?? What was her philosophy around props and backdrops?
Um, it was bad. My photos from 2015 had SO much going on in them, including multiple backdrops that didn't necessarily match. It was all sorts of no bueno.
Check out one of the original photos below for yourself!


Sue says
Simply adorable!
The Simple, Sweet Life says
Thank you! 😀
June Burns says
Aw, what cute cupcakes! Love how easy they are to make too, bet they were lots of fun 🙂
The Simple, Sweet Life says
They were lots of fun! And after all the cakes I've been making, a very nice change of pace. 🙂
Caroline @ Pass the Cocoa says
Aw, these are adorable! They remind me of Peep chicks (:
The Simple, Sweet Life says
Haha I actually hadn't thought of it before you mentioned it, but I definitely see the resemblance now! 🙂
mitzismith116124507 says
I am in love!! super sweet for Easter treat 🙂
The Simple, Sweet Life says
So glad you like them! 🙂
gio says
Aww so adorable!
The Simple, Sweet Life says
Thank you! 😀
lalakme says
These are so sweet! And they don't look terribly difficult, which is the best part!
The Simple, Sweet Life says
Thank you! 🙂 They really are super easy to make!
Katy @ Her Cup of Joy says
Wow how adorable are these! Will definitely add this to my toddler baking to do list!
The Simple, Sweet Life says
Thank you! 🙂 I hope you and your little one enjoy making them!
Lise says
These are so adorable. Love them! Pinned and shared on MomLovesBaking.com Facebook page. 🙂
The Simple, Sweet Life says
So glad you like them and thank you for the sweet shares! 🙂
Mira says
These are too cute! Pinned and shared!
The Simple, Sweet Life says
So glad you liked these little guys! 😀
movita beaucoup says
That last photo? The sideways peeking chick? MADE MY DAY.
The Simple, Sweet Life says
I'm so glad you liked it! That shot is kind of becoming my new thing. 😉
Angelia says
I agree! I love that last shot!!
Kate @ Framed Cooks says
The CUTEST cupcake I have ever seen....and that last picture? THE BEST!!!! Here comes my Easter dessert - pinning!
The Simple, Sweet Life says
Awww thank you! I'm so glad you liked the cupcake and my photobombing picture. 😉
nancykeslin says
so cute. love the photos, tasty looking cupcakes. thanks for sharing
The Simple, Sweet Life says
So glad you liked them! 🙂
Bernadyn says
These are too cute, love them and loving that last picture, haha! Pinned this and sharing on my blog's FB page tomorrow 🙂
The Simple, Sweet Life says
Thank you so much! I'm glad you liked my little photo bomber. He's kind of a character. 😉
Sarah @ Sarah's Bake Studio says
I absolutely love these. They are too cute! Also, I definitely want to try the raspberry lemonade cupcake. That sounds divine. Pinned!
The Simple, Sweet Life says
Thank you! I have to admit, we've finally gotten some sun here and raspberry lemonade just sounded so... spring-y! 🙂
mylifecookbook says
These are so cute! my son would love these.... great post! (found you on Creative Ways)
The Simple, Sweet Life says
Thanks so much for stopping by and leaving a sweet comment! 🙂
justputzing says
These look soooooooooo cute!
The Simple, Sweet Life says
Thank you! 🙂
GaLE says
Adorable cupcakes! But that bunting, I looovvvveee!!!!
Cat says
These are adorable! I love these! Amazing.
The Simple, Sweet Life says
Thank you so much! 🙂
Baking In Pyjamas says
How adorable! These look wonderful. Thanks for linking up to Sweet and Savoury Sunday, stop by and link up again. Have a great day!! Laura@Baking in Pyjamas
Maria says
These are the CUTEST cupcakes!!!! Absolutely adorable!!!
The Simple, Sweet Life says
Awww thank you! 😀
Susan @ Oh My! Creative says
So darling for Easter - pinned! I will be featuring them at Whimsy Wednesday this week! Thanks for linking up with us! Susan
The Simple, Sweet Life says
Thanks so much for the sweet feature! 😀
Sarah @ makegrowdo says
I LOVE these little guys!! I'm getting my very own little chickies this year and am crazy excited.. I think it's only fitting to have a chick party and make these cupcakes!
The Simple, Sweet Life says
How exciting! I've always loved the idea of having chickens, but we unfortunately live in an apartment complex so it's not really feasible. Can't wait to see and her all about your adventures with chicken raising! 😀
Sharon Erickson (@sharonme86) says
My kids would love it if I made this for them! Oh my goodness it's so darling! Pinning! Thanks for sharing this at Totally Terrific Tuesday last week.
The Simple, Sweet Life says
You'll have to try making them! I promise, they're soooooo easy! 😀
Deb@ Cooking on the Front Burner says
Thanks for sharing with us at Best of the Weekend - these will be featured on my blog tonight!
The Simple, Sweet Life says
Thanks so much for the sweet feature! 🙂
Erin D says
These are wonderful! So cute!
http://makingmemorieswithyourkids.com
The Simple, Sweet Life says
Thank you! 🙂
Michele says
I think this is one of the cutest things I have ever seen. Period. Done.
You nailed ADORBZ totally.
Happy Easter!!!!!!!!!!!
The Simple, Sweet Life says
Awww thank you! 🙂
Meggan says
The frosting ingredients here and those in the linked Raspberry Lemonade Cupcakes instructions are slightly different. Do you add the lemon juice at the same time you would add the Raspberry Lemonade Powder if you were using that for flavoring? ...looking forward to making these!
The Simple, Sweet Life says
Exactly! 🙂 Just add the lemon juice (or any other flavoring you might want to use) at the same time as the raspberry lemonade powder in the other recipe.
thequeenbeebaker says
These are absolutely precious!!
The Simple, Sweet Life says
Awww I'm so glad you think so! 😀
Sue says
I am so ready for spring and these just make me smile 🙂 I love the photos and extra instructions. So helpful! !
Lauren says
So I’ve had this webpage up on my phone for a few weeks now in anticipation of Easter but I see it’s now a vanilla cupcake recipe instead of the raspberry lemonade. I know there is a link to the raspberry lemonade cupcakes but the recipe was different and I got ingredients based on what was listed here (raspberry extract instead of raspberry lemonade powder) - is that version somewhere?? Thanks!!
The Simple, Sweet Life says
Hi Lauren! Yes, I did switch to a cupcake flavor and frosting that I thought would be a nice, neutral option, but you can find the cupcake and frosting recipe I originally linked to this post here: https://thesimple-sweetlife.com/raspberry-lemonade-cupcakes/
Lauren says
Thank you so much!!
Lauren says
Oh also - before there were detailed instructions on how to pipe the feet and nose. Are those somewhere else too? Thanks!!!
The Simple, Sweet Life says
Hi Lauren! It's good to know you found those more detailed instructions helpful! I'll be sure to add them back in. In the meantime, the instructions for piping the feet and beaks are as follows:
1. Fill your piping bag with melted orange candy melts, and clip a small hole in the end. You can also use a Wilton #2 tip if you want to make sure you have the right size opening.
2. To make the beaks: Gently apply pressure to your bag of candy melts to pipe a dollop of chocolate. Release the pressure on the bag and gently draw the tip of your bag down to create the point.
3. To make the feet: Pipe a small dot of chocolate onto the parchment paper. Release the pressure slightly, but not entirely, and drag your piping bag down. This will create the middle toe. Repeat the same action on either side of the middle toe drawing your piping bag to the side and down to connect the lines of melted chocolate. Draw the line of chocolate out on the last toe to create enough of an end to secure the feet in the frosting. Allow to harden completely.
4. To remove the candy melts from the parchment, gently pick of an end and peel it away from the chocolate. Do not try to grab the chocolate and peel it up from the parchment as this may result in breakage. If the chocolate starts softened, try putting it in the freezer for a few minutes to harden it back up.
Lauren says
You’re the best! I appreciate the detailed instructions as I’m not very good at the decorative stuff haha thanks again!
Stephanie Tjepkes says
Hi! So I made these chick cupcakes last year for Easter and they turned out amazing! The frosting was their favorite, saying that it reminded them of the boiled frosting that our great grandma used to make. This year I pulled up the recipe again but the frosting seems different? I do not remember putting butter in it or anything like that, has it changed and do you have the original recipe somewhere? Thanks!
The Simple, Sweet Life says
Hi Stephanie! Yes, I did switch to a cupcake flavor and frosting that I thought would be a nice, neutral option, but you can find the cupcake and frosting recipe I originally linked to this post here: https://thesimple-sweetlife.com/raspberry-lemonade-cupcakes/ I've gotten several comments about this so I think I might just have to bring back the original recipe. 🙂 Thanks for the feedback!
Ellen Hauser says
I also was confused by the new recipe. This is my third year making it for my son and his friend. They love decorating the blank chicks themselves with the piped feet, beak, and eyes. I even made some mustaches and other bling for them. They love it. Thank you for the great idea and the link to the original recipe for the cupcakes and frosting.
Janet says
Aw, what cute cupcakes! Love how easy they are to make too, bet they were lots of fun 🙂