Marius Cookies
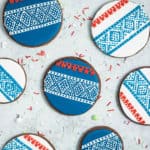
Inspired by a classic Norwegian knitting pattern, these decorated sugar cookies are sure to bring a sense of "hygge" to your home
- Prep Time: 8 hours
- Total Time: 8 hours
- Yield: 12
- Category: Dessert
- Method: Baking
Ingredients
- A dozen sugar cookies
- A batch of royal icing
- Red and blue food gel coloring
Instructions
- Make a half batch of chocolate sugar cookies. Cut the cookies out with large, round cookie cutters.
- Make a full batch of royal icing that has a 20 second consistency.
- Tint a few tablespoons of royal icing red, and then divide the remaining icing into two equal parts. Tint half of the remaining icing a dark blue.
- Pour the dark blue and white icings into separate piping bags and pipe directly onto the cookies. Use a toothpick to gently swirl the icing into any bare patches.
- Empty the remaining blue and white icing from the piping bags into separate bowls and cover with plastic wrap.
- Allow the icing to dry completely (at least 8 hours or overnight).
- Whip the remaining icing for each color until it reaches a piping consistency.
- Pour the icing into separate bags and snip a small, round hole in the end of each (or use a #1 piping tip).
- Starting at the top with the red, pipe a line of icing followed by a second line of icing about a centimeter below the first.
- Connect the lines by making small dots of icing.
- Add four dots of red icing that are two across and two down to the bottom line to create squares.
- Using the remaining color that is not the same as the base coat of icing, pipe two lines about a centimeter apart, connecting them with small dots of icing.
- Starting in the middle, and using the band you just made as a guide to help keep your design straight, pipe an X shape using dots. The X should be nine dots down one side, and nine down the other.
- Pipe another band at the bottom of the X design with two lines about a centimeter apart, connecting them with small dots of icing.
- Pipe two Vs, one above the top of the X, and one below it.
- Add a small dot of icing at the top and bottom of the X.
- Using the dots that make up the X as a guide, pipe a diamond shape.
- Fill the diamond in with dots of icing.
- Make another X, using the diamond as a guide, and fill it in the same way you did the first. Continue this pattern until you reach the end of each side of the cookie.
- Let the cookies dry overnight before packaging.
Notes
- Working ahead: Sugar cookie dough can be kept in the refrigerator for up 5 days before use. You can also freeze the dough for up to 6 months. To use frozen dough, thaw it in the refrigerator overnight.
- To prevent butter bleed, cool your cookies on a cooling rack rather than the pan, make sure they’re completely cool before working with them (I like to leave them out over night so they cool and dry as much as possible).
- If your cookies spread during the baking process, use the same cookie cutter to “cut them out” again immediately after removing them from the oven. When the cookies are hot and soft, you can make a clean cut.
- Royal icing darkens as it dries: whatever color you want on your cookie, you’ll want to mix it slightly lighter as it will darken as it dries.
- Some colors are hard to mix: red and black in particular can be difficult colors to mix. The good news is that they will darken as they dry. It also helps to use a highly pigmented gel food coloring like “super black” or “super red” by Americolor.
- Make more of each icing color than you think you’ll need: because royal icing darkens as it dries, it’s very hard to match a color if you end up not having enough. It’s always a good idea to make more of a color than you think you’ll need.
- If you end up with any little air bubbles in your icing, you can pop those with your toothpick or quilling tool.
- Storage: Cookies can be stored in a cool, dark place in an airtight container for up to 3 weeks.
Find it online: https://thesimple-sweetlife.com/marius-cookies/