• Skip to main content
  • Skip to primary sidebar

The Simple, Sweet Life

menu icon
go to homepage
  • Home
  • Recipes
  • About Me
  • Subscribe
    • Email
    • Instagram
    • Pinterest
    • TikTok
  • subscribe
    search icon
    Homepage link
    • Home
    • Recipes
    • About Me
    • Subscribe
    • Email
    • Instagram
    • Pinterest
    • TikTok
  • ×
    Home » All Desserts » By Holiday » Halloween

    Published: Oct 16, 2015 · Modified: Mar 12, 2022 by Claire

    Creating Dimension with Royal Icing

    Jump to Recipe·Print Recipe· 5 from 1 review

    Learn how to create dimension in your royal icing cookies in this fun Halloween tutorial! | The Simple, Sweet Life

    You GUYS! I am SO excited to be writing this tutorial for you! Maybe that seems a little overzealous for an icing tutorial, but I'll tell you why.

    1. I've watched some of my all-time favorite cookie idols like the wonderful Elizabeth of Arty McGoo and Sally of SweetieDoodle create amazing works of cookie art with the most fabulous dimension, and it's always left me scratching my head wondering how the heck they did it! Seriously guys... seriously. Spoiler alert: I scoured the internet and figured it out.
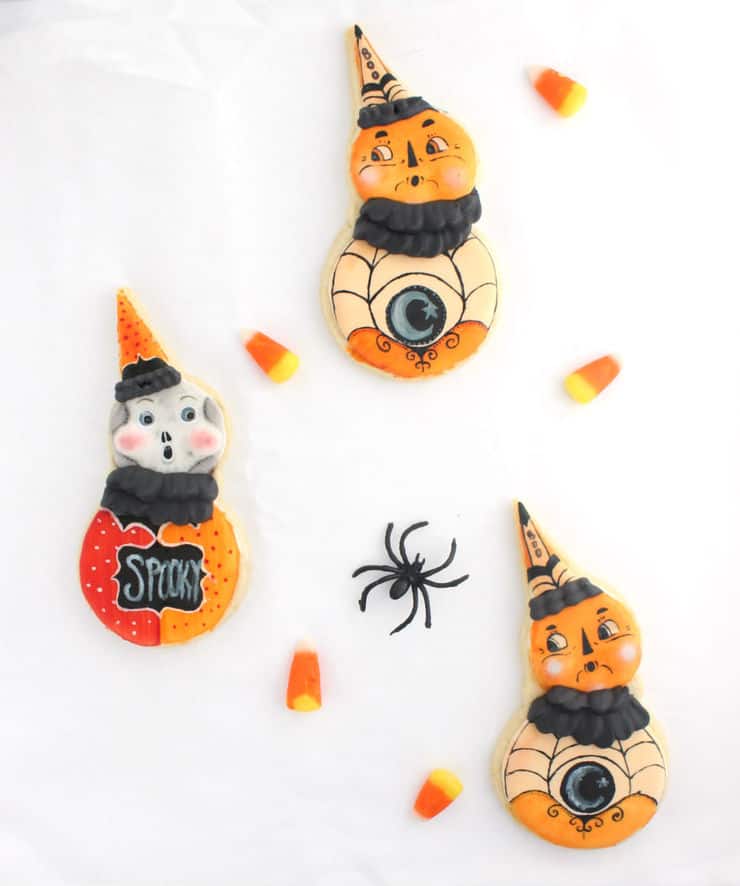
    2. Anyone who knows me well and/or has ever stepped foot into my home during the month of October knows I have a small army, ehm, collection of Halloween figurines. Many of these figurines, including my absolute favorite (sorry guys, I pick favorites), are designed by Johanna Parker.

    Learn how to create dimension in your royal icing cookies in this fun Halloween tutorial! | The Simple, Sweet Life

    So you can imagine how absolutely, ridiculously excited I was when I got in touch with the amazingly talented Johanna Parker to ask if I could use her figurines as the inspiration behind this tutorial and she so graciously agreed!

    Holy guacamole Batman, this tutorial just got real!

    Learn how to create dimension in your royal icing cookies in this fun Halloween tutorial! | The Simple, Sweet Life

    Learn how to create dimension in your royal icing cookies in this fun Halloween tutorial! | The Simple, Sweet Life

    If you're not familiar with Johanna Parker's work (Wait, whaaat?! Go familiarize yourself now! I promise this tutorial will still be here when you get back), you might be wondering why her work. What about it inspired this tutorial... aside from the obvious fact that her work is A-MAZING and I may or may not have just been looking for any excuse to cookie-fy it (in case you're new here, I am aware that "cookie" is technically a noun, and that I may have just verbified it, and also, sometimes I just make up words... like verbify!).

    Learn how to create dimension in your royal icing cookies in this fun Halloween tutorial! | The Simple, Sweet Life

    Learn how to create dimension in your royal icing cookies in this fun Halloween tutorial! | The Simple, Sweet Life

    Learn how to create dimension in your royal icing cookies in this fun Halloween tutorial! | The Simple, Sweet Life

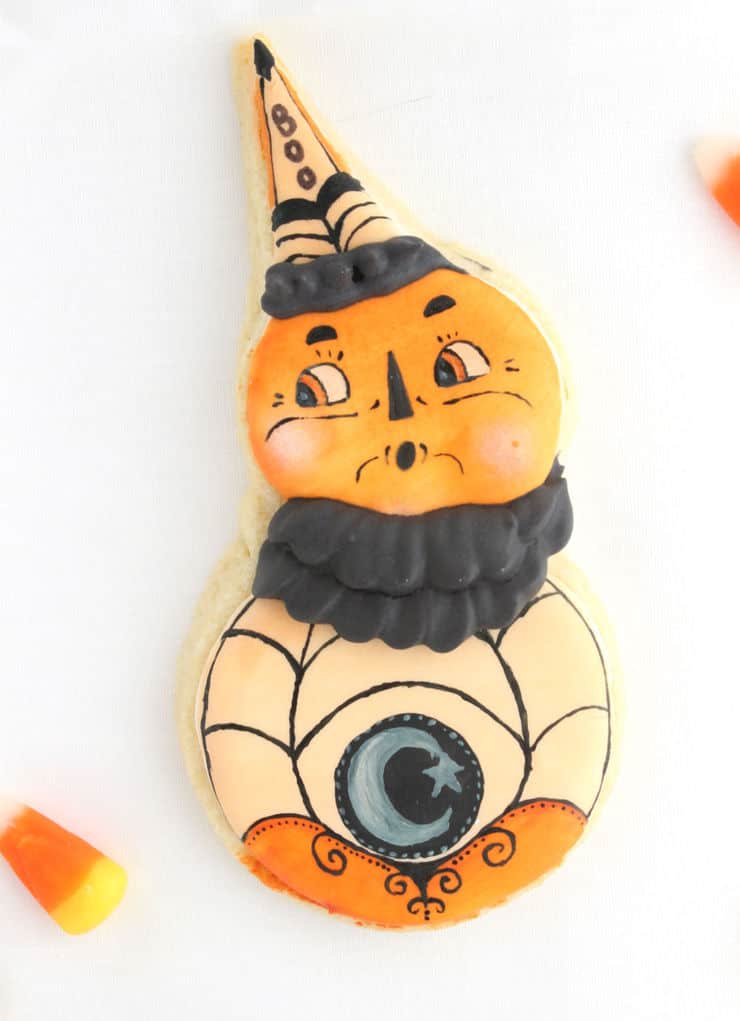
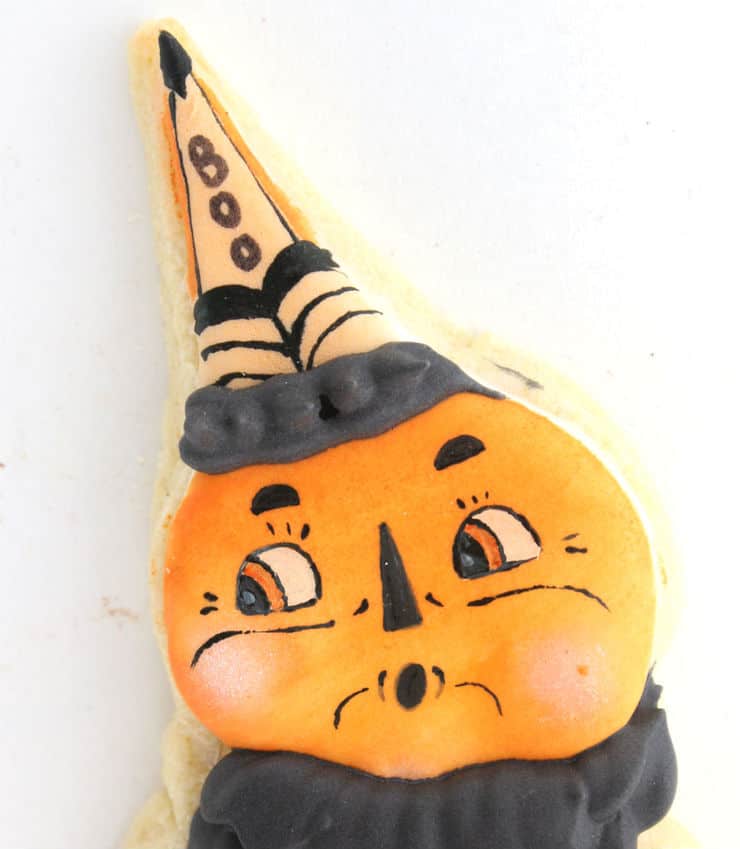
    But the real reason I wanted to use her designs for these cookies: those faces. Seriously, have you seen the faces she creates?! She is the master of whimsical expression and pinchable figurine cheeks. Seriously though, those cheeks. How could I pass up the chance to cookie those adorably pinchable cheeks for HALLOWEEN... AND write a tutorial about it? Obviously the answer is I couldn't.

    Learn how to create dimension in your royal icing cookies in this fun Halloween tutorial! | The Simple, Sweet Life

    Learn how to create dimension in your royal icing cookies in this fun Halloween tutorial! | The Simple, Sweet Life

    Learn how to create dimension in your royal icing cookies in this fun Halloween tutorial! | The Simple, Sweet Life

    Print

    Recipe

    Creating Dimension with Royal Icing

    Learn how to create dimension in your royal icing cookies in this fun Halloween tutorial! | The Simple, Sweet Life
    Print Recipe

    5 Stars 4 Stars 3 Stars 2 Stars 1 Star

    5 from 1 review

    • Author: The Simple, Sweet Life
    • Category: Tutorial

    Ingredients

    • Cookies (here are a few basic sugar cookie recipes)
    • Royal icing
    • A piping bag
    • Wilton #2 tip
    • A toothpick, skewer, or scribe tool (for moving around the icing)
    • Assorted food-only brushes (for painting)
    • Assorted food gel colors (for painting)
    • Black powdered food coloring
    • Q-tips

    Instructions

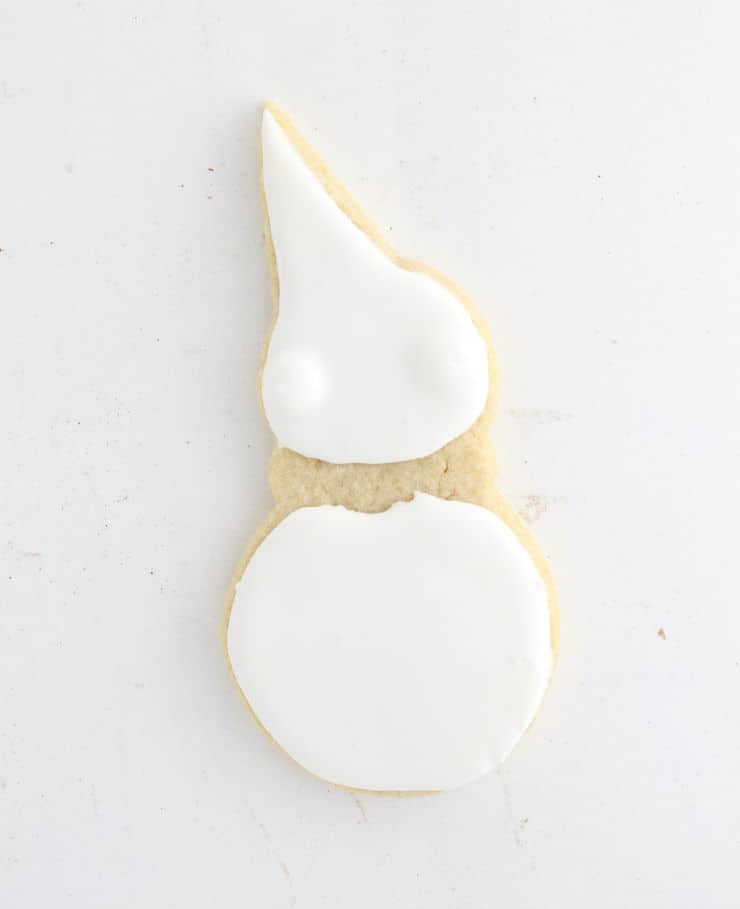
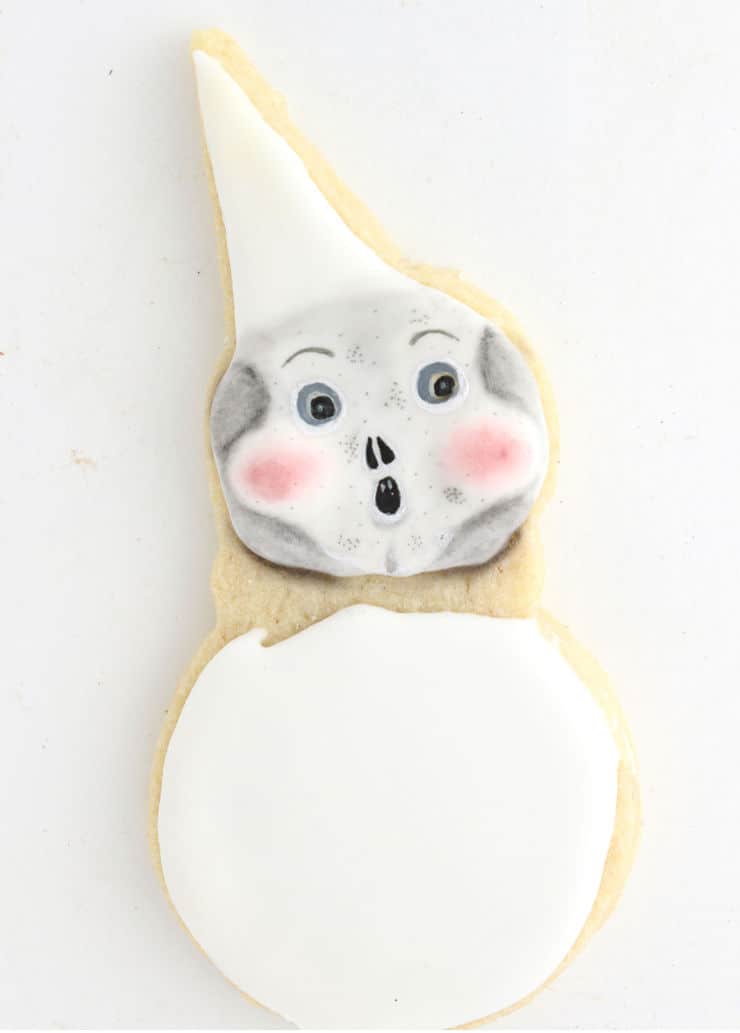
    1. The easiest way to go about these cookies, in my opinion, is to use uncolored royal icing for the base, and to paint over it with food gel colors once it hardens. Start with a batch of royal icing with a 20 second consistency. Pipe the base layer of icing, using your toothpick/skewer/scribe tool to work the icing around and fill in any areas that seem to have more or less icing than others. For these cookies, because I was planning on creating a ruffled collar and border around the hat, the face, hat, and round base were the areas I filled in with icing.
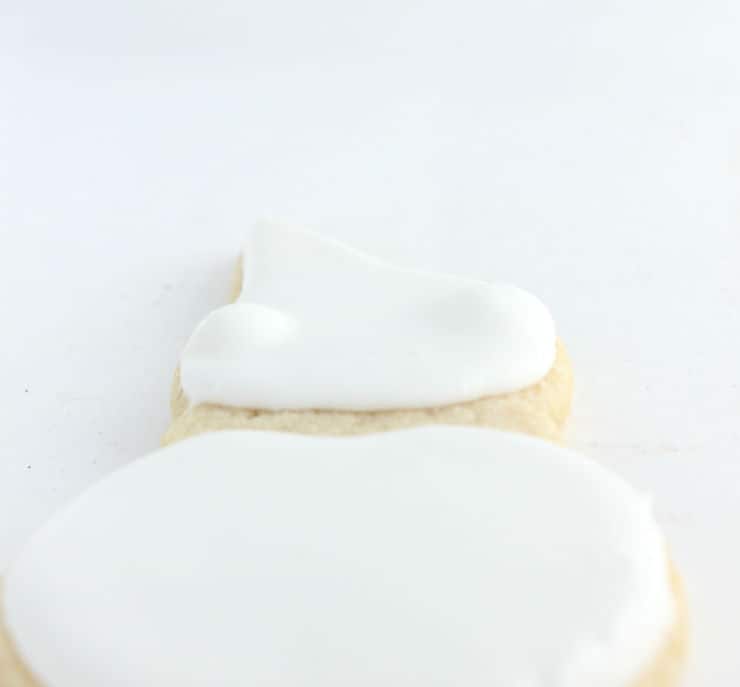
    2. Wait 2-4 minutes until a slight crust begins to form over the icing (or about the time it takes you to put down another base layer of icing on another cookie). Now for the fun part! Stick the end of your piping tip directly into the base layer of icing you created 2-4 minutes ago. Yes, you will be breaking the surface of the icing with your tip. Gently squeeze your piping bag, piping icing under the surface of the initial layer of icing. This will create a bubble of new icing under the surface of the old. Be sure to pipe a little extra icing into the bubble as it will naturally shrink a little before it settles. Use this method to create the cheeks.
    3. You can use the same principal to create dimension in other areas of the face, like the brow or chin. If you're working with a larger area, simply work in small areas, piping icing under the surface, removing the tip, and placing it a little farther along to inject more icing.
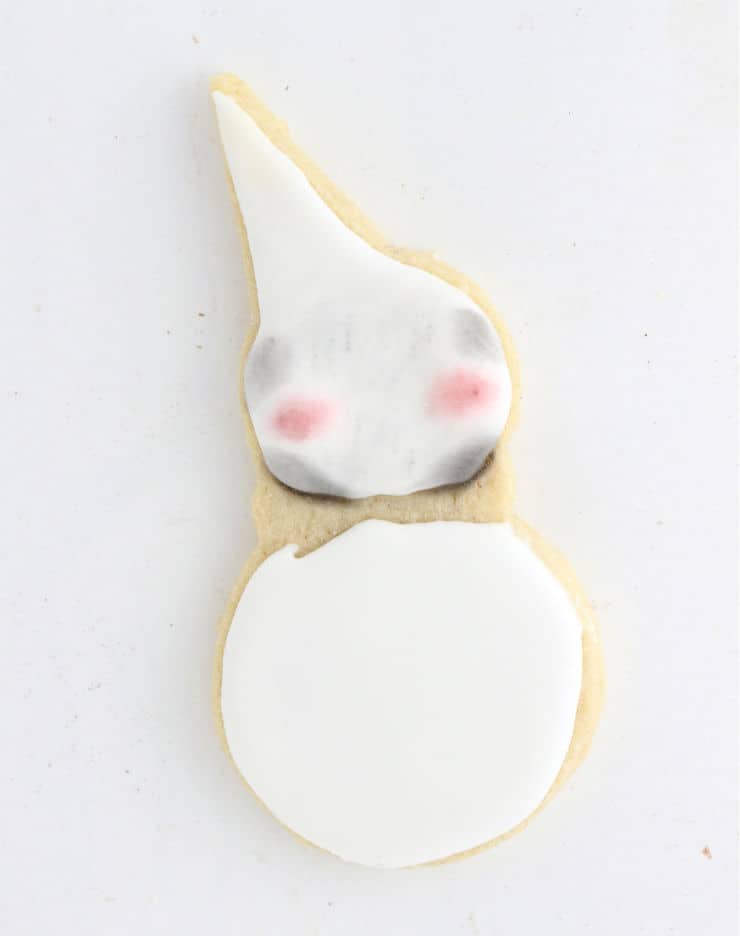
    4. To create even MORE depth in your cookies, you can apply shading, like in the skeleton cookies above. To do this, use a small, completely dry, food-only brush to gently rub the black powdered food coloring into the dry royal icing. For this part, it helps to think about where shadows would naturally fall on your cookie were it upright, or use a picture for reference. If for some reason you shade it darker than you'd like, you can easily remove the black food coloring with a slightly damp Q-tip. Just moisten it with the Q-tip, and dab it dry with the corner of a paper towel. Note: it's best to do the shading BEFORE you paint the cookie. You'll have a harder time correcting mistakes later if you don't.
    5. And that's it! Now it's just up to you to paint and add all your finishing touches!

    Notes

    Decorating technique adapted from McGoo U

    Did you make this recipe?

    Tag @thesimplesweetlifeblog on Instagram and hashtag it #thesimplesweetlife


    More Dessert Recipes

    • Hot chocolate cupcake on top of two stacked white plates with mugs of hot chocolate and other cupcakes in the background.
      Hot Chocolate Cupcakes with Marshmallow Buttercream
    • Collage of four different Norwegian cookies with the words "The best Norwegian Christmas cookies" across the center.
      The Best Norwegian Christmas Cookies (Julekaker)
    • Kokosmakroner in a silver cake pan with frosted fake trees, paper stars and a wreath in the background.
      Kokosmakroner (Norwegian Coconut Macaroons)
    • Close up of frosted three layer orange cranberry cake topped with fresh rosemary, slices of oranges and sugared cranberries.
      Orange Cranberry Cake

    Reader Interactions

    Comments

      Leave a Reply Cancel reply

      Your email address will not be published. Required fields are marked *

      Recipe rating 5 Stars 4 Stars 3 Stars 2 Stars 1 Star

    1. Sue says

      October 22, 2015 at 5:21 am

      I love these!!! The expressions are adorable 🙂

      Reply
      • The Simple, Sweet Life says

        October 22, 2015 at 9:38 pm

        I had a great design to work from! But I love their little expressions too. 🙂

        Reply
    2. Lou Lou Girls says

      October 26, 2015 at 9:21 pm

      Yum! They look amazing! Pinned and tweeted. Thank you for being a part of our party! I hope to see you on Monday at 7 pm. We love partying with you! Lou Lou Girls

      Reply
      • The Simple, Sweet Life says

        October 26, 2015 at 10:49 pm

        Thanks so much for the sweet share! 🙂

        Reply
    3. Cindy OKeefe says

      January 21, 2021 at 6:37 pm

      The contouring advise was very helpful and the only one I could find on the net. Thank you so much for graciously sharing it. Now to try it out!!


      Reply
    4. Katy says

      January 30, 2021 at 2:19 pm

      I’ve started to work with cookies, and this is such amazing info!!! Thank you!

      I had to check out JP, her work is amazing!!!

      Reply

    Primary Sidebar

    woman with long brown hair, half up in a bun, sitting in front of an open refrigerator eating a cookie with a white and orange cat.

    I'm Claire, the baker, blogger, and general sprinkle enthusiast behind The Simple, Sweet Life. Whether you like simple sweets, comfort (baked) foods, or works of sugar art, you're sure to find something here to sweeten your day!

    More about me →

    Popular

    • How to Make Meringue: Everything You Need to Know
    • 10 Things I Wish I Knew About Cookie Decorating
    • overhead view of fluffernutter brownies on a cooling rack
      8 Ways to Upgrade Your Boxed Brownie Mix
    • cacti cookies on a plate with other cookies around it
      How to Make Royal Icing: The Ultimate Guide

    Spooky Treats

    • Slices of cinnamon roll brain covered in red dyed caramel sauce sliced and plated.
      Cinnamon Roll Brains
    • Eyeball decorated Halloween cookies on a black plate with other cookies, a vase of black flowers and a bubbling cauldron in the background.
      Easy Eyeball Cookies
    • black cat cupcakes arranged against a white backdrop next to a bowl of sprinkles, a pairing knife with a light wood handle and a bowl of cut up Oreo cookies.
      Black Cat Cupcakes
    • Overhead view of multiple frankenstein rice krispie treats on a white background.
      Frankenstein Halloween Rice Krispie Treats

    Footer

    ↑ back to top

    Quick Links

    About
    Privacy Policy
    Contact

    Recipes

    Scandinavian baking
    Cakes
    Cookies
    Pies and tarts
    Brownies and bars
    Breakfasts

    Follow

    Instagram
    Pinterest
    TikTok

    As an Amazon Associate I earn from qualifying purchases at no cost to you. Purchases from these links helps support this blog so I can keep creating the free recipes you know and love. All affiliate links are clearly marked.

    Copyright © 2023 The Simple, Sweet Life