

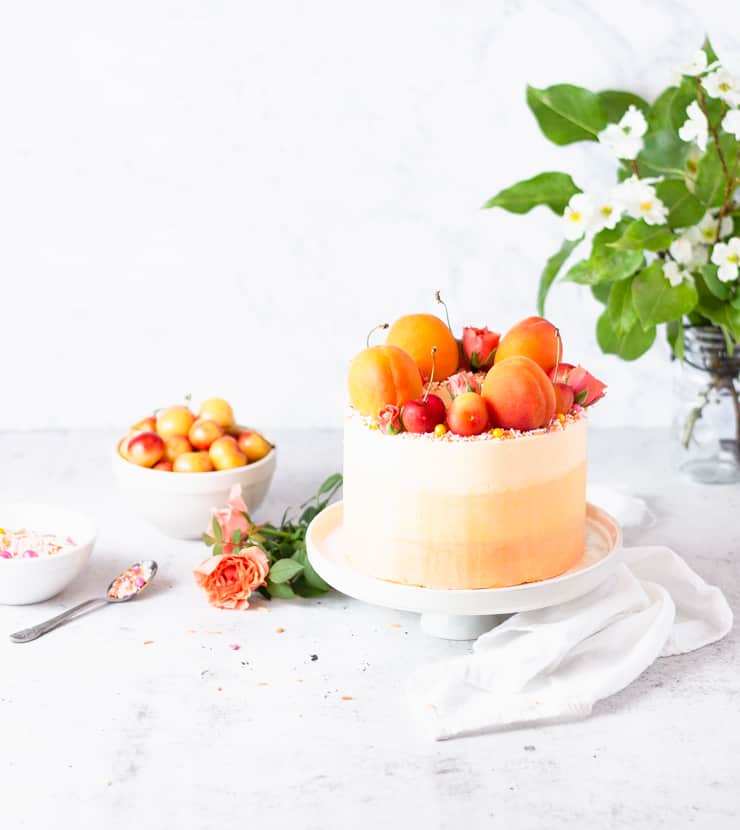
This fresh peach cake combines moist vanilla cake, a creamy peach mousse filling and melt-in-your-mouth vanilla buttercream frosting. Read to the bottom for tips on safely decorating cakes with flowers and a canned peach variation.
Oh sweet, sweet weekend! Raise your hand if your ready for the weekend and a little rest and relaxation. Is your hand up? Good, mine too! And I've got just the cake to make your weekend a little sweeter!
I don't know about anyone else, but I always kind of assume that the official start of Fall is when school starts (after Labor Day), despite the fact that I haven't gone to any sort of school in the last... Yeah, let's just not say how many years.
I know, it's a very scientific way of determining the beginning of Fall. Sure, I could go with the Fall Equinox. But then I'd have to wait longer, and although I can be patient about a lot of things, the beginning of Fall just isn't one.
Buuuuuuuuuuuuut, I won't go there just yet.
Don't worry, the Fall recipes will be here soon. And by soon I mean in the next couple week so you better BE PREPARED!
But in the meantime, I'll let you soak up that last little bit of summer with this peaches and cream cake!
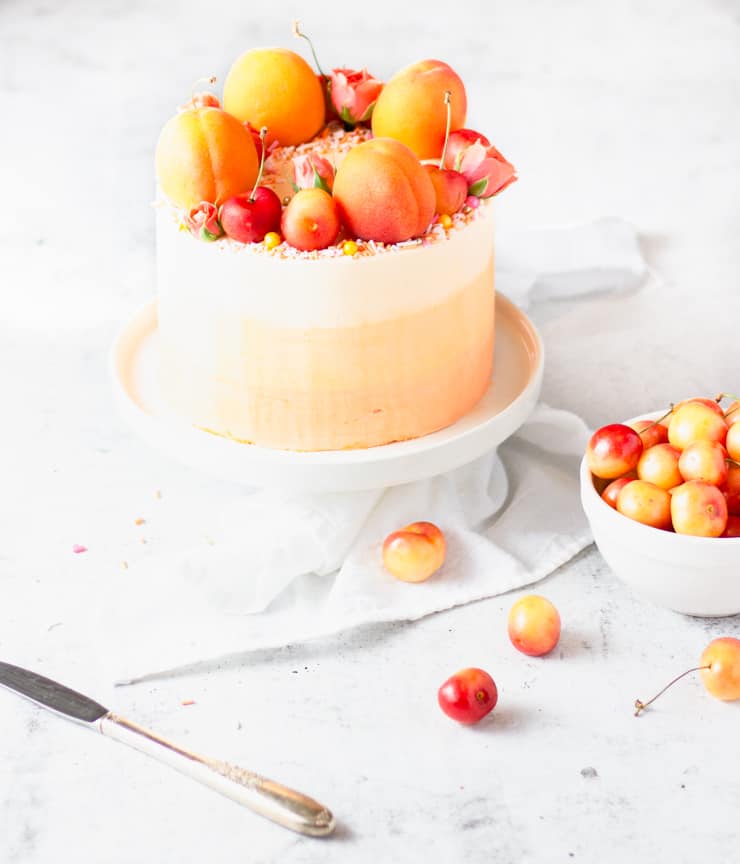
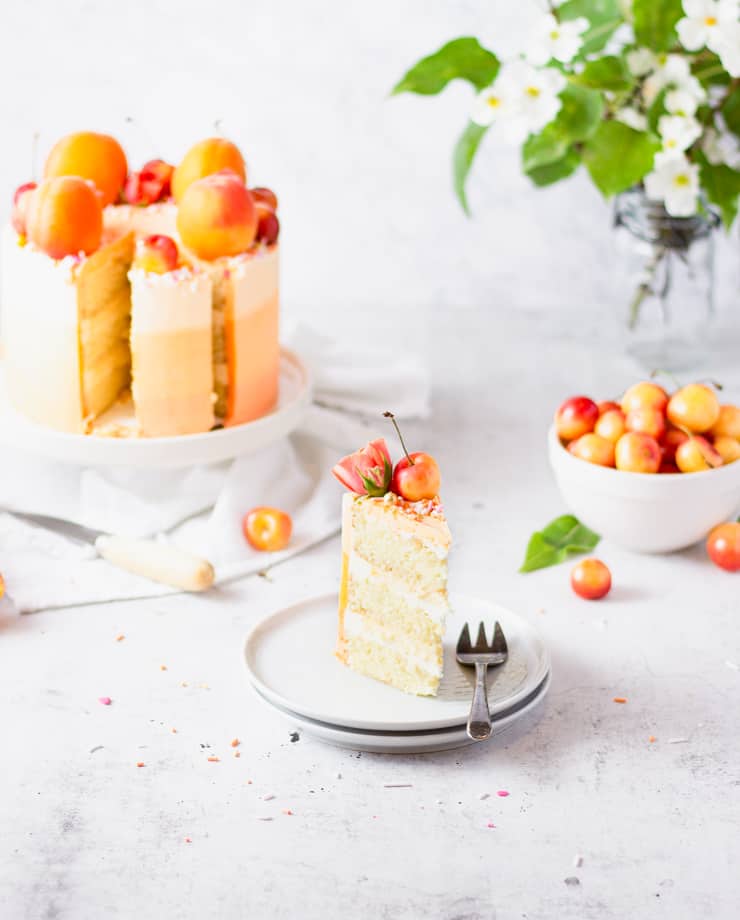
This baby is filled with fresh peach mousse and swiss meringue buttercream, sandwiched between layers of soft vanilla cake, and brightly cased in layers of peach ombre frosting.
How to make this peach cake
First, make your vanilla cake.
Preheat your oven to 350F, and grease and line three 6″ cake pans.
In a bowl, melt your butter, whisk in the milk, and warm until warm to the touch. Set aside to cool, stirring occasionally so the butter and milk don’t separated.
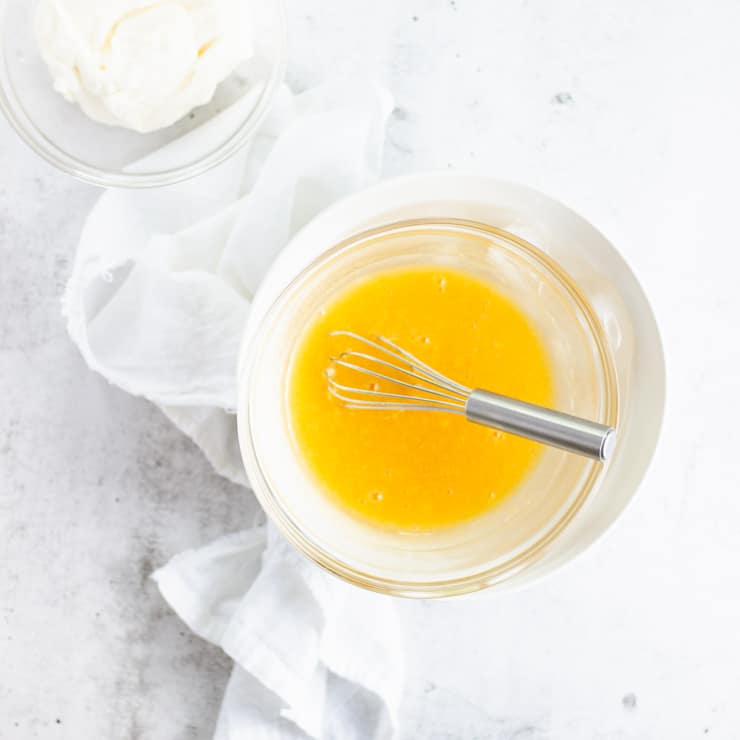
In the bowl of a stand mixer, beat your eggs on high until light and fluffy. Add the granulated sugar and beat until nearly dissolved (about 5-10 minutes).
Using a spatula, gently fold in the flour, baking powder, and vanilla extract until just combined. Fold in the milk-butter mixture, and divide the batter evenly between your three pans.
Bake for 20-25 minutes, or until a toothpick inserted in the center comes out clean.
Once the cake pans are cool enough to handle, turn the cakes out and wrap them in plastic wrap. Set your layers of cake aside in the refrigerator to cool completely.
Pro tip: Wrapping your cake layers while they’re still warm will help lock in the moisture.
Second, make your vanilla frosting.
Because we’re going to need to assemble everything at once, now is a good time to whip up your frosting (we’ll finish up the peach mousse in a bit).
Using a double boiler with the bowl of your stand mixer, whisk together your egg whites and sugar, and heat until the mixture is hot and the sugar dissolves.
Remove the bowl from the double boiler, and beat on high using the whisk attachment until stiff peaks form and the mixture has cooled to room temperature (8-10 minutes).
Switch to your paddle attachment, and begin adding your cubes of cold butter while mixing on low-medium. Once all the butter is in, increase the speed to high and beat until a smooth frosting forms.
Add the vanilla extract and mix until just combined.
Third, make the peach mousse.
Wash, peel and dice your ripe peaches. Puree the peaches in a blender until smooth.
Pour half of your puree into a small saucepan, and stir in your sugar and gelatin. Cook the mixture over medium heat until hot, but not boiling.
Remove the mixture from the burner, and stir in your remaining peach puree.
Plunge the bowl of peach into an ice bath, and stir as the mixture begins to thicken.
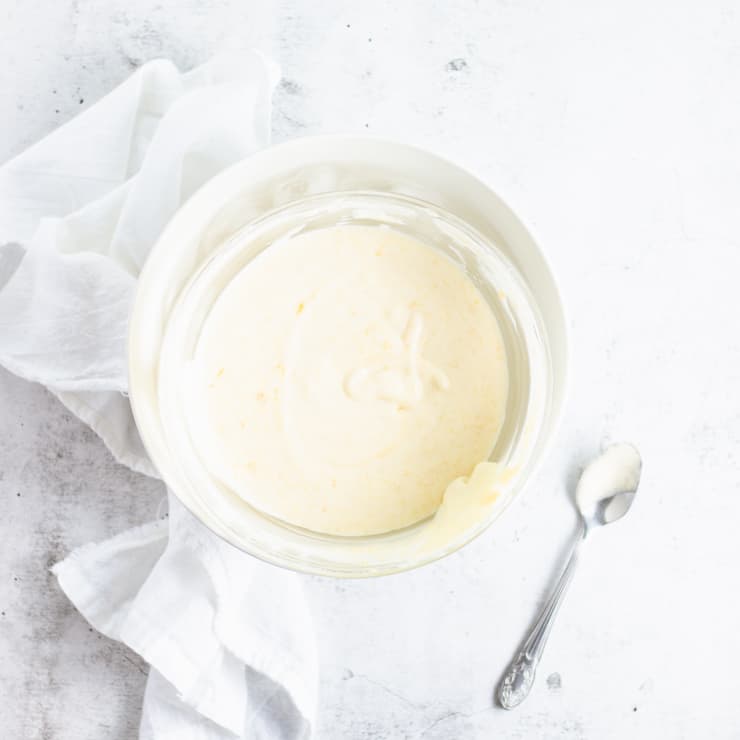
Once the mixture thickens to the consistency of pudding, whip your heavy cream, and gently fold it into the peaches until just combined.
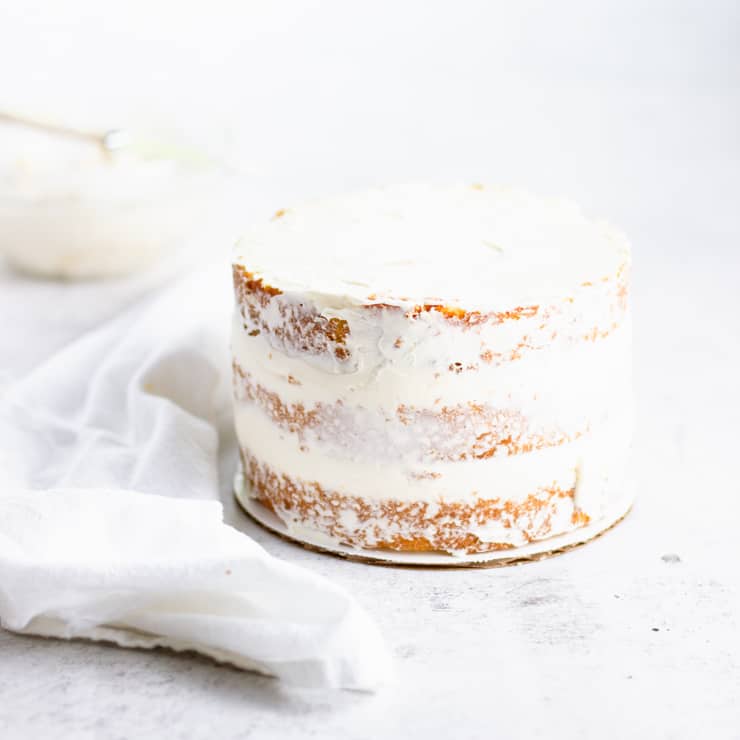
Fourth, fill and crumb coat the cake.
Start by spreading a thin layer of frosting on the first layer.
Spoon a small amount of your frosting into a bag, and pipe a rim around the edge of your frosted layer.This will act as a dam to keep the mousse from being pushed out by the weight of the cake.
Fill the center with mousse, and top with your second layer. Repeat this process for the second layer.
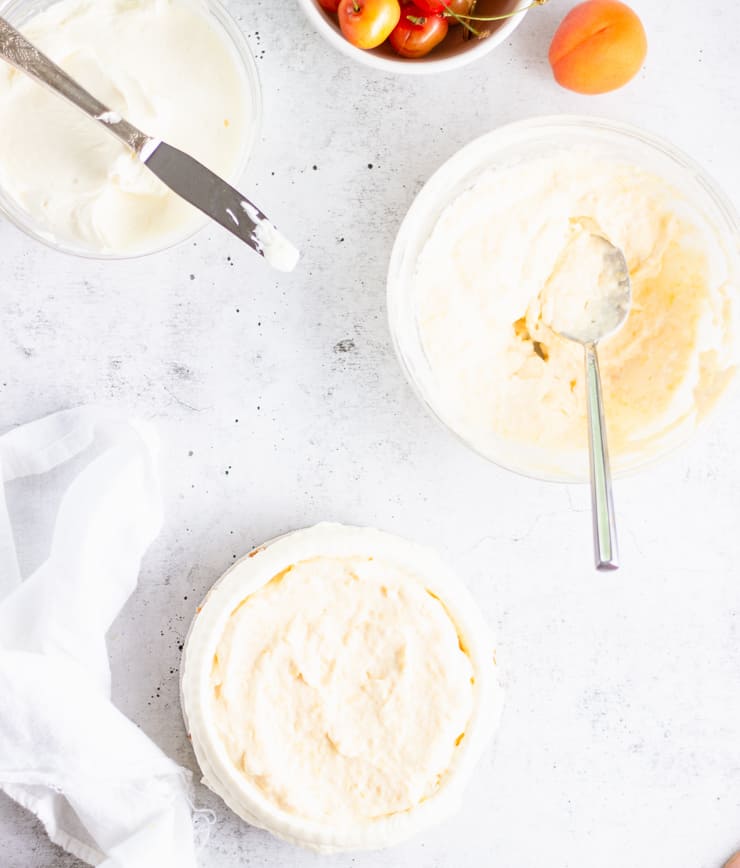
Once your cake is filled, give it a light crumb coating with the frosting, making sure the areas between the layers are completely filled in, and allow to chill at least 3 hours or up to overnight so the mousse can set.
Cover your leftover frosting with plastic wrap so it doesn’t crust.
Finally, frost and decorate the cake.
Once the cake has chilled sufficiently, you can finish frosting the outside. Begin with the top of the cake, making it as even and smooth as possible.
Divide the remaining frosting between 3 bowls, leaving one uncolored, and coloring the other two different shades of orange (or peach, if you will).
Spoon your frosting into piping bags, and starting at the bottom with the darkest shade, begin piping your frosting on and around your cake.
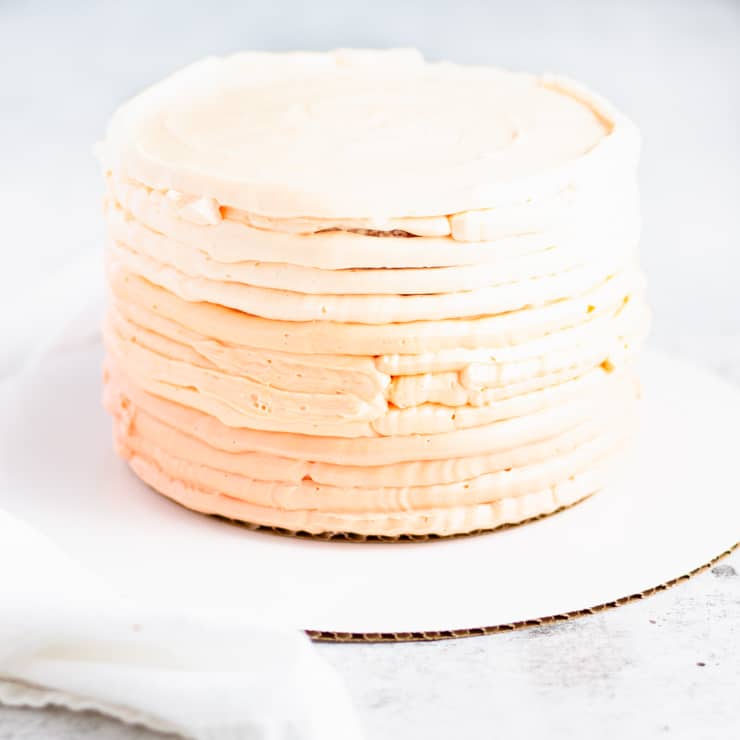
Once you have all your frosting on the cake (be generous with your frosting as it’s easier to take it off later than put more on), use an offset spatula to smooth it out.
Pro tip: If you want an extra smooth finish on your frosting, try using a metal bench scraper warmed in hot water; the warmth from the metal with ever-so-slightly melt the frosting, giving it a perfectly smooth, glossy finish.

Garnish the top of your cake with assorted fruits, sprinkles and flowers.
Important note about decorating with flowers: Not all flowers are edible, and even those that are may not be grown for consumption. For more information, check out my post on how to safely use fresh flowers on cakes.
Tips for making this cake
- How many peaches to buy: 1 ½ cups of diced peaches is approximately 1-2 large peaches or ¾lb.
- Measure your batter: Making even layers of cake start with measuring your batter. For this recipe, that means about roughly 9.3oz of batter per pan (for three pans).
- Chill your cake: Cool cake is easier to cut and handle, so chilling your cake for a short while before use will make this process easier.
- Canned peach variation: Don't have fresh peaches on hand? Simply use canned peaches, rinsed thoroughly, instead.
- Fill that piping bag like a pro: Spoon your frosting onto a large piece of plastic wrap, roll and twist the ends. Trim one end so there’s about ½” in length, drop your frosting into the piping bag (short end first) with the tip already on and pipe!
- The trick for smooth frosting: You’ll need a rotating cake stand and a bench scraper. Place the small end of the bench scraper on the cake stand, long end against the frosting and turn the table. Once excess frosting is removed, heat the scraper in hot water, wipe and drag around the outside of the cake.
- Decorating with flowers: Not all flowers are edible, and even those that are may not be grown for consumption. For more information, check out my post on how to safely use fresh flowers on cakes.
- Storage: This cake will keep in the refrigerator, uncut, for 2-3 days.
- Storing cut cake: Once your cake is cut, you’ll want to protect the exposed cake area. The easiest way to do this is with a piece of plastic wrap or two.
Did you make this recipe? I’d love to hear how it went in the comments below. Better still, snap a photo and tag it on Instagram with #thesimplesweetlife. I love seeing your creations!
PrintRecipe
Peach and Cream Cake

This fresh peach cake combines moist vanilla cake, a creamy peach mousse filling and melt-in-your-mouth vanilla buttercream frosting. Read to the bottom for tips on safely decorating cakes with flowers and a canned peach variation.
- Prep Time: 2 hours
- Cook Time: 25 minutes
- Total Time: 2 hours 25 minutes
- Yield: 16 slices
- Category: Dessert
- Cuisine: American
Ingredients
For the vanilla cake:
- ½ cup whole milk
- ½ cup unsalted butter
- 3 eggs
- 1 ½ cups granulated sugar
- 2 tsp. vanilla extract
- 2 tsp. baking powder
- 1 ½ cup all purpose flour
For the peach mousse:
- 1 ½ cup peeled, pitted and diced peaches
- 2 tbsp. granulated sugar
- 1 tsp. unflavored gelatin
- ½ cup heavy whipping cream
For the swiss meringue buttercream frosting:
- 6 egg whites
- 12 oz. (about 1 ¾ cups) granulated sugar
- 18 oz. (4 ½ sticks) unsalted butter, cold and cubed
- 1 tbsp. vanilla extract
- Orange food gel coloring
Instructions
- Preheat your oven to 350F, and grease and line three 6" cake pans.
- Melt your butter, whisk in the milk, and warm until warm to the touch.
- Set aside to cool, stirring occasionally so the butter and milk don't separated.
- In the bowl of a stand mixer, beat your eggs on high until light and fluffy.
- Add the granulated sugar and beat until dissolved.
- Gently fold in the flour, baking powder, and vanilla extract until just combined.
- Fold in the milk-butter mixture, and divide the batter evenly between your three pans.
- Bake for 20-25 minutes, or until a toothpick inserted in the center comes out clean.
- Once the cake pans are cool enough to handle, turn them out and wrap them in plastic wrap. Refrigerate.
- Using a double boiler with the bowl of your stand mixer, whisk together your egg whites and sugar for the frosting.
- Heat until the mixture is hot and the sugar dissolves.
- Remove the bowl from the double boiler, and beat on high using the whisk attachment until stiff peaks form and the mixture has cooled to room temperature (8-10 minutes).
- Switch to your paddle attachment, and begin adding your cubes of cold butter while mixing on low-medium.
- Once all the butter is in, increase the speed to high and beat until a smooth frosting forms.
- Add the vanilla extract and mix until just combined.
- Wash and dice your ripe peaches, and puree in a blender.
- Pour half of your puree into a small saucepan, and stir in your sugar and gelatin.
- Cook the mixture over medium heat until hot, but not boiling.
- Remove the mixture from the burner, and stir in your remaining peach puree.
- Plunge the bowl of peach mousse into an ice bath, and stir as the mixture begins to thicken.
- Once the mixture thickens to the consistency of pudding, whip your heavy cream, and gently fold it into the peaches until just combined.
- To assemble your cake, start by spreading a thin layer of frosting on the first layer.
- Spoon a small amount of your frosting into a bag, and pipe a rim around the edge of your frosted layer.
- Fill the center with mousse, and top with your second layer.
- Repeat this process for the second layer.
- Once your cake is filled, give it a light crumb coating with the frosting and place it in the refrigerator to chill for at least 3 hours or until the mousse is set.
- To finish frosting the cake, frost the top, making it as even and smooth as possible.
- Divide the remaining frosting between 3 bowls, leaving one uncolored, and coloring the other two different shades of orange (or peach, if you will).
- Spoon your frosting into piping bags, and starting at the bottom with the darkest shade, begin piping your frosting on and around your cake.
- Use an offset spatula to smooth it out.
- Top the cake with fresh fruit, sprinkles and/or flowers.
Notes
- How many peaches to buy: 1 ½ cups of diced peaches is approximately 1-2 large peaches or ¾lb.
- Measure your batter: Making even layers of cake start with measuring your batter. For this recipe, that means about roughly 9.3oz of batter per pan (for three pans).
- Chill your cake: Cool cake is easier to cut and handle, so chilling your cake for a short while before use will make this process easier.
- Canned peach variation: Don't have fresh peaches on hand? Simply use canned peaches, rinsed thoroughly, instead.
- Fill that piping bag like a pro: Spoon your frosting onto a large piece of plastic wrap, roll and twist the ends. Trim one end so there’s about ½” in length, drop your frosting into the piping bag (short end first) with the tip already on and pipe!
- The trick for smooth frosting: You’ll need a rotating cake stand and a bench scraper. Place the small end of the bench scraper on the cake stand, long end against the frosting and turn the table. Once excess frosting is removed, heat the scraper in hot water, wipe and drag around the outside of the cake.
- Decorating with flowers: Not all flowers are edible, and even those that are may not be grown for consumption. For more information, check out my post on how to safely use fresh flowers on cakes.
- Storage: This cake will keep in the refrigerator, uncut, for 2-3 days.
- Storing cut cake: Once your cake is cut, you’ll want to protect the exposed cake area. The easiest way to do this is with a piece of plastic wrap or two.
Cake recipe adapted from Miette (2011), pg. 26
Nutrition
- Serving Size: 1 slice
- Calories: 492
- Sugar: 42.3g
- Sodium: 233mg
- Fat: 31.2g
- Saturated Fat: 19.4g
- Carbohydrates: 51.9g
- Fiber: .5g
- Protein: 4.4g
- Cholesterol: 113mg
If you liked this recipe, you might also like...
- Peaches and cream sheet cake
- No-bake, gluten free gingersnap tangerine tart
- Mimosa tart
- No-churn pineapple upside down cake ice cream
Update Notes: This post was originally published in August of 2015 but was republished with updated photos, directions and tips in August of 2019.
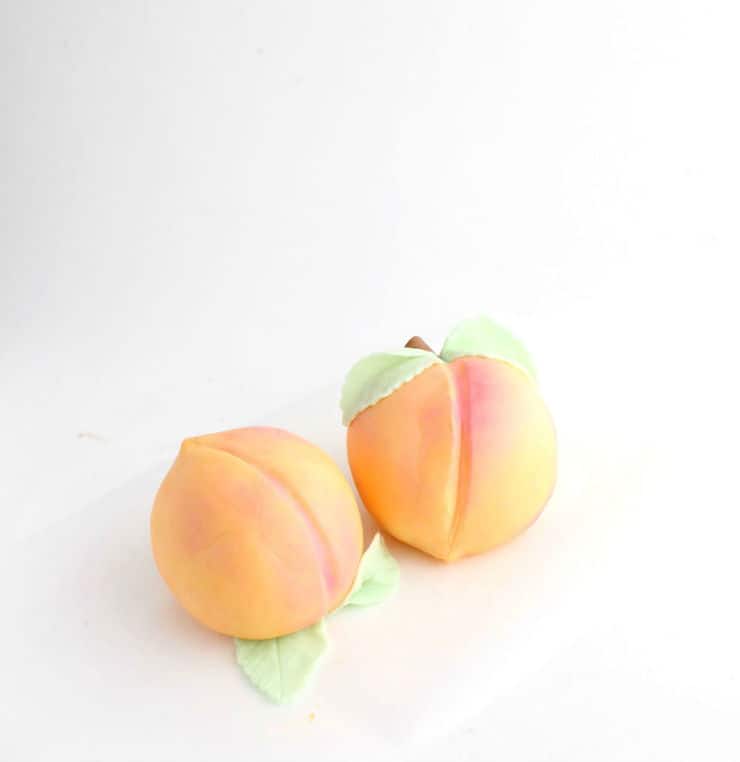
The original cake also had two, big fondant peaches on top. I simplified the decorations in this update (oh, hello fresh fruit and sprinkles!) but am leaving the peach tutorial as well as an old photo below, for anyone interested.

Fondant Peach Tutorial
Materials:
White fondant
Orange, green, and brown gel food coloring
Powdered food coloring in pink
A food only brush
A ball tool
A butter knife or skewer
A rolling pin
A leaf cutter
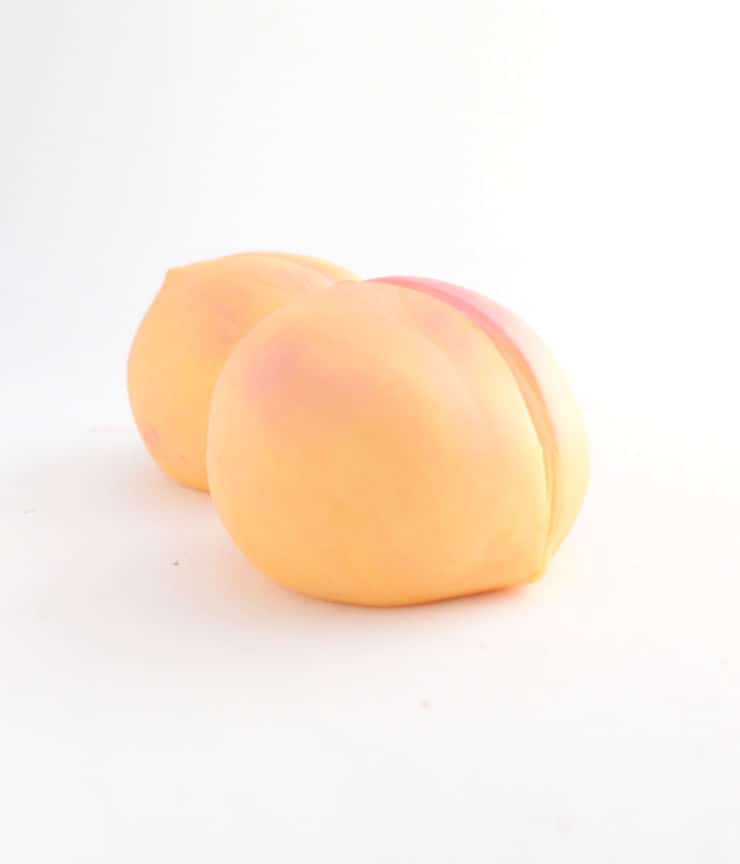
Ok, I know that looks like a lot of materials, but I promise it's not that much and these peaches really are super easy to make. Start by breaking off two lumps of fondant about half the size of your fist and coloring them a light shade of orange. Form the lumps into two smooth balls, pulling down the bottom of each into a point. Now, decide how you want your peaches to sit. I wanted one to look like it was resting on it's side, and the other on it's top. Once you've decided where your peaches are going to rest, slightly flatten that side so they sit nicely without rolling around.

Using your ball tool, create an indent for the stem. Using the blunt end of your butter knife or a skewer, create a line running from the indent to the bottom of the peach on each side. Using your food only brush, brush your peach with your powdered pink food coloring. Don't worry about making it even or uniform, peaches aren't naturally evenly colored.
Break off two more small lumps of fondant, and color one green and one brown. To make the stems, break off a small ball, and gently roll it between your fingers, concentrating specifically on one end so that it tapers. Press the larger end flat and use the ball tool to create a small divot. Press the stem into the indent on the top of the peach. To make the leaves, roll out your green fondant. Cut out your leaves with your leaf cutter, and vein them with the dull side of your butter knife. Press the leaves onto your peaches, and set them on your cake.


Sue says
This is simply stunning! The peach mousse sounds amazing 🙂
The Simple, Sweet Life says
I'm not going to lie, it IS pretty amazing! 😀
Mary says
Does this cake need to stay refrigerated once it’s done?
The Simple, Sweet Life says
Hi Mary! Yes, all buttercream cakes should be refrigerated. That said, cake tastes best at room temperature so I would recommend taking your cake out of the refrigerator about an hour before you plan on serving it.
June @ How to Philosophize with Cake says
Wow that is a beautiful cake! Love how summery it is 🙂 The fondant peaches are so cute too, great idea!
The Simple, Sweet Life says
Thank you! 🙂 Here's to squeezing just a liiiiiiiittle more summer out of this year. 🙂
Elsa | the whinery says
Wow! What a beautiful and adorable cake! And those peach toppers are so cute. I want to have this for the rest of the summer - which I'm trying to hang on to for as long as possible.:-)
The Simple, Sweet Life says
I know the feeling! I finished up this summery cake, looked out the window and saw that it was pouring rain. Apparently Mother Nature did not get my memo.
Vashti Quiroz-Vega says
What a beautiful cake! It looks scrumptious too. Pinning! 😀
The Simple, Sweet Life says
So glad you liked it! 🙂
Aly says
This cake is amazing, I made it as a surprise for my partner on our anniversary he loved it, so did the rest of the family. It's so delicious, the peach mousse is so wonderful in the cake, and on its own ?. I would definitely make it again!!! I can't wait to try more of your recipes.
The Simple, Sweet Life says
I'm SO glad you and your loved ones liked it! 😀
bunsinmyoven says
This cake is gorgeous! Thanks for linking up with What's Cookin' Wednesday!
The Simple, Sweet Life says
Thanks for stopping by with the sweet comment! 😀
paola Beck says
this looks amazing, but can i use the can peaches or does it have to be fresh peaches?
The Simple, Sweet Life says
Hi Paola! You know, I've never used canned peaches for this, but I don't see why not as long as you get them nice and rinsed off so they don't have a bunch of extra juice on them. You'll have to let me know how it goes if you try it with the canned peaches! 😀
GUNJAN C Dudani says
Beautiful photography. Peaches have never looked so beautiful and delicious before. Totally love the cake recipe. This cake recipe is on my to do list for this summer.
Sue says
This cake totally captures the beauty and flavors of a golden summer day and the photos are stunning! Both are show stoppers!!
Jess says
What a gorgeous cake! I love anything peaches and cream so you definitely have my attention with this cake recipe! YUM!
Veena Azmanov says
This is surely delicious and mouth melting. Love the peach option to making it unique and perfect.
Michelle says
Your fondant peaches are absolutely stunning! What a beautiful cake for end of summer. I have lots of peaches right now. Making this cake will be a special treat.
Nicoletta says
Those fondant peaches are so pretty! And the cake is stunning! That peach mousse sounds heavenly.
Lori | The Kitchen Whisperer says
Oh my goodness this looks absolutely stunning! I love peaches! This cake looks like the perfect Sunday brunch dessert!
Jenni LeBaron says
I am impressed by literally everything about this gorgeous cake. Peaches are my ultimate favorite fruit so you already have me on board with that, but I absolutely love how you've used a gradient on the sides of the cake and those fondant peaches are seriously impressive!
Aleta says
Hello beautiful! Wow, not only does this cake sound ultra tasty, but it's just gorgeous! Your tips are super helpful too. I had no idea wrapping your cakes BEFORE cooling helped to lock in moisture.. amazing!
Eden says
This cake is GORGEOUS and so fun to make!! Tastes absolutely delicious!!
Sara says
What a beautiful cake! It is almost too pretty to eat! I know this would make anyone lucky enough to try it say ooh!!!
P.S.Your photos are seriously gorgeous.
Ann says
I can never get past such beautiful and spectacular cakes neither in cafes, nor in culinary blogs - I immediately order a piece of this cake or go to the kitchen and start baking. Personally, I am a big fan of fruit and berry cakes with a delicate cream or cheese cream. I look at this decorations with admiration, because I don’t bother with the appearance of the cake, because sometimes I’m afraid that I won’t succeed as beautifully as I would like, and I will be sorry for the time spent. You are a professional, keep it up! Thank you for the recipe.
Libby says
Can you use pectin instead of gelatin to make the mousse?
Alleyah Murphy says
Can I make this into cupcakes pretty easily?
Claire | The Simple, Sweet Life says
Hi Alleyah! You could totally make this cake as cupcakes; The cake recipe makes about two dozen cupcakes and you could cut out the center of the cupcakes and fill them with the mousse (you can find instructions on filling cupcakes in this post: https://thesimple-sweetlife.com/cherry-garcia-inspired-cupcakes/). Because the frosting recipe is for covering a cake, it'll make much more than you'd need for cupcakes. You should be able to make a 1/3-1/2 batch for frosting cupcakes, depending on how much frosting you plan to use.