
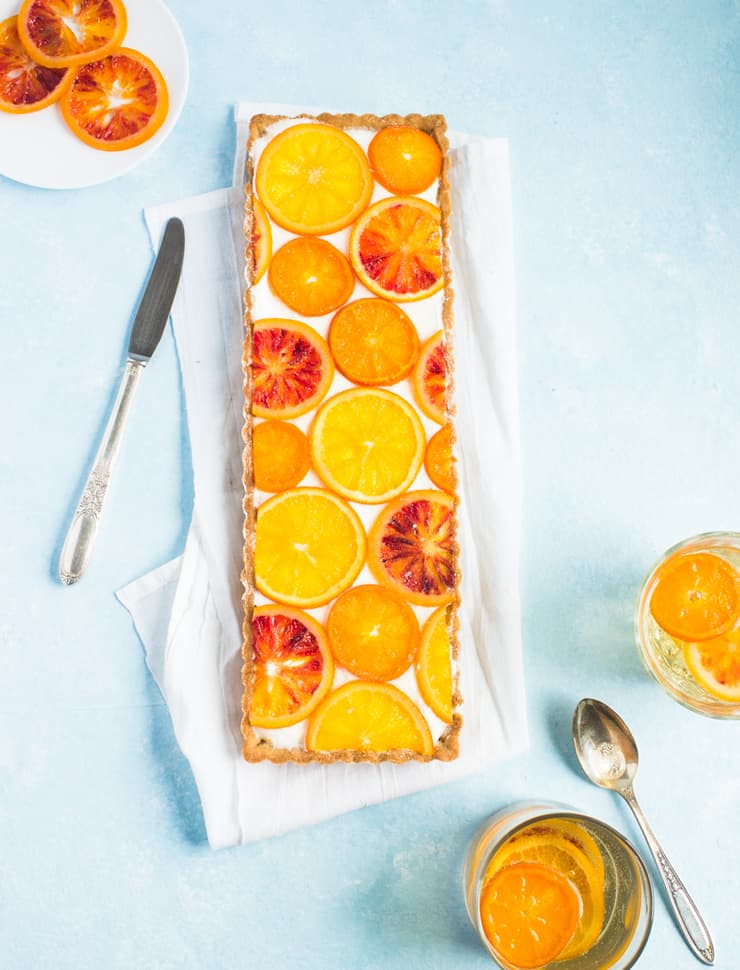
This mimosa tart is everything you love about brunch and then some! With it's bright candied oranges, boozy champagne filling and to-die-for graham cracker crust, what's not to love?
Well heeeeeeeello sweetness! I see you over there with your bright candied oranges, boozy champagne filling and that to-die-for graham cracker crust. This may be the champagne talking, but I see you, I want you, I need you... all to myself.
Seriously guys (and gals), this tart is the REAL deal. It's boozy, it's sweet and it's all sorts of decadent.
Essentially, it's all the best parts of brunch rolled into one deliciously sunny dish. I'm pretty sure that means we're allowed to eat it for breakfast. And I can sooooooo get behind tart for breakfast.
All aboard the brunch train! You just got yourself a one-way ticket to mimosa tart heaven!
How to make this mimosa tart
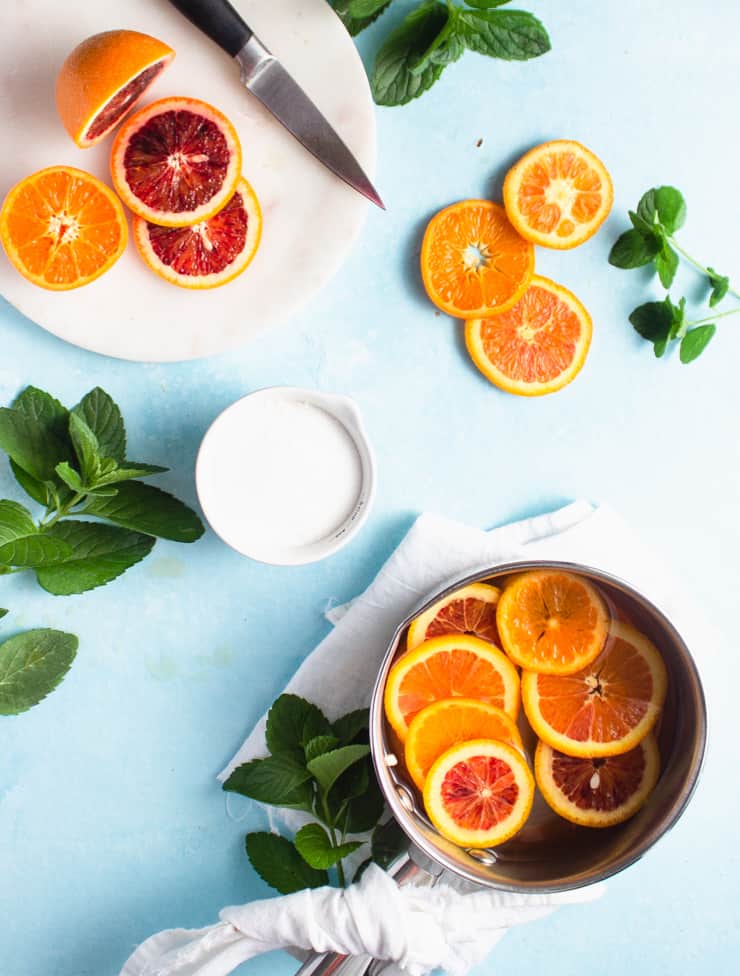
First, make the candied oranges.
In a large pot, combine the water and sugar. Bring the mixture to a simmer and add your orange slices.
Cover and simmer for 45 minutes. Remove the oranges from the pot and gently pat dry. Lightly sprinkle the dried oranges with granulated sugar.
Second, make the graham cracker crust.
In the bowl of a stand mixer, beat the butter for the graham cracker crust until smooth. Add the brown sugar and honey, and continue beating until smooth. Add the remaining ingredients for the crust and beat until it pulls away from the sides and clumps into a single ball.
Wrap the dough in plastic wrap and allow to chill for at least 30 minutes and up to 2 days.
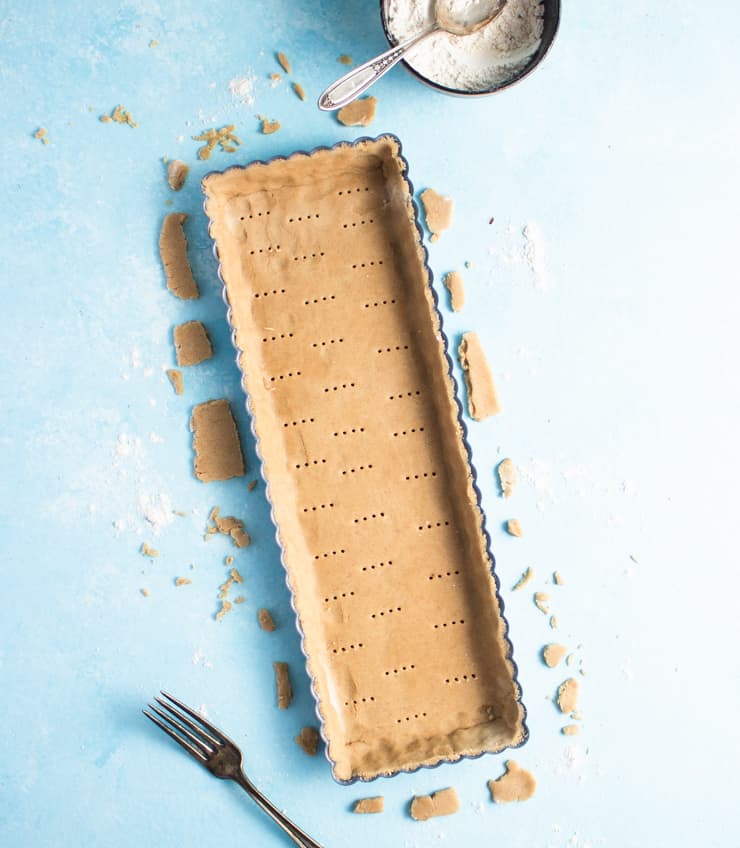
On a lightly floured surface, work the dough for the crust with your hands until malleable. Roll the dough out on a piece of parchment paper until it's slightly larger than your 14" x 5" pan.
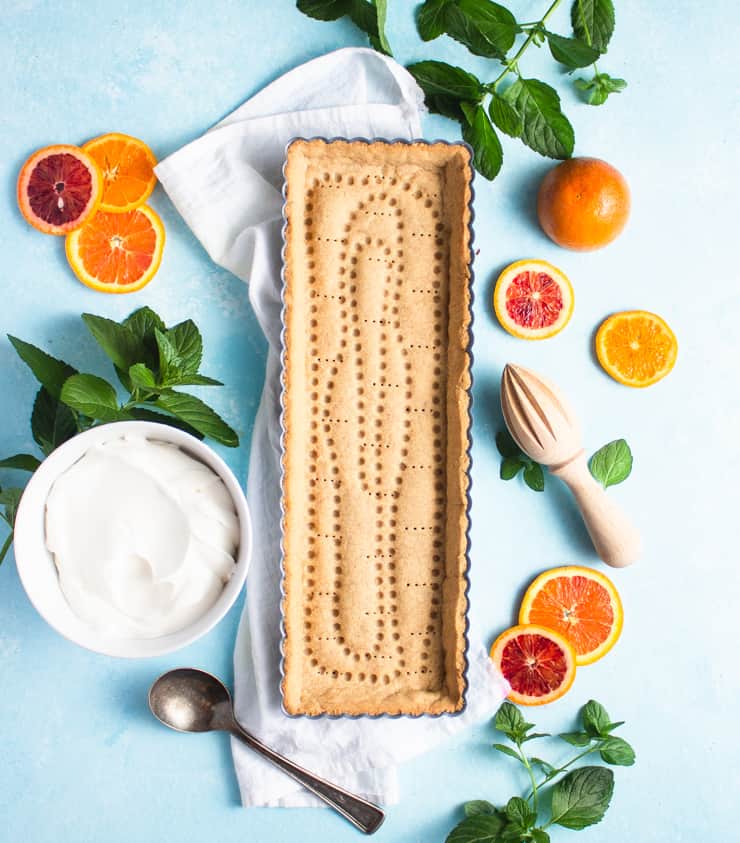
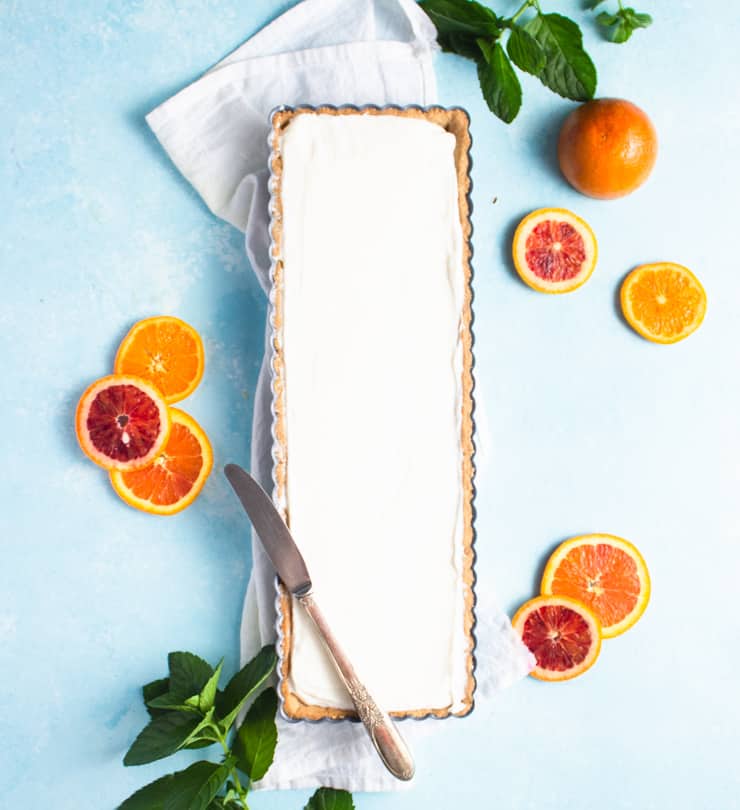
Gently flip the dough into the pan and press it into the bottom and sides. Trim away any excess. Generously prick the bottom, and bake at 350F with pie weights for 10-12 minutes, or until golden brown.
Third, make the champagne filling.
In a small bowl, combine the gelatin and water for the filling. In a small saucepan, whisk together the champagne, orange zest and granulated sugar.
Cook over medium heat until the champagne is hot and just starting to simmer (but not boil). Remove from heat.
Heat the gelatin for 10 seconds in the microwave and pour it into the hot champagne. Whisk until smooth. Set aside to cool to room temperature and until it just starts to set.
In a bowl, beat the heavy whipping cream and powdered sugar until stiff peaks form. Fold in the champagne gelatin.
If you end up with lumps, you can strain the filling.
Finally, assemble the tart.
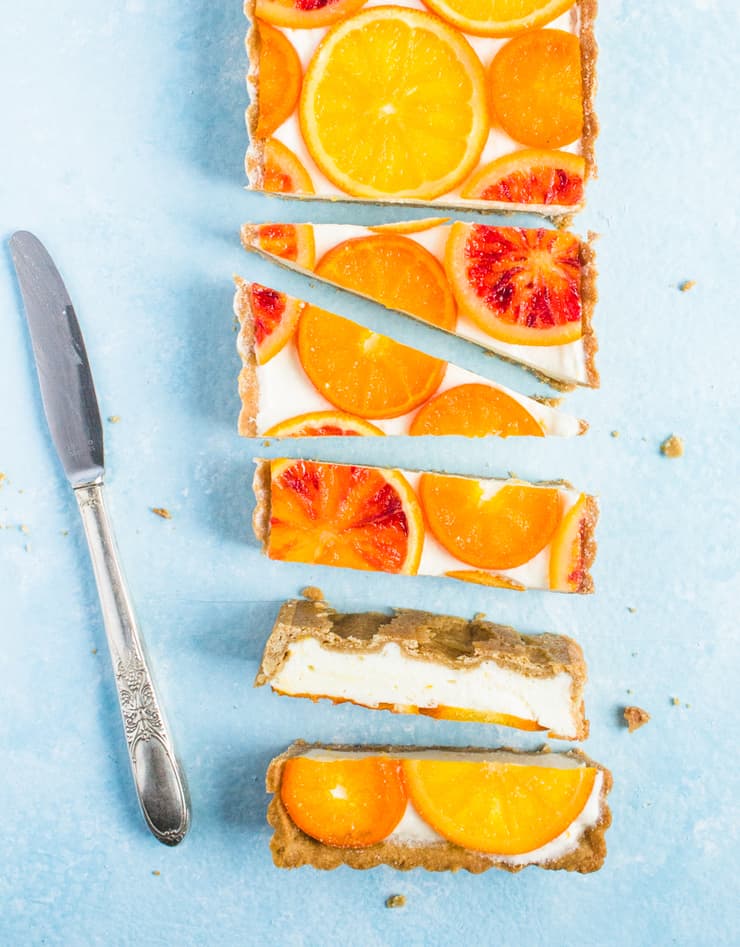
Spread the filling evenly in the graham cracker crust, top with the candied oranges and refrigerate until firm (3-4 hours).
Tips for making the perfect mimosa tart
- Looking to work ahead? The candied oranges can be made up to 2 weeks in advance and the graham cracker dough can be made 2 days in advance. Both should be kept in the refrigerator.
- Selecting a champagne: Both sparkling white wine and champagne work great in this recipe, but you should stay away from the dry variety.
- Graham cracker dough is too dry: Sometimes this dough winds up a little dry. If that happens to you, you can easily fix this by dampening your hands with water and knead that little bit of moisture into the dough. The dough has reached the right consistency when it forms one cohesive ball without being sticky.
- Easily transfer the dough: The secret to easily transferring the graham cracker crust to the pan is to roll it out on a piece of parchment. Pick up the parchment paper and gently turn it out over the pan.
- Baking an empty tart or pie shell: Whenever you're baking an empty pie or shell tart, be sure to use a pie weight of some sort. This will keep the dough from rising, pulling way from the pan and/or forming air pockets. Pie weights are available to purchase or you can make your own by placing parchment paper on your crust and covering it with uncooked rice or dry beans.
- Storage: This tart can be stored in the refrigerator for up to 3 days.

Did you make this recipe? I’d love to hear how it went in the comments below. Better still, snap a photo and tag it on Instagram with #thesimplesweetlife. I love seeing your creations!
PrintRecipe
Mimosa [Citrus and Champagne] Tart
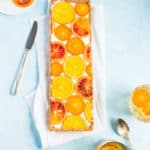
This may just be my favorite tart of all time! It's sweet, it's boozy, and it tastes every bit as good as it looks. This mimosa tart has a graham cracker crust filled with a tangy orange and champagne mousse and is topped with the easiest to make candied oranges.
- Prep Time: 5 hours
- Cook Time: 12 minutes
- Total Time: 5 hours 12 minutes
- Yield: 10
- Category: Dessert
- Cuisine: American
Ingredients
For the candied oranges:
- 3 oranges, sliced (you can use the same variety or different varieties)
- 3 cups water
- 3 cups granulated sugar + extra for coating
For the graham cracker crust:
- ¾ cup all purpose flour
- 3 tbsp. whole-wheat flour
- ¼ tsp. ground cinnamon
- 3 oz salted butter, at room temp.
- ¼ cup brown sugar
- 1 tbsp. honey
Champagne filling:
- 1 packet powdered gelatin
- 2 tbsp cold water
- ½ cup champagne
- 2 tbsp granulated sugar
- 1 tbsp orange zest
- 1 cup cup heavy whipping cream
- ½ cup powdered sugar
Instructions
- In a large pot, combine the water and sugar for the candied oranges.
- Bring the mixture to a simmer and add our orange slices.
- Cover and simmer for 45 minutes. Remove the oranges from the pot and gently pat dry.
- Lightly sprinkle the dried oranges with granulated sugar.
- In the bowl of a stand mixer, beat the butter for the graham cracker crust until smooth.
- Add the brown sugar and honey, and continue beating until smooth. Add the remaining ingredients for the crust and beat until it pulls away from the sides and clumps into a single ball.
- Wrap in plastic wrap and allow to chill for at least 30 minutes, up to 2 days (depending on how far in advance you make it).
- On a lightly floured surface, work the dough for the crust with your hands until malleable.
- Roll the dough out on a piece of parchment paper until it's slightly larger than your 14" x 5" pan.
- Gently flip the dough into the pan and press it into the bottom and sides. Trim away any excess.
- Generously prick the bottom, and bake at 350F with pie weights for 10-12 minutes, or until golden brown.
- In a small bowl, combine the gelatin and water for the filling.
- In a small saucepan, whisk together the champagne, orange zest and granulated sugar.
- Cook over medium heat until the champagne is hot and just starting to simmer (but not boil). Remove from heat.
- Heat the gelatin for 10 seconds in the microwave and pour it into the hot champagne. Whisk until smooth. Set aside to cool to room temperature and until it just starts to set.
- In a bowl, beat the heavy whipping cream and powdered sugar until stiff peaks form. Fold in the champagne gelatin.
- If you end up with lumps, you can strain the filling. Spread the filling evenly in the graham cracker crust, top with the candied oranges and refrigerate until firm (3-4 hours).
Notes
- Looking to work ahead? The candied oranges can be made up to 2 weeks in advance and the graham cracker dough can be made 2 days in advance. Both should be kept in the refrigerator.
- Selecting a champagne: Both sparkling white wine and champagne work great in this recipe, but you should stay away from the dry variety.
- Graham cracker dough is too dry: Sometimes this dough winds up a little dry. If that happens to you, you can easily fix this by dampening your hands with water and knead that little bit of moisture into the dough. The dough has reached the right consistency when it forms one cohesive ball without being sticky.
- Easily transfer the dough: The secret to easily transferring the graham cracker crust to the pan is to roll it out on a piece of parchment. Pick up the parchment paper and gently turn it out over the pan.
- Baking an empty tart or pie shell: Whenever you're baking an empty pie or shell tart, be sure to use a pie weight of some sort. This will keep the dough from rising, pulling way from the pan and/or forming air pockets. Pie weights are available to purchase or you can make your own by placing parchment paper on your crust and covering it with uncooked rice or dry beans.
- Storage: This tart can be stored in the refrigerator for up to 3 days.
Graham cracker crust recipe based on Miette (2011), pg. 150
Filling recipe adapted from Life, Love and Sugar
Nutrition
- Serving Size: 1 slice
- Calories: 254
- Sugar: 26.3g
- Sodium: 56mg
- Fat: 11.5g
- Saturated Fat: 7.2g
- Carbohydrates: 36.1g
- Fiber: 1.7g
- Protein: 2.5g
- Cholesterol: 35mg
If you liked this recipe, you might also like...
- No-bake strawberry margarita cheesecake
- Small batch strawberry champagne jam
- No-Bake, Gluten Free Gingersnap Tangerine Tart
Update Notes: This post was originally published in February of 2018 but was republished with step-by-step photos and tips in June of 2019.


Dominique| Perchance to Cook says
Oh my goodness! This is the best tart ever! I'm thinking it would be perfect to bring to a friends brunch. 🙂
Patti @Patty Cake's Pantry says
This tart is too pretty to eat, but it's so pretty that I need to make it, and serve it to my guests, the next time I host a brunch. I love that you give instructions for making candied orange slices. That's something I've always wanted to learn. Amazing recipe.
The Simple, Sweet Life says
You're too sweet Patti! I'm glad this recipe was able to give you the instructions you need to make candied oranges. They're so fun and easy I may just start putting them on everything...
Anne Murphy says
The candied oranges are so beautiful! And delicious, I'm sure. Never thought of using champagne for a tart filling - sounds so luxurious!
Kushi says
This looks so gorgeous and delicious
Laineey says
That mimosa tart reminds me of the summer!! It sounds and looks absolutely delicious! I'm right next to you on the brunch train! WooWoo!!
The Simple, Sweet Life says
Choo choo! Next stop, brunch-town!
Analida's Ethnic Spoon says
I LOVE tarts and I am going to make this one! Actually my husband likes to make tarts and I like to eat them. He usually makes me one for my birthday each year so I am going to request this one. Here is one of my favorites: https://ethnicspoon.com/perfect-lemon-tart/
Monica says
Oh my goodness, this looks amazing - love everything from the graham cracker crust, to the filling, to those eye-popping candied orange slices on top. What a show-stopper for brunch!
Cindy says
Love the beautiful colors in this tart! I don't have the 14x5" pan, so trying to figure out if I should use something else or maybe just buy one.
The Simple, Sweet Life says
I bought my 14" x 5" tart pan on Amazon for about $12 but if you're not in the market for one, I'm sure you could use a cake or pie pan just as easily. The bake time for the crust would be the same.
Matt Kearns says
Hey Claire these tarts have so much color and vibrance! I bet they taste pretty frikken good too! Can't wait to make them!
Leslie Haasch says
This is so pretty, I wouldn't want to eat it - or anyone to eat it, for that matter! Is it weird to frame a piece of food as art? 🙂
The Simple, Sweet Life says
Not at all! I've framed a few cookies and cake toppers in my day. 😉
Fork in the Road says
A boozy citrus tart? Sounds like a great start to my morning! And the citrus is so beautiful right now, perfect and in season.
Molly~ EasycookingwithMolly says
This tart has my name written all over it!! I love mimosa and citrus desserts and this is a great combination of two. Have to try it soon.
Donna says
I love to make tarts. They're so fancy, but really this one takes tarts to an all new level. This is art! Can you give me advice on cutting the tart? I want to make sure it is still beautiful when plated.
The Simple, Sweet Life says
No problem Donna! The trick to cutting this tart and leaving all the oranges looking pretty is to use a VERY sharp knife. Also, don't be afraid to saw just a little bit when you cut into the oranges. This will make sure that the oranges are cut through before they can be dragged down into the filling.
Kirstin says
Made this and it was delicious! I wasn't sure how thick to cut the orange slices, so I did 1/4" thick and that was way too thin (they disintegrated when cooked) - how thick are the slices supposed to be? Also the crust was pretty difficult to keep together when putting in the tart pan, it kept breaking and falling apart. I didn't have a 14x5 pan so I used a 10" circular tart pan, which was just the right size for the filling. Overall, pretty time consuming recipe, but delicious and beautiful when it was done.
Nicolas Hortense says
Love how you have used a cocktail to make an incredible looking tart. Great work (:
The Simple, Sweet Life says
Thank you! It was so much fun I plan on doing a margarita inspired tart in the not-too-distant future. 😉
Kylie | Midwest Foodie says
OMG this recipe has LADIES BRUNCH written all over it! Pinning for later so I make this next time I have my girlfriends over for brunch. What a fantastic tart recipe! Thanks for sharing 🙂
Gloria | Homemade & Yummy says
This tart looks delicious. I love rustic desserts. This is the perfect bbq party dessert. I think I need to make this for my next gathering.
Sue says
I love this... the colors... the citrus flavors! This all says summer to me. I have just the pan for this! And BTW... beautiful shots and great detailed directions!
Jennifer T Tammy says
This sounds so perfect for a special brunch - not everyone can have a mimosa, but everyone can enjoy this!
lauren says
Oh hello, I'm obsessed with this. Champagne filling? Yes please! I love your inclusion for the prep ahead steps...that's so helpful!
Jordan says
Ok. This is just too pretty. Brunch GOALS. I love trying to make fancy treats like this for random weekend breakfasts! Can't wait to test drive this one.
Amy says
What a fabulous idea! It’s so pretty and perfect for brunch or dessert. I love mimosas and can’t wait to serve this for friends!
Kylee Ayotte says
I think I need to host a brunch for the sole purpose of making and eating this tart!! You had me at Mimosa, but those candied oranges.... yum!!
Amanda says
You had me at mimosa tart! I'm a huge mimosa lover, so any mimosa-themed dessert is perfect for me. Such a fun dessert -- thanks for sharing!
Lorie says
Oh my word! If ever there was a tart I needed in my life, THIS is it! What a genius recipe. Can not wait to make it!
Karyl Henry says
Oh my gosh what a perfect tart for brunch or pool day! Those candied oranges look so beautiful and add a great vibrant color. I'm definitely making this one soon
Julie says
This is BEAUTIFUL! I have this same rectangular tart pan and never really know what to do with it -- now I'm so inspired. The citrus is just gorgeous on top!
Jo says
Oh my goodness, this is simply amazing. Love the pop of colors here. Would make perfect addition on the brunch table.
Daniela says
Absolutely adoring the mimosa/tart combo idea! So fun, refreshing and perfect for summer :)!
Nikita Mehta says
Hi! This looks fabulous and I definitely look forward to trying it out! I'm based in Bombay, India and was wondering if I could use sparkling wine instead of champagne! What champagne / SW work with this? Any useful tips for this aspect? Thank you