

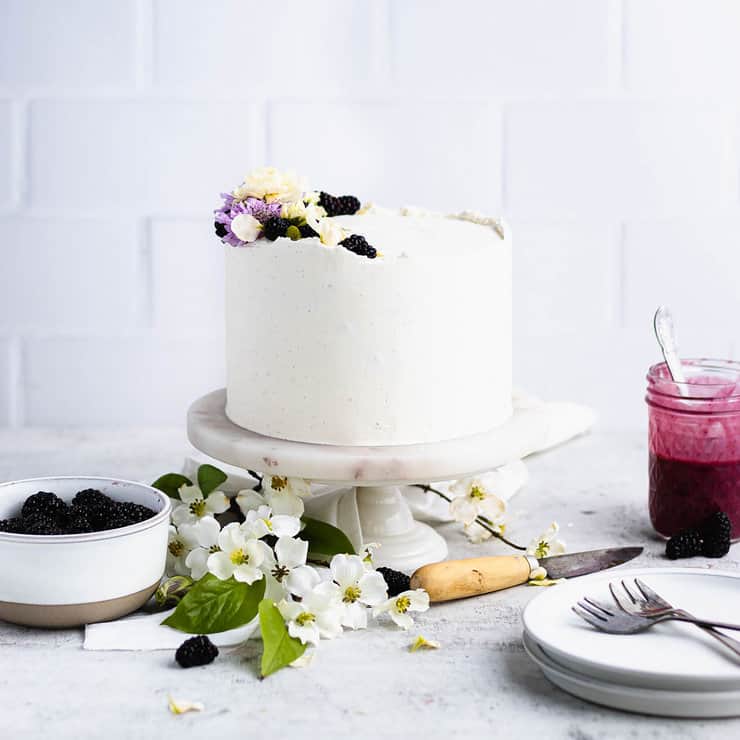
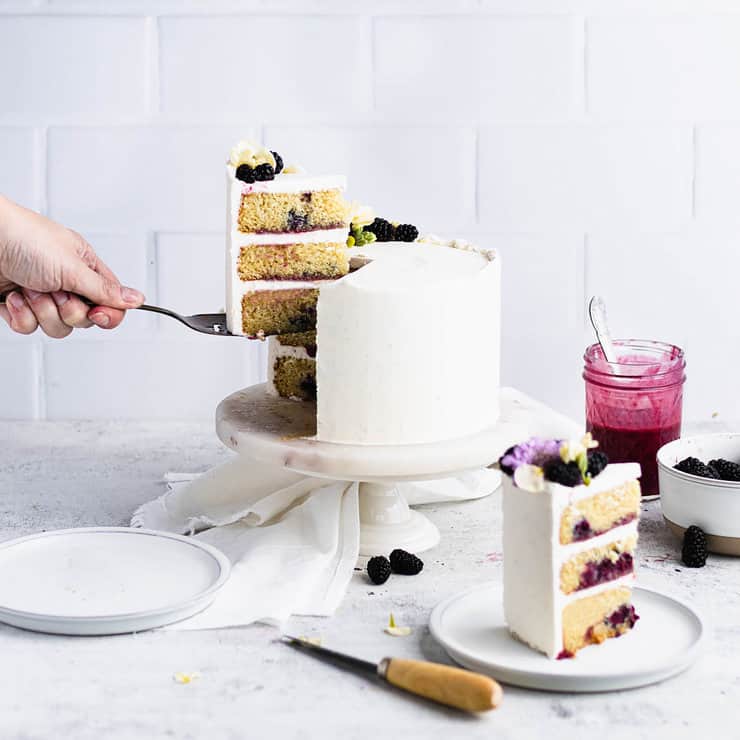
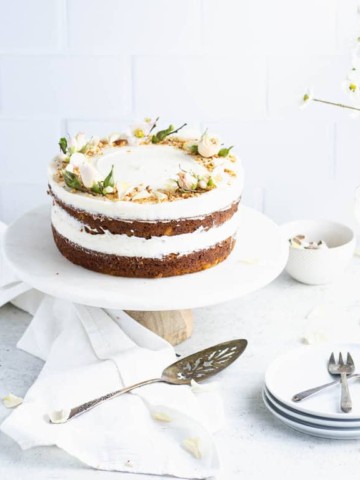
Packed full of sun-ripened berry flavor, this blackberry cake features three layers of fresh blackberry-speckled vanilla cake, a silky blackberry curd filling, and a melt-in-your-mouth vanilla bean buttercream.
This blackberry cake has been crowned the new household favorite (right up there with the recent key lime cookies).
Moist, buttery layers of blackberry-bespeckled cake, a generous smear of our homemade blackberry curd, and just the right amount of vanilla bean-infused buttercream frosting - We love this SO much.
Jump to:
Ingredients
Below are a few tips on key ingredients as well as some helpful information on the baking science that makes this recipe work.
For a full list of ingredients and their measurements, skip down to the recipe card.
Blackberry cake

- Unsalted butter: Adds a rich, buttery flavor as well as moisture to the vanilla cake.
- Whole milk: I use whole milk as it's what we tend to have on hand, but 2% or even 1% would produce a similarly good cake. I would avoid skim milk.
- Sour cream: This is one of my favorite cake hacks as it adds moisture, a subtle tangy flavor and creates a tender, fine crumb.
- Baking powder and baking soda: We're using both in this recipe because baking soda neutralizes the flavor of acids and we want to preserve some of that sour cream tang.
- Fresh blackberries: This is key to getting that delicious late summer flavor! If your blackberries are particularly large, I recommend slicing them in half.
Filling and frosting
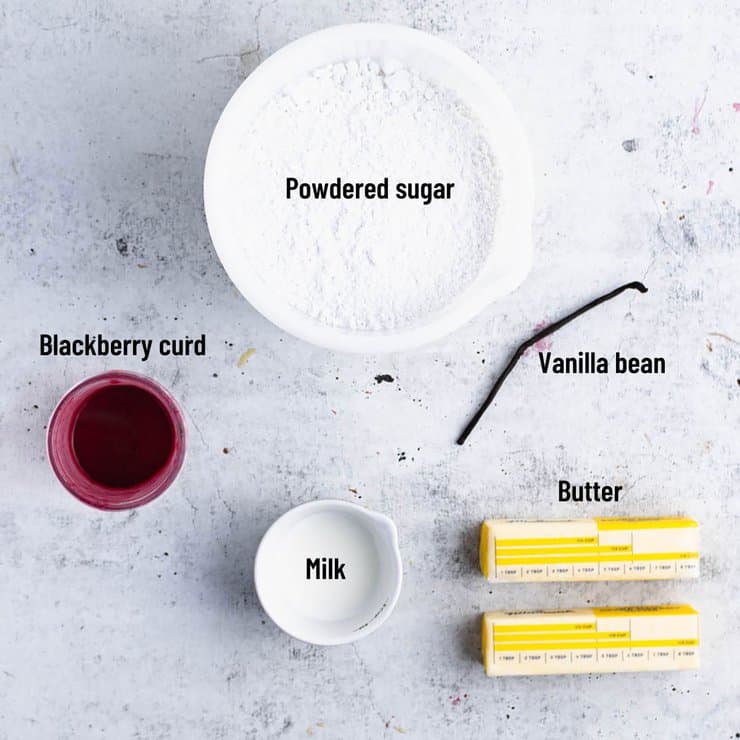
- Blackberry curd: Really punches the blackberry flavor of this cake up a notch.
- Vanilla bean: Gives the frosting its signature vanilla bean flavor.
- Unsalted butter: Should be at room temperature for best results.
- Powdered sugar: Adds sweetness and makes for a silky smooth buttercream.
- Milk: Ensures the frosting is smooth and not too dense. Any milk (except skim) will work.
Working ahead

The cake layers can be individually wrapped in plastic wrap and refrigerated for 3-5 days or frozen for up to three months. Frozen layers can be frosted but shouldn't be leveled or divided.
If you're making your own blackberry curd, it can be refrigerated for up to 7 days or frozen for up to three months. Thaw in the fridge overnight before use.
The frosting can be stored in an airtight container in the fridge for up to 7 days or frozen for up to three months. Bring to room temperature and whip for a few minutes before using.
How to make blackberry cake

First, make the cake batter.
Cream the butter and sugar until light and fluffy. Beat in the eggs one at a time.
On low, add the dry ingredients in two equal parts alternating with the wet ingredients in one part.

Second, prepare the blackberries and bake.
Toss the blackberries in flour to coat.
Pour ⅓ of batter into each of the prepared pans and top with ⅓ of blackberries.
Bake at 350F for 28-33 minutes.
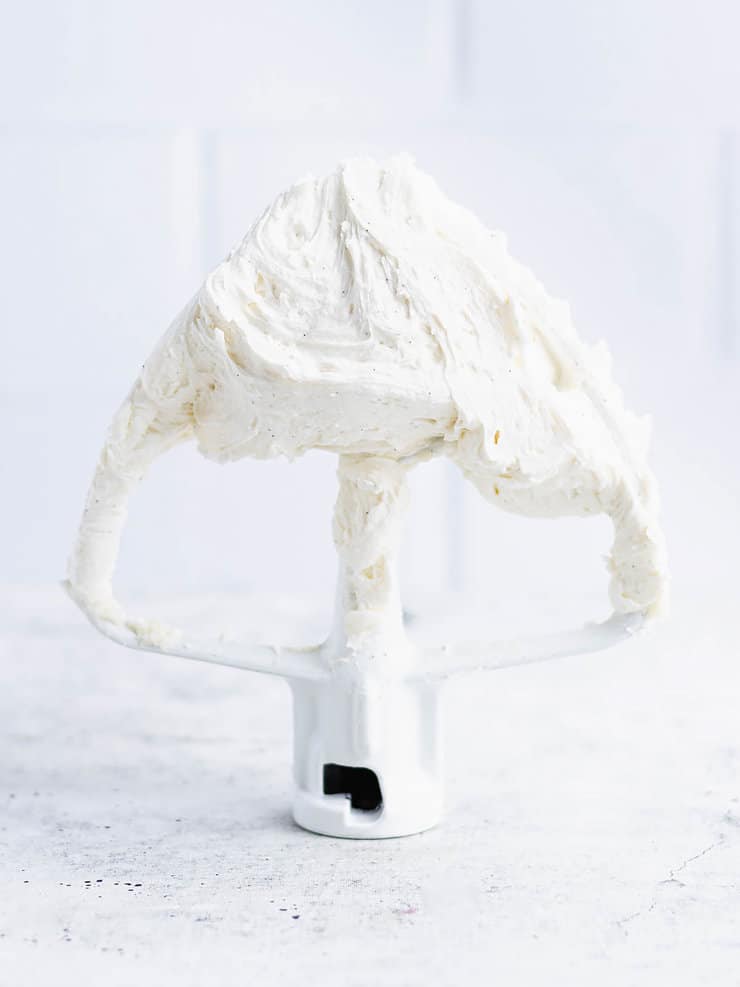
Third, make the frosting.
Beat the butter and vanilla beans until smooth and light (5-6 minutes).
Add the powdered sugar and continue beating until fluffy (2-3 minutes).
Add the vanilla extract (optional), milk to thin and beat on low until air bubble-free.

Fourth, assemble the layers.
Spread ¼" of frosting on top of the first layer of cake.
Use a spoon or offset spatula to remove a shallow layer in the center. Fill with half of the curd and repeat for the second layer.

Fifth, frost the cake.
Top with the final layer of cake and cover with a thin layer of frosting (crumb coat).
Refrigerate until set (about 15 minutes) to lock in the crumbs.
Frost with the remaining frosting.
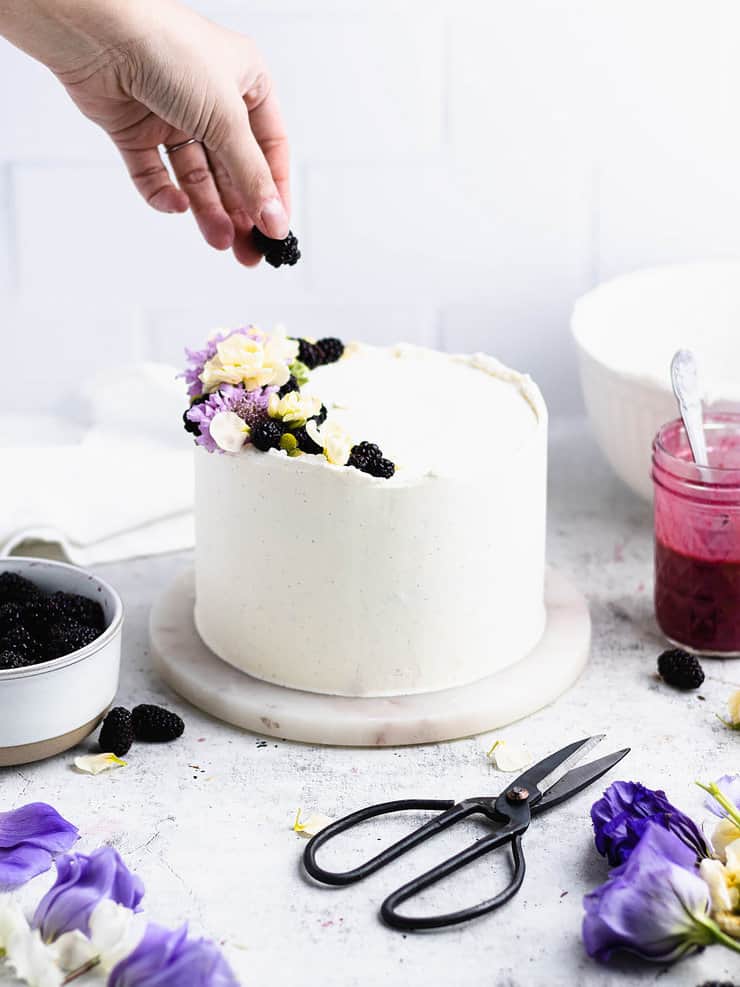
Finally, decorate the cake.
Top with fresh berries, fruit and/or cake-safe flowers.
This cake should be refrigerated until approximately one hour before serving (cake tastes best at room temperature).
Blackberry cake tips
- Even layers: The easiest way to get even cake layers is to weigh your batter. For this recipe, you'll need approximately 300g of batter for each 6" layer.
- Chill your cake: Cool cake layers are easier to handle and cut/level.
- Frosting: Want a perfectly smooth frosted cake? Check out my post on how to frost a cake for step-by-step instructions.
- Storing a cut cake: The easiest way to protect the exposed layers of cake so they don't dry out is to press a piece of plastic wrap against each exposed side.
- Decorating with flowers: Flowers look lovely on cakes but can pose a food safety risk when done incorrectly. For more information on cake-safe flowers and how to prepare them, check out my post on fresh flower cake decorating.
Substitutions
Sour cream: If you don't have sour cream on hand, plain or vanilla yogurt can be substituted at a 1:1 ratio.
Frozen blackberries: This cake really tastes best with fresh blackberries, but if you don't have any on hand, you can use thawed frozen blackberries with the excess juice drained off.
Store-bought frosting: If you would prefer to use store-bought frosting, you'll need about 3 cups to fill and frost this cake.
Storage
This cake should be stored in the fridge and is best when eaten within 2-3 days.
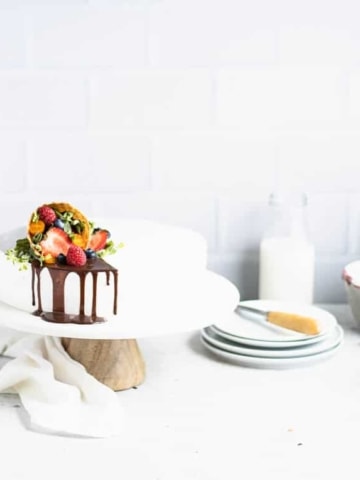
More berry cakes
Did you make this recipe? Please leave a ⭐ star rating and let me know how it went in the comments below! I regularly update these posts and feedback from wonderful readers like you helps me improve them.
Recipe
Blackberry Cake

This blackberry cake features layers of blackberry bespeckled vanilla cake, blackberry curd filling and vanilla bean buttercream frosting.
- Prep Time: 40 minutes
- Cook Time: 30 minutes
- Total Time: 1 hour 10 minutes
- Yield: 16 slices
- Category: Dessert
- Method: Baking
- Cuisine: American
Ingredients
Blackberry cake:
- 3 large eggs
- 1 ⅓ cup (266g) granulated sugar
- ½ cup unsalted butter, at room temperature
- ½ cup (120ml) whole milk
- ¼ cup (60g) sour cream
- 1 tablespoon vanilla extract
- 1 ¾ cup (210g) all-purpose flour + 1 tablespoon for dusting blackberries
- 1 ½ teaspoon baking powder
- ½ teaspoon baking soda
- 6 ounces fresh blackberries
Filling and frosting:
- ½ cup blackberry curd
- 1 cup (112g) unsalted butter, at room temperature
- 4 cups (240g) powdered sugar
- Seeds from ½ vanilla bean
- 2 tablespoons (30ml) milk
- Optional: ¼ teaspoon vanilla extract
Instructions
Blackberry cake:
- Grease and line the bottom of three 6" round cake pans.
- Cream the butter and sugar on medium until light, fluffy, and no longer clinging to the sides of the bowl (about 2-3 minutes).
- Reduce mixer to low and beat in the eggs one at a time until just combined.
- Stir together the dry ingredients (flour, baking powder, and baking soda) in one bowl and the wet ingredients (milk, sour cream, and vanilla extract) in another.
- With the mixer on low, add the dry ingredients in two equal parts, alternating with the wet ingredients in one part. Mix between each new addition until just combined.
- Toss the blackberries with a tablespoon of flour to coat. There should be just enough flour to soak up the juices and coat the berries, but not so much that there's extra flour in the bottom of the bowl.
- Pour ⅓ of the batter into each of the prepared pans (about 300g each).
- Add ⅓ of the flour-dusted blackberries to the top of each pan of batter.
- Bake at 350F for 28-33 minutes, or until a toothpick inserted in the center comes out with only cooked crumbs.
- When the pans are cool enough to handle, turn the cakes out, wrap them in plastic wrap and refrigerate until ready to use.
Vanilla bean frosting:
- In the bowl of a stand mixer, beat the butter and vanilla bean seeds on high until smooth and lightened in color (5-6 minutes).
- Scrape down the sides of the bowl and add the powdered sugar. Beat on low until the powdered sugar is incorporated, then increase to medium-high and continue beating until smooth and fluffy (about 2-3 minutes).
- If the frosting is thick, add 1-2 tablespoons milk to thin it to a spreadable consistency. Add the vanilla extract (optional) and beat on low for 5-10 minutes to work out the air bubbles.
Assembly:
- Level the layers of cake (if necessary). Place the first layer on a flat plate and cover with ¼" of frosting.
- Use an offset spatula or large spoon to remove a shallow layer of frosting from the center of the cake leaving about ½" barrier around the edges (to keep the curd in).
- Spoon half of the curd into this area and cover with the next layer of cake. Repeat for the second layer.
- Top with the final layer, spread a thin layer of frosting over the entire cake and refrigerate until set (about 15 minutes).
- Frost the top and sides of the cake with the remaining frosting and top with fruit and cake-safe flowers.
Notes
- Even layers: The easiest way to get even cake layers is to weigh your batter. For this recipe, you'll need approximately 300g of batter for each 6" layer.
- Chill your cake: Cool cake layers are easier to handle and cut/level.
- Frosting: Want a perfectly smooth frosted cake? Check out my post on how to frost a cake for step-by-step instructions.
- Storing a cut cake: The easiest way to protect the exposed layers of cake so they don't dry out is to press a piece of plastic wrap against each exposed side.
- Decorating with flowers: Flowers look lovely on cakes but can pose a food safety risk when done incorrectly. For more information on cake-safe flowers and how to prepare them, check out my post on fresh flower cake decorating.
- Storage: Store in the fridge. Best when eaten within 2-3 days.
Nutrition
- Serving Size: 1 slice
- Calories: 383
- Sugar: 62.1g
- Sodium: 107.8mg
- Fat: 9.3g
- Saturated Fat: 5.3g
- Carbohydrates: 74.1g
- Fiber: 1.2g
- Protein: 3.5g
- Cholesterol: 68.2g

Sue says
This is drop dead gorgeous sounds amazing!! I look forward to trying this out.
veenaazmanov says
Delicious for sure. Your recipe is a go for. My next Birthday cake at home is this delicious and yummy treat.
Mikayla says
Oh my, the wonderful blackberry flavor in the curd and the berries in the cake layers are to die for. I think next I'll try raspberries and stick with the vanilla bean frosting!
Giangi Townsend says
What an inspiration! I am not a baker but your instructions are easy to follow.
Cannot wait to make it this weekend.
Thank you!
Cathleen says
This cake is absolutely beautiful! It is my husband's birthday today, and I have SO many blackberries in my garden, this recipe is perfect! Thank you so much for sharing 🙂
Tammy says
Oh a gorgeous cake! You decorated it beautifully....and how I would love a slice of this heavenly dessert. The blackberry is such a fabulous combination for the season!
Sharon says
This cake was a wonderful way to use a bumper crop of blackberries that I had, but it also make a beautiful birthday cake too.
Kristina says
This cake turned out lovely! I love a cake decorated with flowers also, so I make edible ones using silicone molds and stick them onto the frosted cake. It was delicious.
Madelyn says
This recipe turned out delicious, perfectly buttery and sweet. The cake overall was beautiful and was a great use of fresh blackberries.
Tristin says
My sister loves blackberries so I chose to make your recipe for her birthday. It came out with the perfect crumb and was just so pretty!!
Veronika says
We loved the blackberry curd in between the cake layers in combination with the creamy frosting. The cake was a hit!
Charlotte johnson says
I’m a teenager who just got bored at home, but so glad I found this recipe. It was easy to follow and was a delicious cake to have as my first layered one! lol. very yummy and will be baking again for any celebration.