Forget Me Not Cupcakes
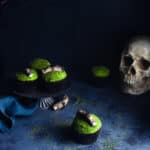
There may be debate about the origins of tying a piece of string around your finger as a reminder, but there's no debating that these cupcakes will be unforgettable! Whether sending them as party invitations or making them the center of your Halloween dessert line-up, these cupcakes are sure delight and deliciously satisfy even the scariest sweet tooth!
- Prep Time: 1 hour
- Total Time: 1 hour
- Yield: 12
- Category: Dessert
- Cuisine: American
Ingredients
Scale
- 12 cupcakes
- 2 1/2 cups frosting
- 1/3lb fondant
- 5 graham crackers, crushed
- Food coloring in blue, yellow and brown
- Baking cocoa
- Black powdered food coloring
- Black thread or embroidery floss
Instructions
- To make the fondant fingers, start with a small quarter-size ball of fondant.
- Roll the piece of fondant out until it is the length and width of your pinky. Trim an end if it gets too long.
- Use your thumb and index fingers to pinch the fondant on either side of where the knuckle join would be.
- Using a straw cut in half and rounded at the edges, make an indent for the finger nail.
- Use a ball tool to create an indent at the large end of the finger. Pull the ends to create a frayed effect.
- Use a scribe tool to carve out the knuckle joint lines, and score the finger repeatedly with short, shallow strokes to create texture.
- Repeat for each finger and set aside to harden. To get a slightly bent shape, lay them on something that will slightly elevate them, like a straw.
- For the coloring, brush each finger with baking cocoa. Use a damp paper towel to blotch away some of the cocoa to create a slightly uneven, organic finish.
- Repeat this step with the black powdered food coloring until you reach the desired effect.
- Tie a bow on each fondant finger using thread or embroidery floss.
- In a food processor, pulse your graham crackers until finely ground. Alternative, you can crush them in a large plastic bag with a rolling pin.
- In a small bowl, add blue and yellow food coloring, and mix with vodka or water to thin.
- Combine the graham cracker crumbs and food coloring, stirring until crumbs are evenly coated. Repeat until you reach the desired shade of green.
- Tint your frosting a mossy green using blue, yellow and brown food coloring.
- Scoop your green frosting into a piping bag and, using a large round tip (like an Ateco 809), pipe a swirl of frosting onto the tops of each cupcake.
- Dip the frosted cupcakes into the green graham cracker crumbs until the frosting is completely coated.
Notes
- Fondant decorations, like these finger cupcake toppers, can be made well in advance of when you need them. Just make sure to keep them in a cardboard box or a paper bag. Storing them in air-tight plastic containers will cause them to get soft and sticky.
- What makes these fondant fingers work are all the little details. Take your time and keep adding little details here and there until they're just right.
- Don't have a scribe tool? Try the un-serrated side of a butter knife.
- No ball tool? No problem! Try the round end of your flatware or use your fingers to gently work an indent into the piece of fondant.
- A fluffy frosting pipes more easily than a thick buttercream. If you’re making your own, an Italian or French meringue buttercream work best. If you’re buying something from the store, try a “fluffy” vanilla frosting.
- Fill that piping bag like a pro: Spoon your frosting onto a large piece of plastic wrap, roll and twist the ends. Trim one end so there’s about ½” in length, drop your frosting into the piping bag (short end first) with the tip already on and pipe!
- Storing frosted cupcakes: While cupcakes are always best when eaten the same day they’re made, these can be stored in an air-tight container at room temperature for 1-2 days.
Find it online: https://thesimple-sweetlife.com/zombie-cupcakes/