Miffy Cupcakes
- Yield: 12 cupcakes
- Category: Dessert
Ingredients
Scale
For the cookies:
- 1/2 batch of sugar cookie dough
- 1/2 batch of royal icing
- Bunny cookie template
- A black food marker
- Pink powdered food coloring
- A small, food-only brush
For the cupcakes:
- 12 cupcakes
- 1/2 batch of Italian meringue buttercream
- A large frosting tip (I used Ateco 829) + a piping bag
- Sprinkles
Instructions
- Print out your bunny cookie template and transfer the design to a piece of cardboard or cardstock. Cut out your design. If you plan on using it more than just this once, you might consider laminating your piece of cardstock.
- Whip up a 1/2 batch of sugar cookie dough as per the instructions in this post. Roll your dough out to about 1/3" thick, and using a sharp lightly-floured knife, cut out the cookies using your cardboard/cardstock template. Transfer the cookies to a parchment paper lined baking sheet and bake at 350F/175C for 6-8 minutes, or until lightly browned and no longer shiny on top.
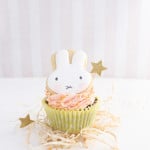
- In the bowl of a stand mixer, mix up a 1/2 batch of royal icing as per the instructions in this post. Whip the royal icing until thick and fluffy but not stiff. You're going for a 20 second consistency with this one. Fill a piping bag with the icing, clip the tip, and start piping a bunny face shape onto your cookie, leaving about an 1/8" space around the edge. Use a toothpick to move the icing around to fill in any spaces lacking icing or to smooth out the outline. Let the icing harden for 5-6 hours.
- To create the features of the face, use your black food marker to draw on the eyes and nose, and your pink powdered food coloring and a brush to create rosy cheeks.
- For the cupcakes, whip up a dozen of your favorite cupcakes (I personally prefer the chocolate cupcakes from this recipe) and some frosting (I recommend a 1/2 batch of this to-die-for Italian meringue buttercream, but really any frosting will work). Tint your frosting pink and pipe it onto your cooled cupcakes with a large frosting tip. Add some gold sprinkles to the sides and top with your Miffy cookies.
Find it online: https://thesimple-sweetlife.com/miffy-cupcakes/