
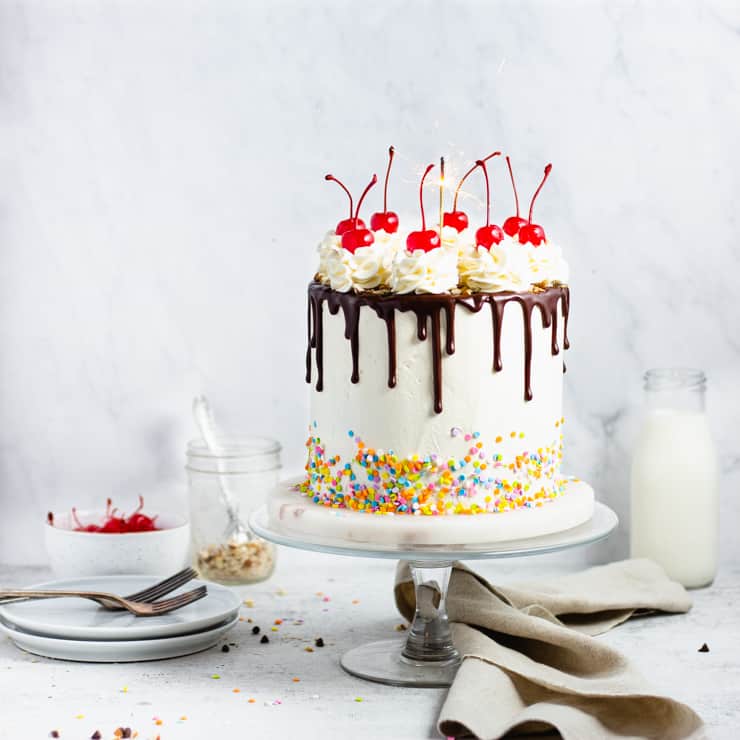
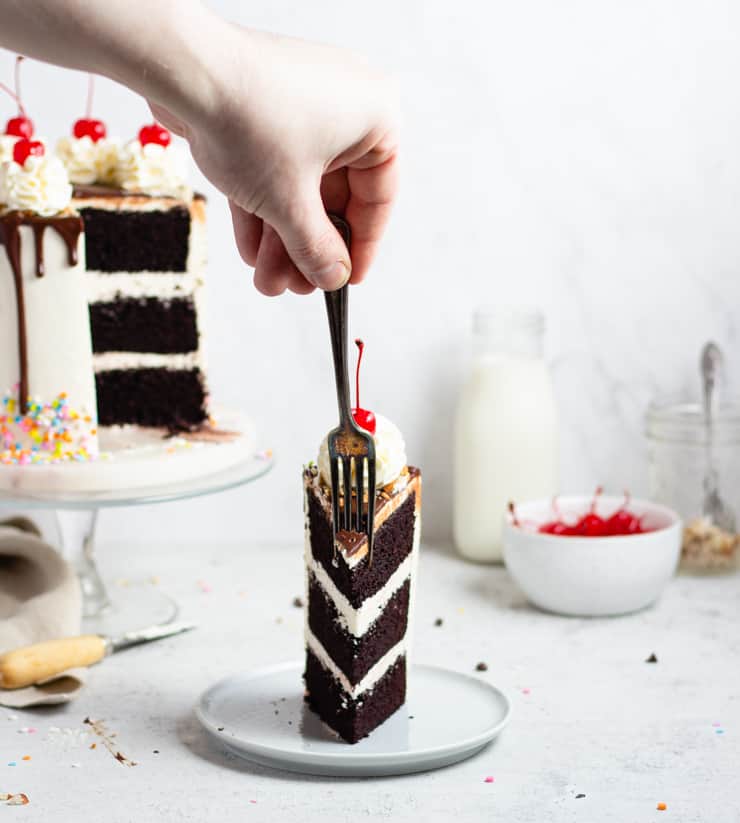
Whatever the occasion, celebrate with this fudge sundae inspired cake! It has 3 layers of dark chocolate cake, vanilla buttercream frosting, a chocolate ganache drip and sprinkles, cherries and nuts to boot.
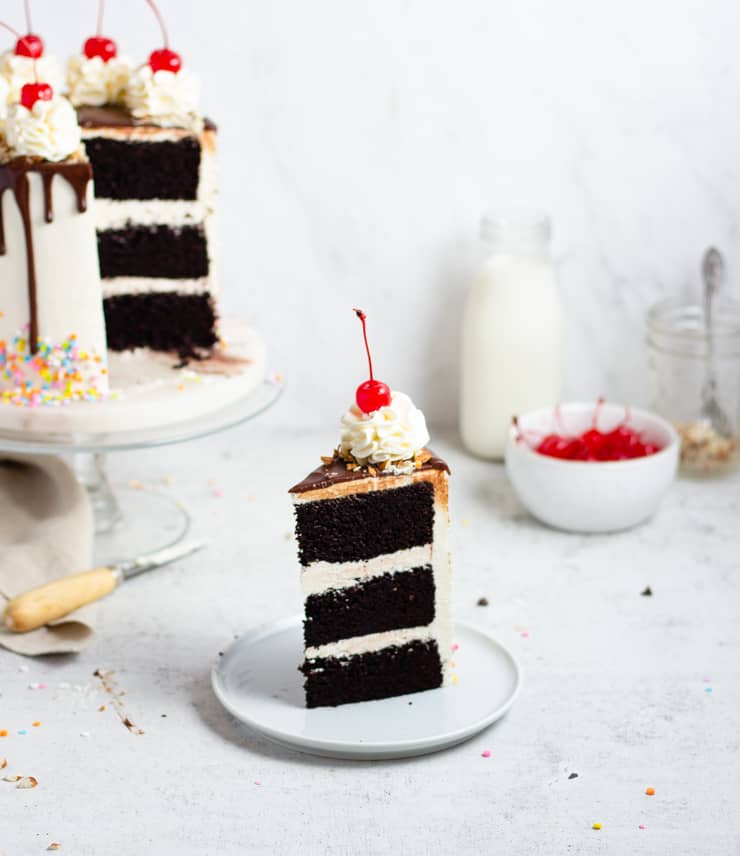
If you thought it couldn't get any better than a rich fudge covered sundae, you haven't met this cake yet. This fudgy dessert starts with a cake so chocolaty, it's almost black, adds a smooth vanilla frosting and tops it all off with a decadent chocolate drip, sprinkles (because, of course) and maraschino cherries. One bite of this cake and you'll be saying "Fudge sundae who?"
How to make this fudge sundae cake
First, make the cake.
Combine the boiling water and chocolate, stirring until smooth. Whip the eggs until light and fluffy and add the vegetable oil, continuing to whip until combined.
Add the sugar, milk and water/chocolate mixer, whipping until just combined. Fold in the dry ingredients, divide evenly between three 6" cake pans and bake at 350F for 30-35 minutes.
Second, make the chocolate ganache.
While the cakes bake, combine the heavy cream and chocolate for the ganache. Microwave for 30 seconds and then continue microwaving in 10 second increments until the ganache can be stirred smooth. Set aside to cool.
Third, make the frosting.
Combine the sugar and water in a small saucepan over medium-high heat. Boil the syrup until it's completely clear.
While the syrup boils, whip the egg whites in the bowl of a stand mixer until they hold stiff peaks. With the mixer on high, pour the hot syrup down the side of the bowl and continue whipping until the meringue has cooled to room temperature.
With the mixer on low, add the butter in one inch pieces then the vanilla extract. Increase the speed to medium and then high and continue beating until a smooth frosting forms.
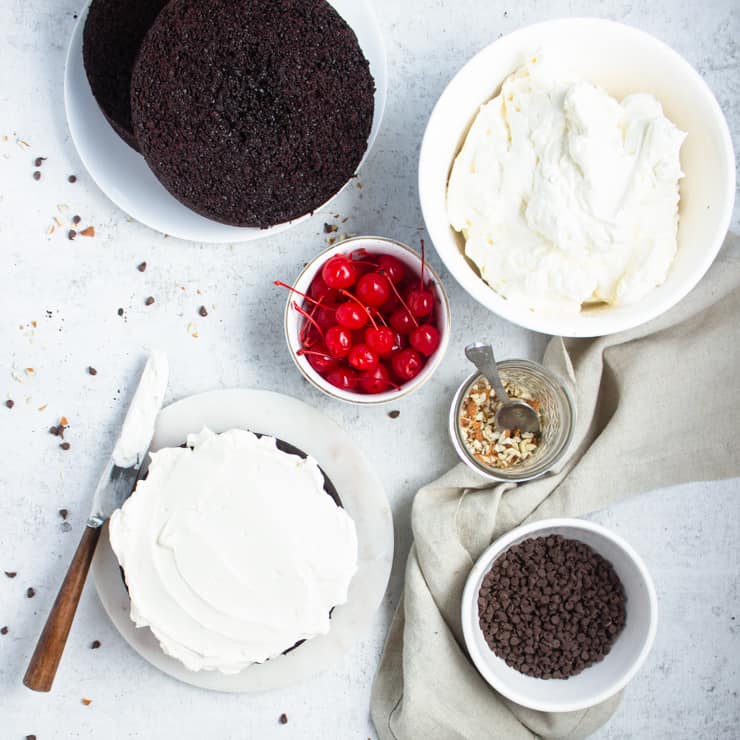
Finally, assemble the cake.
Level the cakes, if necessary. Spread a thick layer of frosting between each layer, then coat the entire cake with a thin layer of frosting (crumb coat). Refrigerate the cake until the crumb coat is firm (about 15 minutes).
Use the remaining frosting to finish icing the cake, drizzle with the ganache (microwave the ganache until you reach the desired consistency if it's gotten to firm), and top with sprinkles and cherries.
Tips for making this cake
- Measure your batter: Making even layers of cake start with measuring your batter. For this recipe, that means about roughly 1 lb of batter per pan (for three pans).
- Stir the ganache with a spatula: Using a whisk can incorporate too much air leaving the ganache with air bubbles. Use a spatula to ensure you're ganache stays smooth and bubble-free.
- Chill your cake: Cool cake is easier to cut and handle, so chilling your cake for a short while before use will make this process easier.
- Crumb coat: Spreading a thin layer of frosting around the sides and top of the cake, and then refrigerating it will lock in any crumbs and keep them from reaching the surface of your frosted cake.
- Air bubble-free frosting: If the frosting has a lot of air bubbles, reduce the speed on your stand mixer to low and beat for 3-5 minutes, or until smooth.
- The trick for smooth frosting: You’ll need a rotating cake stand and a bench scraper. Place the small end of the bench scraper on the cake stand, long end against the frosting and turn the table. Once excess frosting is removed, heat the scraper in hot water, wipe and drag around the outside of the cake.
- The trick to a perfect ganache drip: The first trick is getting the right consistency - You really want to let it cool until it resembles a thick fudge. The second is to use a piping bag so you can control the drip over the edge. Start by creating the drip and then add ganache to the top and smooth it out with an offset spatula.
- Storage: This cake will keep at room temperature, uncut, for 3-4 days. For best results, cover it with a plastic lid, bowl or place it in a cardboard box. This is easiest if you don’t add the cookies until you’re ready to serve.
- Storing cut cake: Once your cake is cut, you’ll want to protect the exposed cake area. The easiest way to do this is with a piece of plastic wrap or two.
Did you make this recipe? I’d love to hear how it went in the comments below. Better still, snap a photo and tag it on Instagram with #thesimplesweetlife. I love seeing your creations!
PrintRecipe
Fudge Sundae Cake

Whatever the occasion, celebrate with this fudge sundae inspired cake! It has 3 layers of dark chocolate cake, vanilla buttercream frosting, a chocolate ganache drip and is topped with sprinkles and cherries.
- Prep Time: 1 hour 20 minutes
- Cook Time: 35 minutes
- Total Time: 1 hour 55 minutes
- Yield: One 6" Cake - 16 slices
- Category: Dessert
- Method: Baking
- Cuisine: American
Ingredients
For the chocolate cake:
- 1 cup boiling water
- 2 oz. dark chocolate, coarsely chopped
- 2 eggs
- ½ cup vegetable oil
- 2 cups granulated sugar
- 1 cup milk
- 4 oz. baking cocoa
- 1 ¼ cup all purpose flour
- 1 tsp. baking soda
- ½ tsp. baking powder
For the vanilla frosting:
- ½ cup water
- 1 ¾ cup granulated sugar
- 8 egg whites
- 1 lb. unsalted butter, at room temp.
- 1 tsp. vanilla extract
For the dark chocolate ganache:
- 4 oz. dark chocolate (60% cocoa), coarsely chopped
- 4 oz. heavy cream (ultra pasteurized if you have it)
For garnishing:
- Sprinkles
- Coarsely chopped nuts
- Maraschino cherries
Instructions
- In a small bowl, combine the boiling water and dark chocolate. Stir until the chocolate is melted and set aside.
- In the bowl of a stand mixer, whip the eggs until light and frothy.
- Add the vegetable oil and continue whipping until completely incorporated.
- Add the sugar, milk, and water/chocolate mixtures, and whisk until just combined.
- Gently fold in the baking cocoa, flour, baking soda, and baking powder with a spatula until the batter is lump free.
- Divide the came batter evenly between three 6" cake pans, and bake at 350F for 30-35 minutes, or until a toothpick inserted into the center of the cakes comes out clean.
- Once the pans are cool enough to handle, transfer the cakes to plastic wrap, and refrigerate until cool and firm.
- While the cakes bake, heat the heavy cream and chocolate for the ganache in the microwave until hot (about 30 seconds).
- Gently stir with a spatula (a whisk will create too many air bubbles) until smooth. Set aside to cool.
- To make the frosting, stir together the water and granulated sugar in a small saucepan over medium-high heat.
- Boil until completely clear. While the syrup boils, whip the egg whites in a stand mixer until stiff. With the mixer on low, slowly pour the hot syrup into the egg whites.
- Increase the speed to high and whip until the mixture and bowl cool to room temperature. With the mixer on low again, add pieces of butter until all the butter has been added.
- Add the vanilla extract. Increase the speed to high and whip until a smooth frosting forms.
- Once the cakes are cool, level the tops if necessary.
- Using the frosting, begin stacking your layers of cake and filling between the layers.
- Coat the top and sides of the cake with a thin layer of frosting (a crumb coat) and allow to set in the refrigerator (about 15 minutes, or until the frosting is firm).
- Frost the top and sides of the cake with a generous helping of frosting, smoothing the frosting with an offset spatula or bench scraper.
- Add any sprinkles you might want to add to the sides, and allow to set in the refrigerator until the frosting is firm (about 15-20 minutes).
- Microwave the ganache in 5 second increments until it reaches a thin, spreadable consistency (it shouldn't be warm).
- Using an offset spatula, spread a thin layer of ganache out to the edges of the cake.
- Pour the remaining ganache into a piping bag, and moving around the edge of the cake, create drips down the side.
- Garnish the cake with leftover frosting, sprinkles, nuts, and maraschino cherries.
Notes
- Measure your batter: Making even layers of cake start with measuring your batter. For this recipe, that means about roughly 1 lb of batter per pan (for three pans).
- Stir the ganache with a spatula: Using a whisk can incorporate too much air leaving the ganache with air bubbles. Use a spatula to ensure you're ganache stays smooth and bubble-free.
- Chill your cake: Cool cake is easier to cut and handle, so chilling your cake for a short while before use will make this process easier.
- Crumb coat: Spreading a thin layer of frosting around the sides and top of the cake, and then refrigerating it will lock in any crumbs and keep them from reaching the surface of your frosted cake.
- Air bubble-free frosting: If the frosting has a lot of air bubbles, reduce the speed on your stand mixer to low and beat for 3-5 minutes, or until smooth.
- The trick for smooth frosting: You’ll need a rotating cake stand and a bench scraper. Place the small end of the bench scraper on the cake stand, long end against the frosting and turn the table. Once excess frosting is removed, heat the scraper in hot water, wipe and drag around the outside of the cake.
- The trick to a perfect ganache drip: The first trick is getting the right consistency - You really want to let it cool until it resembles a thick fudge. The second is to use a piping bag so you can control the drip over the edge. Start by creating the drip and then add ganache to the top and smooth it out with an offset spatula.
- Storage: This cake will keep at room temperature, uncut, for 3-4 days. For best results, cover it with a plastic lid, bowl or place it in a cardboard box. This is easiest if you don’t add the cookies until you’re ready to serve.
- Storing cut cake: Once your cake is cut, you’ll want to protect the exposed cake area. The easiest way to do this is with a piece of plastic wrap or two.
Chocolate cake recipe adapted from Miette
Nutrition
- Serving Size: 1 slice
- Calories: 597
- Sugar: 53.4g
- Sodium: 287mg
- Fat: 37.5g
- Saturated Fat: 20.7g
- Carbohydrates: 65.7g
- Fiber: 3g
- Protein: 6.6g
- Cholesterol: 95mg
If you liked this recipe, you might also like...
Update Notes: This post was originally published in June of 2016 but was republished with an updated format and tips in May of 2020.


Sue Gregory says
This truly is amazing... perfect in EVERY way!
The Simple, Sweet Life says
Thank you! And I'll take that as an extra compliment from someone who's not normally a dessert sort of person! 😉
Linda @ 2 Cookin Mamas says
What a fiasco! I bet after receiving such a beautiful oven (a little jealous here)!that all the grief you went through was worth it. What a fantastical gorgeous cake! It looks like a mile high of total deliciousness!
The Simple, Sweet Life says
Thank you Linda! 🙂 And it was definitely worth it not only to have an oven where the door doesn't fall off, but also to finally be able to bake again after a couple weeks hiatus! And, of course, the decadent chocolate cake made it worth it. 😉
apopofred says
Glad you took the money to another store, no reason to be led on like that! But man oh man did you celebrate well haha!
The Simple, Sweet Life says
All's well that ends well, right? Particularly if it ends with cake. 😉
sarahgiebens says
Oh my...This is indeed the perfect cake to christen the new oven! And indeed, the answer should always be cake. In fact, it doesn't even matter what the question is 😉 So glad for you guys you finally had that dream stove. This cake looks so good I wish I could grab a slice through my screen. Drooling all over the place! Pinned!
The Simple, Sweet Life says
Thank you Sarah! 😀 It was definitely a treat to get back to baking after a couple weeks hiatus following the breaking-off-of-the-oven-door incident... Wish I could send you a slice! 😀
Antonina says
WHAT A FABULOUS PICTURE. I know the taste, so I am drooling freely just seeing the picture. It Is BEAUTIFUL, and we are honored to have a taste of this creation and celebrating the new oven. CONGRATULATIONS>
The Simple, Sweet Life says
I'm SO glad you enjoyed the cake! 😀 The people at the store told us that gas ovens aren't very good for baking, but everything seemed to have come out ok. We're definitely enjoying the new oven! 😀
Emily Cope-Kyle says
This is the most gorgeous cake I have ever seen! Truly picture perfect!
The Simple, Sweet Life says
Awww thank you Emily! 😀
Amanda says
Wow, this looks absolutely amazing! I'm sure it tastes pretty darn good too 😛
The Simple, Sweet Life says
Thank you Amanda! 🙂
The Simple, Sweet Life says
Awww you sure know how to make a girl's day Renee! 😀 P.S. I totally ate the slice I had with a cup of coffee and I would definitely recommend it. It's awfully hard to beat chocolate cake and coffee in my book!
bunsinmyovenk says
This cake is beyond amazing! Thanks for linkin' up with What's Cookin' Wednesday!
The Simple, Sweet Life says
Thanks so much Karly! 😀
Lou Lou Girls says
Hello gorgeous! Just stopping by to let you know that we will be featuring your yummycake at our party that starts tonight! Pinned and Tweeted! I can’t wait to see you! Lou Lou Girls
The Simple, Sweet Life says
Thanks so much for the sweet feature! 😀
The Simple, Sweet Life says
So glad to hear you liked it Alma! 🙂
DearCreatives (@DearCreatives) says
Oh, my gosh! & That cake is divine!!!! So gorgeous! Pinned & shared. Thanks for joining the Inspiration Spotlight party @DearCreatives
The Simple, Sweet Life says
Thanks for the sweet comment! 😀
April J Harris (@apriljharris) says
I'm so glad you got your stove installed in the end - and what a wonderful cake to Christen it with!! Your Fudge Sundae Cake looks absolutely amazing. Scheduled to pin. Thank you so much for sharing with us at Hearth and Soul. Hope to 'see' you again this week!
The Simple, Sweet Life says
Thanks April! 🙂 I firmly believe all ovens should be christened with a decadent cake. 😉 I mean, is there any other way to do it?
The Bearded Hiker says
That is just impressive. Seriously. I'd love to try this. I'm not much of a cake maker, but I think I should try this!
The Simple, Sweet Life says
I think you should try it too! 😀 Thanks for the sweet comment!
The Simple, Sweet Life says
Awww you're too sweet Jeannee! 😀
Kate says
What a beautiful cake!!! I can't wait to try it...but first I need to buy more cake pans!
Hailey says
I didn’t see in the recipe what temperature the oven should be. I’m assuming 350 degrees? Thanks!
The Simple, Sweet Life says
Hi Hailey! Thank you for catching that! Yes, it should say to bake the cakes at 350F. 🙂
Laurel says
I made this with my son. We followed the recipe exactly. I feel like the pound of butter was a typo???? The frosting tasted like pure butter (it would be ok to spread a teaspoon on toast). The cake was moist and the only part worth eating, but would have paired much better with a traditional frosting.